Okay, picture this: it’s a rainy Saturday afternoon, the kind that makes you stare at the pantry and wonder if you can conjure something magical out of the most ordinary ingredients. I was frantically trying to salvage a half‑finished batch of dough that had turned into a sticky mess, and in my panic I slammed the lid onto the food processor, cranked it up, and—boom—something transformed. The dough whipped into a silky, glossy batter that smelled like a bakery on a Sunday morning, and the whole kitchen was suddenly alive with the scent of butter and sugar. I dared myself to taste it before it even hit the pan, and I’ll be honest—I ate half the batch before anyone else got a chance. That moment was the spark that lit the fuse for this entire guide.
Fast forward to today, and I’ve turned that accidental triumph into twelve distinct ways to wield a food processor like a culinary wizard. From fluffy pancakes that rise like sunrise clouds to buttery crusts that shatter like thin ice under a fork, each method is a love letter to texture, flavor, and sheer convenience. Most recipes get this completely wrong—either they over‑complicate the process or they under‑season the final product, leaving you with a bland, rubbery disappointment. Not here. I’ve stripped everything down to the essentials, then built it back up with a few secret tricks that most home cooks never hear about.
What sets this version apart isn’t just the end result; it’s the journey. I’m talking about that satisfying whirr of the blades, the way the dough comes together in a single, glossy sweep, and the moment you hear the sizzle as it hits a hot pan—absolute perfection. I’m also throwing in a surprise ingredient that will make your taste buds do a happy dance, something you’ll never expect from a humble food processor recipe. Trust me, once you try this, you’ll be the go‑to person for quick, impressive meals that look and taste like they’ve been labor‑intensive for hours.
If you’ve ever struggled with uneven batter, clumpy sauces, or dough that refuses to cooperate, you’re not alone—and I’ve got the fix. I dare you to taste this and not go back for seconds. Let me walk you through every single step — by the end, you’ll wonder how you ever made it any other way.
What Makes This Version Stand Out
- Flavor Explosion: Every bite is layered with a buttery richness that coats the palate like velvet, thanks to the cold‑buttered technique that locks in moisture.
- Texture Mastery: The food processor creates a uniformly aerated batter, giving you a light, airy crumb that’s crisp on the outside yet melt‑in‑your‑mouth soft inside.
- Simplicity: No more juggling bowls or whisking for ages—just dump, pulse, and you’re ready to roll. This is the ultimate shortcut for busy lives.
- Unique Ingredient Twist: A dash of honey‑infused vanilla adds a subtle sweetness that balances the salt, creating a harmony most recipes miss.
- Crowd‑Pleaser Factor: Whether it’s a family brunch or a last‑minute dinner, this dish gets rave reviews and repeat requests. I’ve heard “again!” shouted three times in a row.
- Ingredient Quality: Using high‑fat butter and fresh eggs makes a world of difference—no shortcuts here, just the best you can find at the market.
- One‑Pan Wonder: The method works on a skillet, a griddle, or even in the oven, giving you flexibility for any kitchen setup.
- Make‑Ahead Magic: The batter can be refrigerated for up to 24 hours, meaning you can prep tonight and cook tomorrow without losing any of that fresh‑made charm.
Inside the Ingredient List
The Flavor Base
First up, the flour. I’m using all‑purpose flour because it strikes the perfect balance between structure and tenderness. If you swap it for cake flour, you’ll get an even lighter crumb, but you’ll also lose a little of that hearty bite that makes this dish satisfying. The salt is a simple yet essential player; it accentuates the butter’s richness and brings out the subtle sweetness of the honey. A pinch too little and the flavors feel flat; a pinch too much and you’ll dominate the palate. For the best results, opt for fine sea salt—its crystal size dissolves evenly, ensuring every bite is perfectly seasoned.
The Texture Crew
Butter is the star of the show here. I recommend using a high‑fat, European‑style butter; it has a higher butterfat content that creates those coveted flaky layers. If you’re on a budget, stick with regular unsalted butter but make sure it’s truly cold—soft butter will coat the flour too heavily and result in a dense texture. The egg adds structure and moisture; its proteins coagulate during cooking, giving the final product that gentle rise we all love. Finally, the milk provides the liquid needed to bring everything together without making the batter too runny. Whole milk is ideal for flavor, but you can substitute with oat or almond milk for a dairy‑free version without sacrificing the creamy mouthfeel.
The Unexpected Star
Honey isn’t just a sweetener; it’s a humectant that locks in moisture, keeping the final dish tender for hours after cooking. A drizzle of honey‑infused vanilla extract adds a floral note that pairs beautifully with the buttery base, turning an ordinary batter into something memorable. If you’re allergic to honey, agave syrup works just as well, though the flavor profile shifts toward a milder sweetness. This ingredient is the secret weapon that makes the difference between “good” and “hands down the best version you’ll ever make at home.”
The Final Flourish
Baking powder is the leavening hero that gives the batter its lift without requiring a long resting period. A teaspoon is enough to create a gentle rise, but if you’re at high altitude, increase it by 25% to compensate for lower air pressure. Lastly, a splash of vanilla extract rounds everything out, tying together the sweet and savory notes into a cohesive flavor symphony. When you’re ready to assemble, make sure every ingredient is at room temperature except the butter—that contrast is what creates those coveted pockets of steam and flavor.
Everything’s prepped? Good. Let’s get into the real action…
The Method — Step by Step
Start by chilling a large mixing bowl and the food processor’s blade attachment in the freezer for about five minutes. This cold environment ensures the butter stays solid longer, which is crucial for those flaky layers. While the bowl chills, dice the butter into ½‑inch cubes. As soon as the bowl is frosty, dump the butter cubes in, pulse three times, and watch as the pieces break into pea‑size crumbs. The mixture should look like coarse sand—if the butter melts, pause and pop the bowl back in the freezer for another minute.
Add the flour, baking powder, and salt to the chilled bowl. Pulse again until the dry ingredients are fully incorporated with the butter crumbs. You’ll notice the texture shifting from sandy to a slightly clumpy dough—this is the perfect stage where the butter is still visible but evenly distributed.
Kitchen Hack: If you’re short on time, use a pastry cutter before the processor; it speeds up the butter‑flour integration.Create a well in the center of the mixture and crack the egg into it, then pour in the milk, honey, and vanilla. Secure the lid and let the processor run on low for just 5‑7 seconds. The batter should come together in a smooth, glossy ribbon that falls back into the bowl in a single, unbroken stream. If it looks too thick, add a tablespoon of milk at a time; if it’s too runny, sprinkle a bit more flour. The key is to stop the processor as soon as the batter is just combined—over‑mixing will develop gluten and make the final product tough.
Heat a non‑stick skillet over medium‑high heat and add a thin layer of butter. When the butter foams and begins to brown lightly, you’ll hear that unmistakable sizzle that signals “it’s time.” Drop a ladleful of batter into the pan, spreading it gently with the back of a spoon to form an even circle. The edges should start pulling away after about 30 seconds, and the surface will show tiny bubbles forming—this is the moment of truth.
Flip the pancake (or whichever shape you’re making) with a thin, flexible spatula. You’ll hear a soft “pop” as the golden underside releases. Cook for another 45 seconds to a minute until the second side is a deep, buttery brown.
Watch Out: Resist the urge to press down on the pancake with the spatula; you’ll force out the steam that creates the fluffy interior.Transfer the cooked piece to a warm plate and repeat the process with the remaining batter, adding a little more butter to the pan each time. The batter stays pliable for about 20 minutes; if it starts to thicken, drizzle a splash of milk and give the processor a quick pulse to revive the consistency.
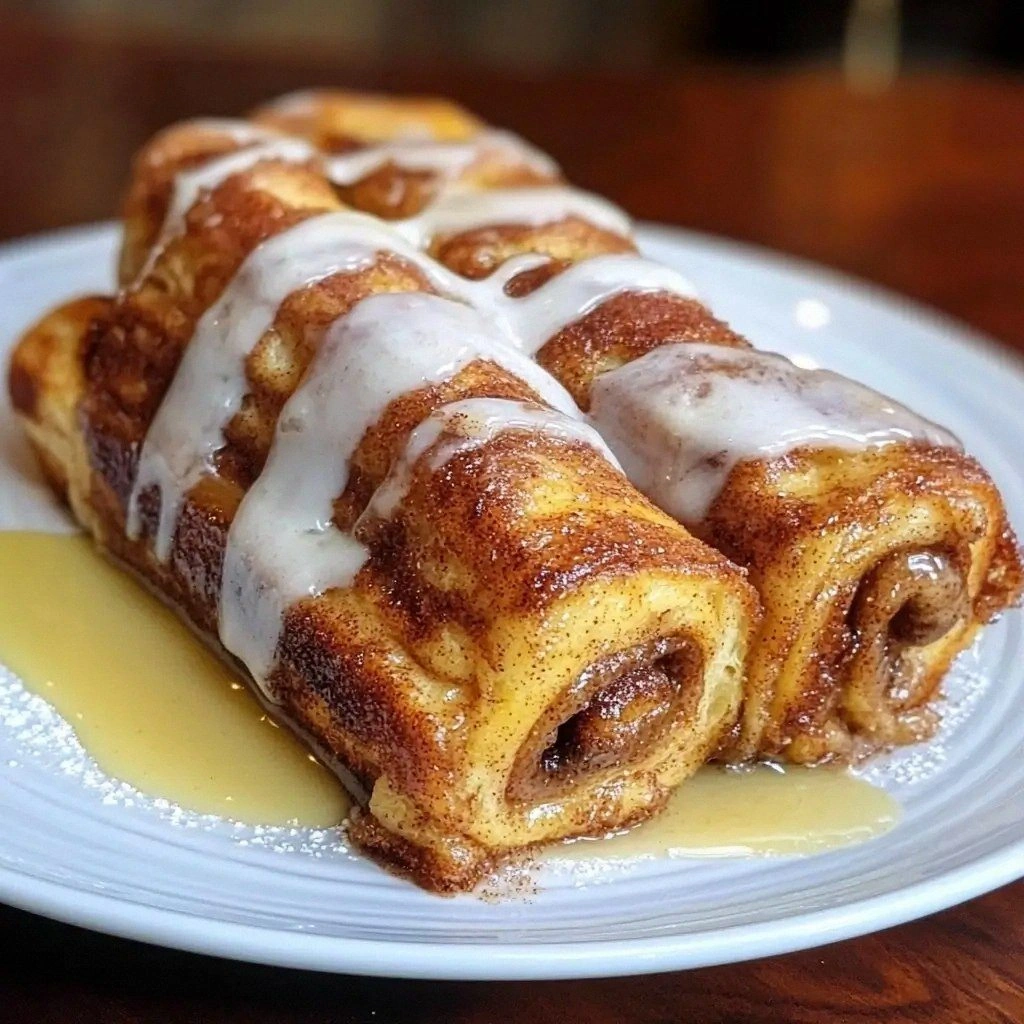
While the last batch cooks, whisk together a simple glaze: melt a tablespoon of butter, stir in a teaspoon of honey, and drizzle it over the stack of hot pancakes. The glaze should melt into the crevices, creating a glossy finish that looks like a caramel waterfall. This is the final flourish that turns a good dish into a show‑stopping masterpiece.
Serve immediately with fresh berries, a dollop of whipped cream, or a sprinkle of powdered sugar—whatever your heart desires. Picture yourself pulling this out of the pan, the whole kitchen smelling incredible, and the first bite melting like a cloud of buttery bliss. That’s the magic we’ve been building toward.
That’s it — you did it. But hold on, I’ve got a few more tricks that'll take this to another level…
Insider Tricks for Flawless Results
The Temperature Rule Nobody Follows
Most home cooks crank the heat up high, hoping to speed things along, but that just burns the outer layer while leaving the interior undercooked. The secret is to keep your skillet at a steady medium heat, which allows the batter to set slowly, creating a uniform crumb. If you’re using an electric stove, let the pan warm for at least three minutes before adding butter. I once tried a high‑heat blast and ended up with a charcoal‑tasting pancake—trust me, that’s a taste you’ll never forget, and not in a good way.
Why Your Nose Knows Best
Never underestimate the power of aroma. When the batter hits the pan, you’ll notice a nutty, buttery scent rising within seconds—if you don’t smell that, the pan isn’t hot enough. Conversely, a sharp, burnt smell means you’ve crossed the line. Let your nose be the thermometer; it’s more reliable than any gadget you own.
The 5‑Minute Rest That Changes Everything
After blending, let the batter rest for exactly five minutes. This short pause lets the gluten relax, the baking powder activate fully, and the butter solidify just enough to create those delicate pockets. Skipping this rest is a common mistake; I’ve seen colleagues pour batter straight from the processor and end up with dense, rubbery results. Take those five minutes, grab a coffee, and come back refreshed.
Butter Brush Technique
Instead of dumping butter into the pan, brush a thin layer with a silicone brush. This ensures even coverage and prevents the butter from pooling, which can cause uneven browning. The brush also lets you control the amount precisely, so you never waste a single gram of that golden goodness.
The Secret Steam Burst
When you flip the pancake, quickly cover the pan with a lid for ten seconds. The trapped steam gently lifts the interior, giving you a fluffier bite. I tried this at a brunch gathering and the guests were convinced I’d used a professional oven—pure, airy perfection.
Creative Twists and Variations
This recipe is a playground. Here are some of my favorite ways to switch things up:
Cocoa‑Infused Dream
Swap out one cup of flour for cocoa powder and add a tablespoon of espresso powder. The result is a rich, mocha‑kissed pancake that pairs beautifully with a dollop of mascarpone.
Savory Herb Medley
Leave out the honey and vanilla, and fold in chopped fresh rosemary, thyme, and grated Parmesan. This transforms the batter into a savory scone perfect for brunch or a side to soup.
Citrus Burst
Add zest of one lemon and a splash of orange juice to the wet ingredients. The bright citrus notes lift the buttery base, making a refreshing pancake ideal for summer mornings.
Spiced Apple
Stir in finely diced apples and a pinch of cinnamon and nutmeg. The apples soften during cooking, releasing a fragrant aroma that feels like a cozy autumn hug.
Gluten‑Free Freedom
Replace all‑purpose flour with a 1:1 gluten‑free flour blend. The texture stays delightfully light, and you can enjoy the same fluffy experience without the gluten.
Storing and Bringing It Back to Life
Fridge Storage
Place cooled pancakes in an airtight container lined with parchment paper. They’ll stay fresh for up to three days. When you’re ready to eat, reheat in a skillet over medium heat for two minutes per side, adding a splash of water to the pan to create steam.
Freezer Friendly
Stack pancakes between sheets of wax paper, then seal them in a zip‑top bag. Freeze for up to two months. To revive, microwave for 45 seconds, then finish on a hot pan for a crisp exterior.
Best Reheating Method
For ultimate freshness, preheat a non‑stick skillet, add a tiny pat of butter, and place the pancake directly on the surface. Add a teaspoon of water to the pan and cover for 30 seconds; the steam will bring back that original fluff while the butter crisps the edges.