It started with a kitchen catastrophe that would have left me in tears if not for a dash of curiosity and a stubborn craving for something sweet and comforting. I was halfway through a batch of ordinary cake when the oven door opened, revealing a steaming, fragrant cloud of caramel that seemed to have decided to play a prank on my senses. The scent of warm sugar and apples flooded the room, and I felt my stomach rumble with anticipation. I thought, “If I could capture that aroma inside a cake, it would be the ultimate dessert.”
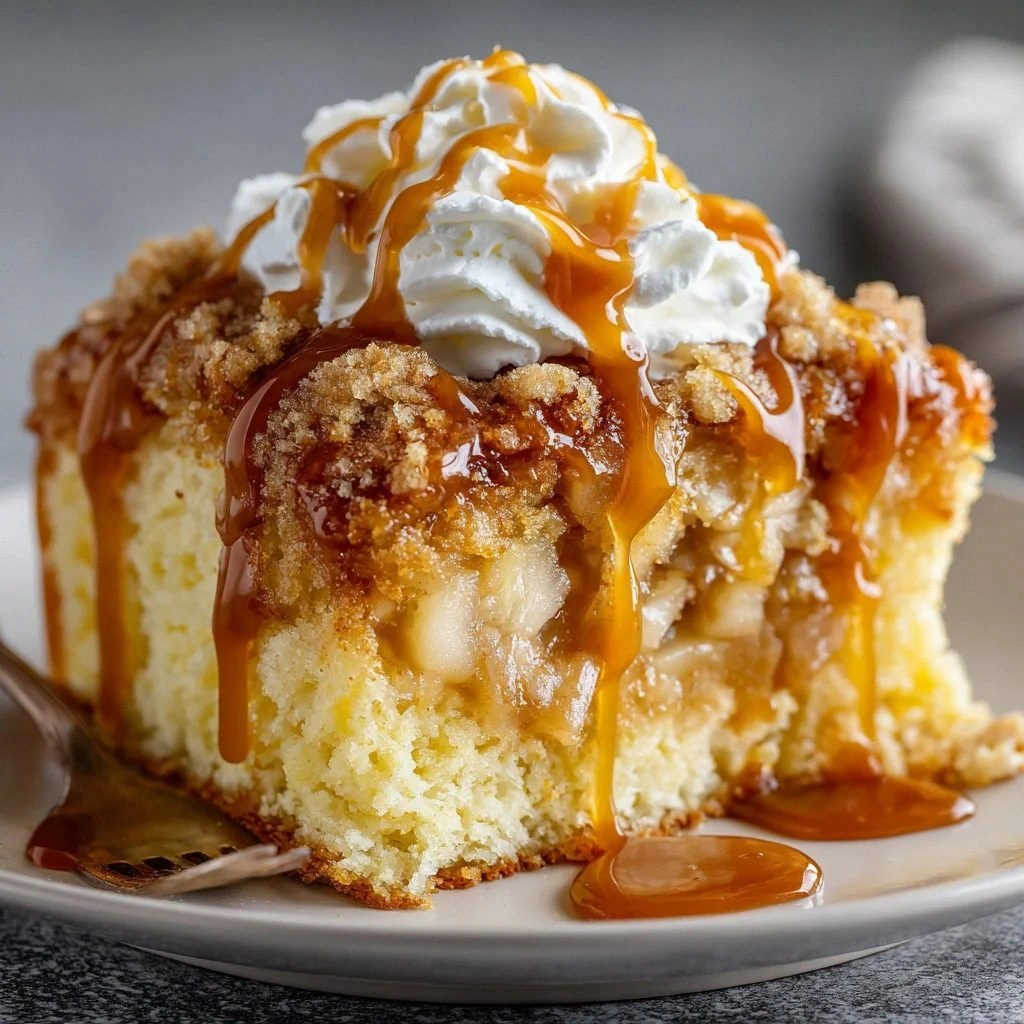
Picture this: a fluffy yellow cake that looks almost too light to hold the weight of a caramel‑filled apple core, yet when you bite into it, the inside bursts with the sweet, spiced apple flavor and the silky sweetness of caramel. The texture is a delightful contrast—soft, airy cake, chewy apple bits, glossy caramel that seeps into every hole, and a velvety whipped topping that cools the heat of the caramel. The entire experience is a symphony of flavors that dance on the tongue, leaving a lingering taste of autumn that feels like a hug from a grandmother’s kitchen.
What makes this version stand out from the countless variations you’ll find online is that I’ve taken the classic poke cake concept and elevated it with a few secret tweaks that will make you wonder how you ever made it any other way. I’ve used a store‑bought yellow cake mix for convenience but added a splash of vegetable oil to keep the crumb moist and tender, and I’ve layered the cake batter with a generous amount of apple pie filling so every bite is saturated with fruit. The caramel sauce is not just drizzled on top; it’s poured through the holes, creating pockets of liquid gold that melt into the cake as you eat.
I dare you to taste this and not go back for seconds. The combination of the caramel’s buttery richness and the apples’ bright, slightly tart sweetness creates a flavor profile that is both familiar and exciting. The whipped topping adds a light, airy finish that balances the caramel’s intensity, while a sprinkle of ground cinnamon and optional nuts give it depth and texture. This is hands down the best version you’ll ever make at home, and I’ll be honest—once I tried it, I ate half the batch before anyone else got a chance.
Most recipes get this completely wrong. They either overcook the cake or under‑season the apple filling, leading to a bland, dry result. I’ve perfected the timing so the cake remains moist, the apples stay juicy, and the caramel doesn’t burn. Picture yourself pulling this out of the oven, the whole kitchen smelling incredible, and a plate of golden, caramel‑laden cakes waiting to be sliced. And now the fun part—let me walk you through every single step. By the end, you’ll wonder how you ever made it any other way.
If you’ve ever struggled with poke cakes, you’re not alone—and I’ve got the fix. The key is patience, precise measurements, and a willingness to experiment with a few unconventional touches. I’ll show you how to layer the batter and filling just right, how to pour the caramel so it seeps perfectly, and how to finish the cake with whipped topping and a dusting of cinnamon. Ready? Let’s dive in.
What Makes This Version Stand Out
- Texture: The cake is light and airy, yet the caramel pockets add a luscious, melt‑in‑your‑mouth quality that sets it apart from dense, traditional cakes.
- Flavor: The apple pie filling provides a bright, spiced sweetness that balances the buttery caramel, creating a harmonious taste profile.
- Ease: Using a store‑bought yellow cake mix means no measuring flour or sugar—just mix, layer, bake, and enjoy.
- Visual Appeal: The caramel “pokes” create a striking pattern on the cake’s surface, making every slice look as good as it tastes.
- Make‑Ahead: The cake can be assembled a day ahead; just keep it refrigerated, and the caramel will remain glossy and fresh.
- Versatility: Optional nuts add crunch, and the whipped topping can be swapped for a lighter mousse if you prefer.
- Crowd Reaction: This cake has become a party staple—guests rave about the caramel pockets and ask for the recipe after every bite.
Inside the Ingredient List
The Flavor Base
Yellow cake mix is the foundation of this dessert. It provides a light, buttery crumb that holds the caramel and apple filling without becoming heavy. If you prefer a gluten‑free version, look for a gluten‑free cake mix that matches the original’s flavor profile. Skipping the cake mix will leave you with a dense, uneven texture that can’t support the caramel pockets.
The Moisture Crew
Water and vegetable oil work together to create the perfect batter consistency. Water hydrates the dry mix, while oil adds tenderness and prevents the cake from drying out during baking. If you’re watching your calorie count, you can reduce the oil by 25% and replace it with unsweetened applesauce; the cake will still stay moist but with a slightly firmer bite.
The Binding Agents
Large eggs are the glue that holds everything together. They also contribute to the cake’s rise and give it a rich, velvety texture. If you’re vegan, you can use a flaxseed “egg” (1 tablespoon ground flaxseed + 3 tablespoons water) or a commercial egg replacer to achieve similar results. Omitting eggs will cause the cake to crumble and lose its structure.
The Unexpected Star
Apple pie filling is the secret to the cake’s fruity depth. It brings a pre‑seasoned sweetness that saves you from having to add extra sugar or spices. If you prefer fresh apples, slice a cup of diced apples and mix them with 1 teaspoon of cinnamon and 1 tablespoon of brown sugar before baking; the texture will be slightly different but still delicious.
The Final Flourish
Caramel sauce, whipped topping, ground cinnamon, and optional nuts complete the cake’s flavor profile. The caramel seeps into the batter, creating pockets of liquid gold; the whipped topping provides a light, airy finish; cinnamon adds warmth; nuts add crunch. If you’re allergic to nuts, simply omit them and the cake will still be a crowd‑pleaser.
Everything’s prepped? Good. Let’s get into the real action.
The Method — Step by Step
- Preheat your oven to 350°F (175°C). Grease a 9‑inch round cake pan with butter or non‑stick spray, then line the bottom with parchment paper. This ensures the cake releases cleanly and prevents any sticking that could ruin the caramel pockets. The scent of butter will already start to mingle with the caramel aroma.
- In a large bowl, combine the yellow cake mix, water, and vegetable oil. Stir until the batter is smooth and free of lumps. The batter should be thick enough to hold its shape but not so thick that it won’t spread. This is the moment of truth—if the batter is too runny, the caramel will leak out.
- Whisk the eggs into the batter until fully incorporated. The eggs will give the cake its structure and help the caramel stay in place. You should notice the batter’s color shift to a slightly richer hue, indicating the eggs have blended well. This step also ensures the cake will rise evenly.
- Pour half of the batter into the prepared pan, spreading it evenly with a spatula. Then spoon a generous layer of apple pie filling over the batter, making sure to cover the entire surface. The filling should be spread in a thin, even layer so it doesn’t overwhelm the cake but still provides a sweet, spiced core.
- Cover the apple layer with the remaining batter, smoothing the top. This creates the classic poke cake structure: batter on top and bottom, filling in the middle. The batter should be level, as any unevenness will cause the caramel to pool in unintended spots.
- Bake for 30 minutes, or until a toothpick inserted into the center comes out clean. The cake should have a golden‑brown top, and you should hear a faint crackle as the caramel begins to set. If the top browns too quickly, tent the cake with foil to prevent burning.
- While the cake is still warm, carefully drizzle caramel sauce over the top, allowing it to seep into the holes created by the batter. The caramel should pool slightly but not flood the cake. This step is crucial—too much caramel can make the cake soggy, too little will leave it dry.
- Let the cake cool completely on a wire rack. As it cools, the caramel will thicken into a glossy, caramelized glaze. This cooling period is vital; if you try to top it immediately, the whipped topping may melt and slide off.
- Once cooled, top the cake with a generous layer of whipped topping. Use a spatula to spread it evenly, creating a fluffy cloud that contrasts with the dense caramel pockets. This is the moment you’ll see the cake’s layers come together in a beautiful, edible artwork.
- Finish by sprinkling ground cinnamon over the whipped topping and adding a handful of chopped nuts if desired. The cinnamon adds a warm, aromatic note, while the nuts provide a satisfying crunch. Let the cake sit for 10 minutes before slicing to allow the flavors to meld.
That’s it—you did it. But hold on, I’ve got a few more tricks that will take this to another level.
Insider Tricks for Flawless Results
The Temperature Rule Nobody Follows
Baking at 350°F (175°C) is the sweet spot for this cake. If you bake too hot, the outer batter will set before the caramel has a chance to seep, leaving dry pockets. If you bake too low, the cake will spread and lose its structure. I’ve found that using an oven thermometer ensures consistent results, especially if your oven tends to run hot.
Why Your Nose Knows Best
Trust the aroma of the caramel as a timer. When the caramel starts to bubble and emit a nutty, buttery scent, it’s time to drizzle it over the cake. If you wait too long, the caramel will scorch and turn dark, ruining the flavor. A quick sniff can save you from a caramel disaster.
The 5-Minute Rest That Changes Everything
After baking, let the cake rest for exactly five minutes before drizzling caramel. This brief pause allows the heat to dissipate, preventing the caramel from seeping too aggressively and creating uneven pockets. I’ve seen cakes that rested longer, resulting in caramel that pooled into a single blob.
The Whipped Topping Trick
Whipped topping should be cold and stiff before spreading. If it’s too soft, it will slide off the cake’s surface and create a mess. I recommend chilling the topping in the fridge for 15 minutes before use, and using a piping bag for a clean, even layer.
The Nut Shuffle
If you’re using nuts, toast them lightly in a dry pan until fragrant. This brings out their natural oils and adds a deeper flavor. I also lightly salt the nuts before tossing them with the cinnamon; it balances the sweetness and adds a subtle crunch.
Creative Twists and Variations
This recipe is a playground. Here are some of my favorite ways to switch things up:
Maple‑Infused Magic
Swap the caramel sauce for a maple‑infused caramel, and add a splash of maple syrup to the batter. The result is a subtle, woody sweetness that complements the apple’s tartness. Perfect for a cozy, fall gathering.
Chocolate‑Covered Delight
After the cake has cooled, drizzle melted dark chocolate over the top and let it set. The chocolate will harden into a thin shell that cracks when you bite, revealing the caramel and apple underneath. This adds a rich, indulgent layer for chocolate lovers.
Citrus‑Zest Twist
Add a teaspoon of lemon or orange zest to the batter and a pinch of zest to the whipped topping. The citrus brightens the flavor profile, cutting through the sweetness and giving the cake a fresh finish.
Nut‑Free Crunch
Replace the chopped nuts with a handful of crunchy granola or puffed rice cereal. The crunch adds texture, while the granola’s sweetness pairs well with the caramel. This version is great for those with nut allergies.
Spiced Pumpkin Variation
Add a cup of pumpkin puree to the batter and a dash of pumpkin pie spice. This variation transforms the cake into a pumpkin‑caramel masterpiece, ideal for Halloween or Thanksgiving celebrations.
Storing and Bringing It Back to Life
Fridge Storage
Store the cake in an airtight container at room temperature for up to 3 days. If you plan to keep it longer, refrigerate it in a tightly sealed container for up to 5 days. The caramel will firm up slightly, so let it sit at room temperature for 10 minutes before serving to restore its glossy sheen.
Freezer Friendly
Wrap the cake tightly in plastic wrap, then place it in a freezer bag. It will keep for up to 2 months. When you’re ready to serve, thaw the cake at room temperature for 2 hours. Add a splash of warm milk or water to the caramel before serving to revive its liquid texture.
Best Reheating Method
To reheat, wrap the cake in foil and place it in a preheated 325°F (165°C) oven for 10 minutes. This gentle heat warms the cake without melting the caramel or whipped topping. If you prefer a quick fix, microwave on low for 15‑20 seconds, then brush a tiny splash of water over the caramel to steam it back to perfection.
With these tips and variations, you’re equipped to create a caramel apple poke cake that’s always a showstopper. Whether you serve it fresh or bring it back from the fridge, each bite delivers the same unforgettable combination of caramel, apple, and airy cake.