Introduction
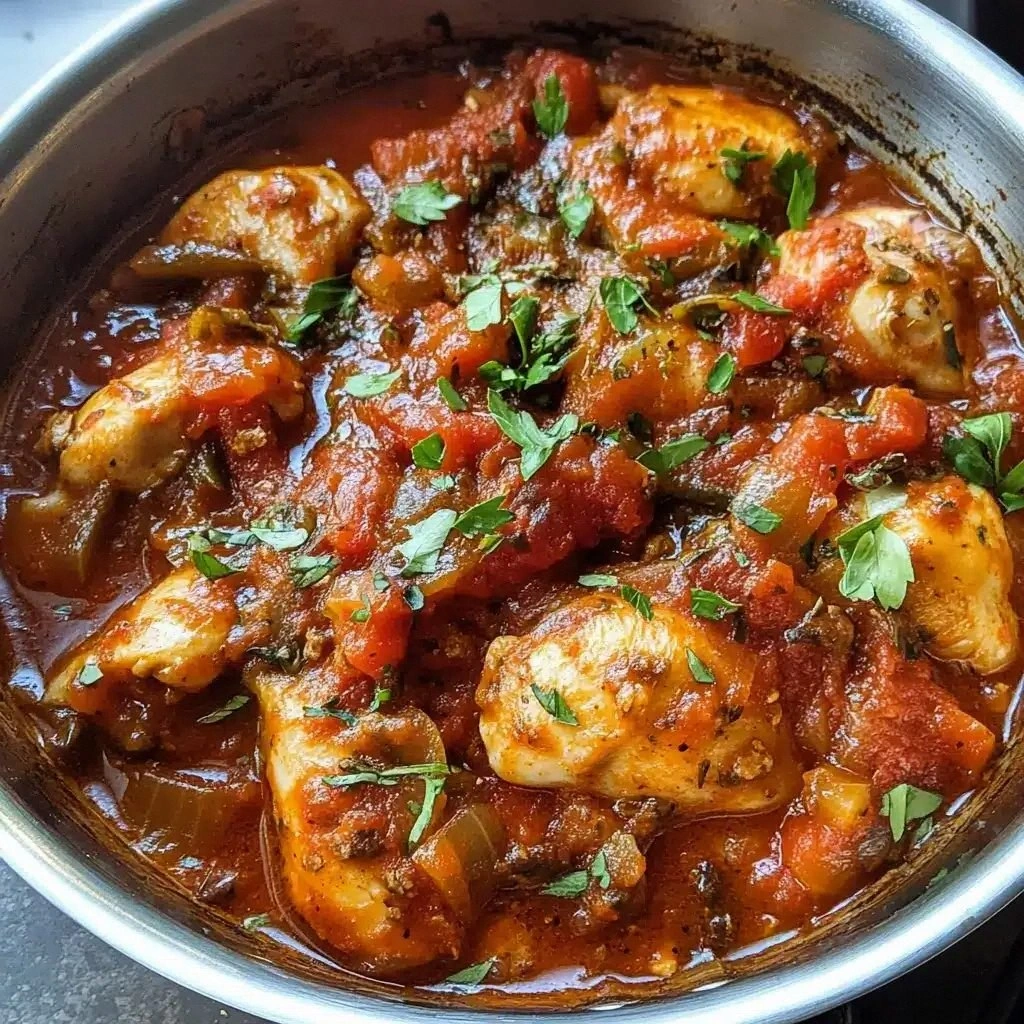
I was standing in my kitchen, staring at a pile of raw chicken thighs, when my friend dared me to whip up something that could make the whole house smell like a trattoria. I laughed, grabbed a skillet, and decided to give the classic Italian Chicken Cacciatore a modern twist. The result was a dish that not only tasted like it had traveled through Tuscan hills but also felt like a warm hug on a rainy evening. The aroma of sautéed onions, garlic, and roasted bell peppers mingled with the tangy sweetness of crushed tomatoes, creating an irresistible perfume that had me humming along to my favorite playlist.
Picture yourself pulling this out of the oven, the whole kitchen smelling incredible, and a family gathering around the table with anticipation. The first bite delivers a burst of umami, the chicken so tender it practically melts in your mouth, while the sauce clings to the grains of rice or the crust of rustic bread like velvet. I dare you to taste this and not go back for seconds. The flavors mingle in a way that makes the dish feel both comforting and adventurous at the same time.
What sets this version apart is the balance of techniques: searing the chicken to lock in juices, deglazing with a splash of wine to lift the fond, and then letting the sauce simmer until it thickens to a silky consistency. I used fresh herbs at the end rather than dried, which keeps the flavor bright and prevents bitterness. The result is a dish that feels effortless yet sophisticated, a culinary triumph that you’ll brag about for weeks.
I’ve spent countless evenings experimenting with Cacciatore, and this one finally nailed it. The sauce has a depth that you can’t get from canned tomatoes alone, thanks to the caramelization of onions and the subtle bitterness of roasted bell pepper. The secret ingredient? A hint of balsamic vinegar added at the end, which elevates the acidity without overpowering the dish. If you’re ready for the game-changer, keep reading, because I’ll walk you through every single step — by the end, you’ll wonder how you ever made it any other way.
I’ve also added a few micro-challenges to keep things exciting: keep the pan at medium-high heat for the first sear, then lower it to medium for the simmer. I’ll share the exact timing and temperature for each step, so you can replicate the results perfectly. I’ll also throw in a few “watch out” moments where a misstep could ruin the sauce. And if you’re curious about how to tweak the dish for a vegetarian version, I’ll cover that in the variations section.
Let’s dive into what makes this recipe stand out, break down the ingredient list, and then get our hands dirty in the kitchen. Trust me, the payoff is worth every minute you spend. I’ll keep the tone light, witty, and honest, because cooking should be fun and not a chore. So grab your apron, and let’s get cooking!
What Makes This Version Stand Out
- Flavor Depth: The combination of fresh herbs, a splash of wine, and a dash of balsamic creates layers of complexity that dance on the palate.
- Texture Balance: Crispy edges of seared chicken contrast with the silky sauce, giving each bite a satisfying bite.
- Time Efficiency: The method can be completed in under an hour, making it perfect for weeknight dinners.
- Ingredient Quality: Using high‑quality olive oil and fresh tomatoes makes all the difference.
- Make‑Ahead Friendly: The sauce actually tastes better the next day, so you can prep it in advance.
- Versatile Pairing: Works beautifully with pasta, polenta, or crusty bread, so you can tailor it to your mood.
- Crowd‑Pleaser: Family and friends rave about the comforting yet sophisticated flavor profile.
- Low Fuss: Minimal cleanup thanks to a single pot or skillet.
Alright, let's break down exactly what goes into this masterpiece…
Inside the Ingredient List
The Flavor Base
Onions, garlic, and bell pepper are the backbone of the sauce, providing sweetness and depth. Sauté them until translucent; this takes about five minutes and releases their natural sugars. If you skip the onions, the sauce will feel thin and lack body. For an extra kick, add a pinch of red pepper flakes during the sauté.
The tomato paste adds body and a concentrated tomato flavor that thickens the sauce. It also helps balance the acidity of the canned tomatoes. Use a light hand with the paste; too much can make the sauce taste like tomato soup. A good rule of thumb is two tablespoons for four servings.
Fresh herbs like oregano and basil are added at the end to preserve their bright, citrusy notes. Dried herbs can become bitter if added too early, so keep them for the final stir. If you’re out of fresh herbs, a teaspoon of dried will suffice but watch the cooking time.
The Texture Crew
Chicken thighs bring moisture and a rich flavor that stands up to the robust sauce. I prefer bone‑in thighs for extra juiciness, but boneless works too. Pat the chicken dry before searing to achieve a golden crust. If you’re short on time, you can use pre‑cut chicken pieces.
Carrots and celery add subtle sweetness and a hint of earthiness. They also thicken the sauce slightly as they break down. If you’re vegetarian, replace them with mushrooms for a similar texture. Remember to slice them uniformly so they cook evenly.
Olives and capers provide a briny punch that cuts through the richness. They’re optional but highly recommended for authenticity. If you don’t like olives, simply omit them; the dish will still be delicious. Capers are small, so rinse them well to avoid excess salt.
The Unexpected Star
A splash of red wine is the secret sauce that lifts the flavor profile. It deglazes the pan, picking up the browned bits that carry flavor into the sauce. Use a dry red wine you would enjoy drinking; the better the wine, the better the sauce. If you’re not a wine person, substitute with chicken broth.
Balsamic vinegar adds a subtle sweetness and acidity that balances the tomato’s natural tartness. Add it at the end of the cooking process to preserve its complex flavor. Too much can overpower the dish, so start with a teaspoon and taste before adding more.
The Final Flourish
Fresh parsley is sprinkled on top just before serving for a burst of color and freshness. It also adds a mild peppery note that brightens the dish. If you’re allergic to parsley, substitute with cilantro for a different but equally vibrant finish. The parsley should be chopped finely to blend seamlessly with the sauce.
Everything's prepped? Good. Let's get into the real action…
The Method — Step by Step
- Heat a large skillet over medium‑high heat and add a splash of olive oil. Pat the chicken thighs dry with paper towels, then season both sides generously with salt and pepper. Place the chicken skin‑side down and let it sear for about 4 minutes until the skin is crisp and golden. Flip and sear the other side for 3 minutes; the chicken should release easily when it’s ready to turn. This step locks in juices and creates a flavorful crust.
- Remove the chicken and set it aside on a plate. In the same skillet, reduce the heat to medium and add the diced onions. Cook, stirring frequently, for about 3 minutes until they soften and start to caramelize. Add the minced garlic and sliced bell pepper, and sauté for another 2 minutes. The garlic should be fragrant but not browned, as burnt garlic can taste bitter.
- Stir in the tomato paste and let it toast for 1 minute; this brings out its earthy sweetness. Then pour in the red wine, scraping the bottom of the pan to loosen the browned bits. Let the wine reduce by half, which concentrates the flavor and removes the alcohol. If you’re using a wine substitute, simply add the broth at this stage.
- Add the diced tomatoes, chicken broth, capers, olives, oregano, and bay leaves. Stir to combine, then return the chicken to the skillet, nestling it into the sauce. Bring the mixture to a gentle simmer, cover partially, and let it cook for 20 minutes. The sauce should thicken slightly and the chicken should reach an internal temperature of 165°F.
- Halfway through the simmer, check the liquid level; if it’s too thick, add a splash of water or more broth. This keeps the sauce from drying out. Also, stir occasionally to prevent sticking. At this point, you’ll notice the aroma filling the kitchen—it's unmistakably home‑cooked comfort.
- Once the chicken is tender, remove the bay leaves and stir in the fresh basil and parsley. The herbs should release their oils, giving the sauce a bright, herbal note. Taste the sauce; if it needs more acidity, add a teaspoon of balsamic vinegar. Let the sauce simmer for an additional 5 minutes to meld the flavors.
- If you prefer a thicker sauce, remove the lid and let it reduce for another 5 minutes. The consistency should be glossy and cling to the chicken. For a lighter version, simply leave the lid on and serve as is. This step is optional but highly recommended for a richer mouthfeel.
- Serve the chicken over a bed of creamy polenta, al dente pasta, or crusty bread to soak up the sauce. Garnish with extra parsley and a drizzle of olive oil if desired. The dish should look appetizing with a glossy sheen and a pop of color from the herbs. Plate it promptly to keep the chicken warm and the sauce silky.
That’s it — you did it. But hold on, I’ve got a few more tricks that'll take this to another level…
Insider Tricks for Flawless Results
The Temperature Rule Nobody Follows
Most people keep the heat too high during the simmer, which can scorch the sauce and ruin the flavor. I keep it at a gentle low boil; the sauce should bubble slowly, not roar. This ensures the flavors meld without losing the delicate herbs. If you’re in a hurry, you can raise the heat slightly, but be sure to stir frequently.
Why Your Nose Knows Best
Before you taste the sauce, sniff it. The aroma is the first indicator of how well the dish is developing. A sweet, tomato‑y scent means the onions have caramelized properly. If it smells acidic or flat, adjust the seasoning or add a splash of balsamic to balance it. Trust your nose; it’s a reliable taste tester.
The 5‑Minute Rest That Changes Everything
After cooking, let the dish rest for five minutes. The sauce will thicken slightly, and the chicken will finish cooking in its own heat. This resting period also allows the flavors to settle, giving the sauce a richer depth. Skipping this step can leave the sauce watery.
Keep the Pan Clean, Keep the Flavor
Use a silicone spatula to scrape the bottom of the pan during sautéing; this prevents the fond from burning. A clean pan ensures the sauce doesn’t develop off‑flavors. If you’re using a non‑stick pan, avoid metal utensils that can scratch the surface.
The Right Pan Size Matters
A skillet that’s too small forces the ingredients to crowd, which can cause uneven cooking. I use a 12‑inch cast‑iron skillet that allows space for the chicken to sear without crowding. If you don’t have a cast‑iron pan, a heavy‑bottomed stainless steel skillet works well.
The Final Touch of Freshness
Add fresh basil and parsley right before serving; this preserves their bright flavor and color. If you add them too early, the heat will wilt them and the dish will look dull. A quick stir just before plating keeps the herbs lively.
Creative Twists and Variations
This recipe is a playground. Here are some of my favorite ways to switch things up:
Italian Sausage Swap
Replace chicken with spicy Italian sausage for a richer, meatier dish. The sausage’s fennel and paprika add depth. Keep the rest of the sauce unchanged for a hearty meal. Serve over spaghetti for a classic twist.
Vegetarian Version
Use chickpeas or lentils in place of chicken for a protein‑rich vegetarian option. The legumes absorb the sauce’s flavors beautifully. Add extra mushrooms for texture. This version is great for a plant‑based dinner.
Seafood Variation
Swap chicken for firm white fish fillets or shrimp. The seafood cooks quickly, so reduce simmer time to 10 minutes. The sauce’s acidity pairs wonderfully with the delicate flavor of fish. Finish with a squeeze of lemon for brightness.
Spicy Kick
Add a tablespoon of red pepper flakes during the sauté for a fiery edge. The heat balances the sweetness of the tomatoes. Use a mild pepper if you’re sensitive to spice. This version is perfect for a cozy night in.
Low‑Carb Adaptation
Serve the sauce over cauliflower rice or zucchini noodles to keep it low‑carb. The veggies soak up the sauce without adding extra carbs. This makes the dish suitable for keto or paleo diets. The flavor remains unchanged.
Sunday Roast Twist
Simmer the chicken in the sauce for 45 minutes to create a slow‑roasted flavor. The long cooking time develops deep caramelization. Serve with mashed potatoes for a comforting Sunday meal. The dish will taste even better the next day.
Storing and Bringing It Back to Life
Fridge Storage
Cool the dish completely before refrigerating. Store in an airtight container for up to 4 days. The sauce will thicken in the fridge, so add a splash of water or broth when reheating. Keep the chicken pieces separate to prevent them from becoming soggy.
Freezer Friendly
Freeze individual portions in freezer‑safe containers for up to 3 months. Thaw overnight in the refrigerator before reheating. The texture stays firm, and the flavors stay intact. This is ideal for meal prep.
Best Reheating Method
Reheat on the stovetop over low heat, stirring occasionally. Add a splash of water or broth to loosen the sauce. Bring to a gentle simmer until heated through. The result is a silky sauce that feels freshly made.
Conclusion
I’ve spent hours perfecting this dish, and it’s now a staple in my kitchen. The combination of seared chicken, aromatic vegetables, and a tomato‑wine sauce creates a symphony of flavors that is both comforting and sophisticated. The best part? It’s simple enough for beginners yet sophisticated enough to impress guests. I dare you to try it and see for yourself.
If you’ve ever struggled with Cacciatore, you’re not alone — and I’ve got the fix. The key lies in the sear, the deglaze, and the finishing herbs. Follow these steps, and you’ll have a dish that’s both delicious and unforgettable. I’ll be waiting for your photos and comments; let’s keep the conversation going.
Remember, cooking is an adventure, not a chore. Keep experimenting, keep tasting, and most importantly, keep enjoying the process. Happy cooking!