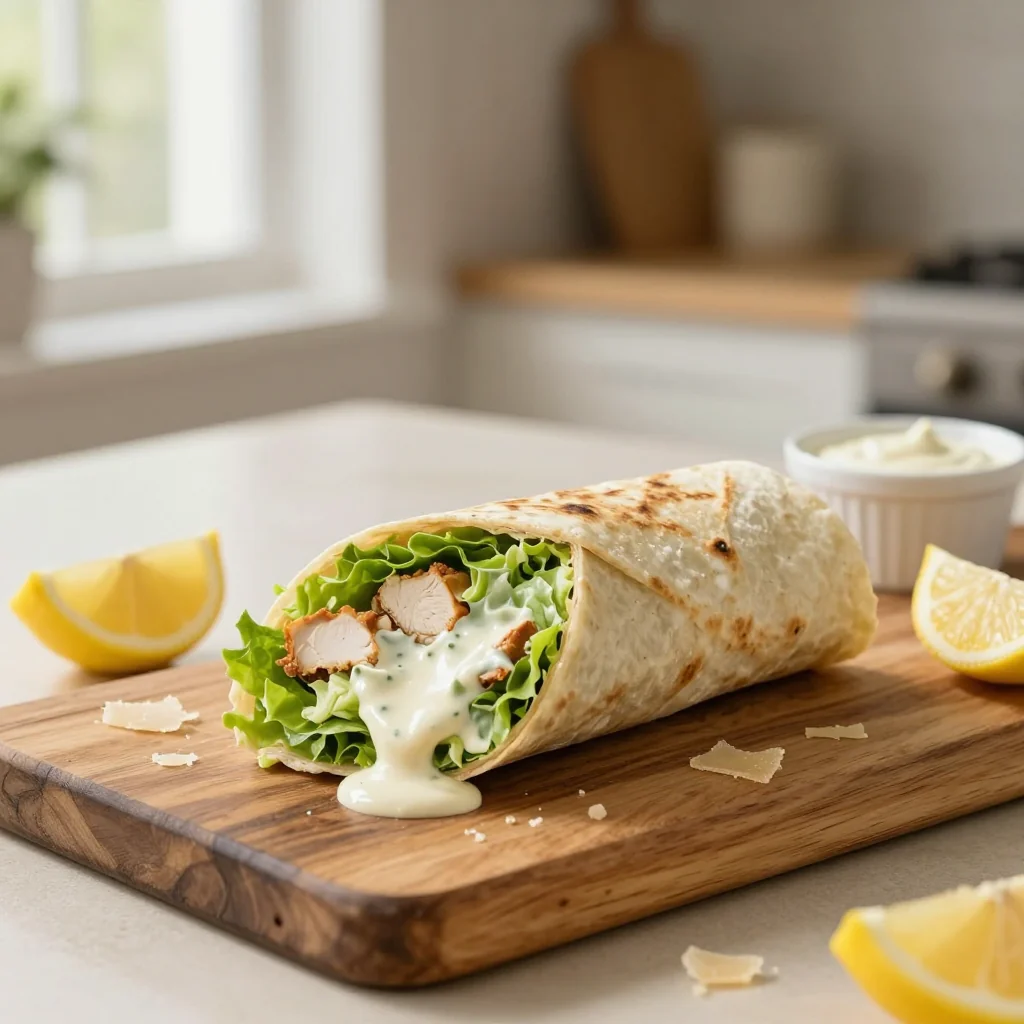
A fresh, handheld twist on the classic Caesar salad that’s perfect for lunch or a light dinner.
The first time I tasted a Caesar salad, I was sitting on a sun‑drenched patio in Rome, watching the city pulse around me. The tangy lemon, the salty Parmesan, and the smoky undertone of anchovies danced together, creating a harmony that lingered long after the last bite. Years later, while packing a quick lunch for a busy workday, I realized that the classic salad could be transformed into something portable, something you could enjoy on the go without sacrificing any of that iconic flavor.
The Chicken Caesar Wrap with Homemade Dressing was born from that very moment of inspiration. I wanted a dish that captured the soul of the traditional Caesar but could fit snugly into a tortilla, making it ideal for picnics, office lunches, or a relaxed dinner at the kitchen table. The wrap format also lets the crunchy romaine and crisp croutons stay separate until the very last second, preserving texture in a way a bowl never could.
In this article, I’ll walk you through every step—from seasoning the chicken to whisking a silky, homemade Caesar dressing that beats any store‑bought version. You’ll learn how to balance flavors, achieve the perfect sear, and assemble the wrap so each bite delivers a burst of freshness, richness, and a hint of smoky heat.
I’m thrilled to share this recipe with you, and I hope it becomes a staple in your culinary repertoire. Let’s get started and create a wrap that feels both indulgent and wholesome!
🌟 Why This Recipe Will Captivate You
From flavor to convenience, this wrap checks every box for a satisfying, nutritious meal.
- ✨ Balanced Nutrition: Lean chicken provides high‑quality protein while the romaine adds crisp fiber and essential vitamins.
- ✨ Homemade Dressing Superiority: Skipping the jar saves you hidden sugars and preservatives, delivering a bright, authentic taste.
- ✨ Textural Harmony: Warm, seared chicken meets cool lettuce, crunchy croutons, and creamy cheese for a multi‑dimensional bite.
- ✨ Portability: Wrapped in a soft tortilla, the dish travels well, making it perfect for lunchboxes or picnics.
- ✨ Customizable: Easily adapt to gluten‑free, vegetarian, or low‑carb diets without losing the core flavors.
- ✨ Quick Turn‑around: From prep to plate in under 30 minutes, it fits seamlessly into a busy lifestyle.
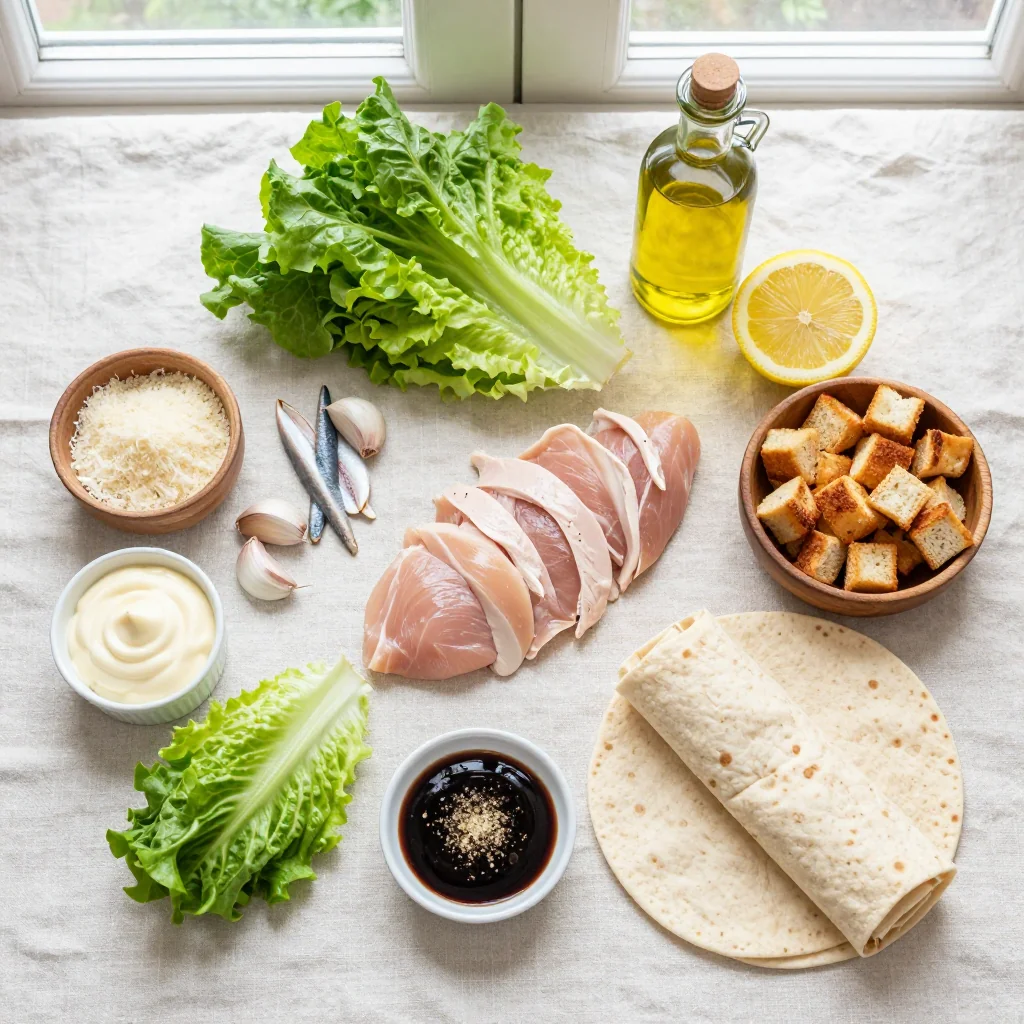
🥗 Ingredients
📝 Complete Ingredient List
For Chicken & Dressing:
For Wrap Assembly:
For Garnish / Optional Extras:
🔍 Focus on Key Ingredients
Chicken Breast
Chicken breast is the protein backbone of this wrap. When sourced from free‑range farms, it retains a natural tenderness and a subtle, buttery flavor. Pat the pieces dry before seasoning; this ensures a golden crust rather than steaming. The quick sear locks in juices, keeping the meat moist even after it cools for wrapping.
Parmesan Cheese
Parmesan adds the unmistakable umami punch that defines a Caesar. Freshly grated Parmesan melts into the dressing, creating a silky texture while also providing a salty crunch when shaved over the finished wrap. Look for a cheese with a deep golden hue and a granular texture—this signals proper aging.
Romaine Lettuce
Romaine offers a crisp bite and a slightly bitter edge that balances the richness of the dressing. Choose heads that feel heavy for their size and have bright, undamaged leaves. Roughly chopping the lettuce into bite‑size pieces makes it easy to roll inside the tortilla without tearing.
🔄 Quick Substitutions
| If you don’t have… | Use instead… |
|---|---|
| Chicken breast | Grilled tofu or tempeh (for a vegetarian version) |
| Flour tortillas | Large lettuce leaves or low‑carb wraps |
| Parmesan cheese | Pecorino Romano or aged Asiago |
👨🍳 Step‑by‑Step Instructions
Follow these detailed steps to create a perfectly balanced Chicken Caesar Wrap. Each phase builds flavor, texture, and visual appeal.
📋 Phase 1: Preparation & Mise en Place
Set up your workstation, season the chicken, and whisk the dressing.
Season the Chicken
Pat the chicken breasts dry with paper towels. Drizzle both sides with 1 tbsp olive oil, then sprinkle evenly with garlic powder, salt, and pepper. Let the seasoned chicken rest for 5 minutes; this allows the flavors to penetrate the meat.
Prepare the Homemade Caesar Dressing
In a medium bowl, whisk together 1 tsp Dijon mustard, 2 tbsp fresh lemon juice, ¼ cup grated Parmesan, and 1 tsp garlic powder. Slowly drizzle in the remaining 1 tbsp olive oil while whisking continuously until the mixture emulsifies into a smooth, glossy sauce. Adjust seasoning with a pinch of salt and freshly ground black pepper.
🔥 Phase 2: Cooking & Assembly
Cook the chicken, toast the croutons, and bring everything together.
Sear the Chicken
Heat a large skillet over medium‑high heat. Add a drizzle of olive oil and place the chicken breasts in the pan. Cook for 5‑6 minutes per side, or until the internal temperature reaches 165 °F (74 °C) and the exterior is golden‑brown. Transfer to a cutting board and let rest for 3 minutes before slicing thinly.
Toast the Croutons (Optional)
If you prefer extra crunch, quickly toast the croutons in the same skillet for 1‑2 minutes, stirring constantly to avoid burning. This step intensifies their flavor and adds a pleasant contrast to the creamy dressing.
Combine Lettuce and Dressing
In a large mixing bowl, toss the chopped romaine with half of the homemade dressing (reserve the rest for drizzling later). Ensure every leaf is lightly coated; this prevents the lettuce from wilting once wrapped.
✨ Phase 3: Finishing & Plating
Wrap, garnish, and serve.
Layer the Fillings
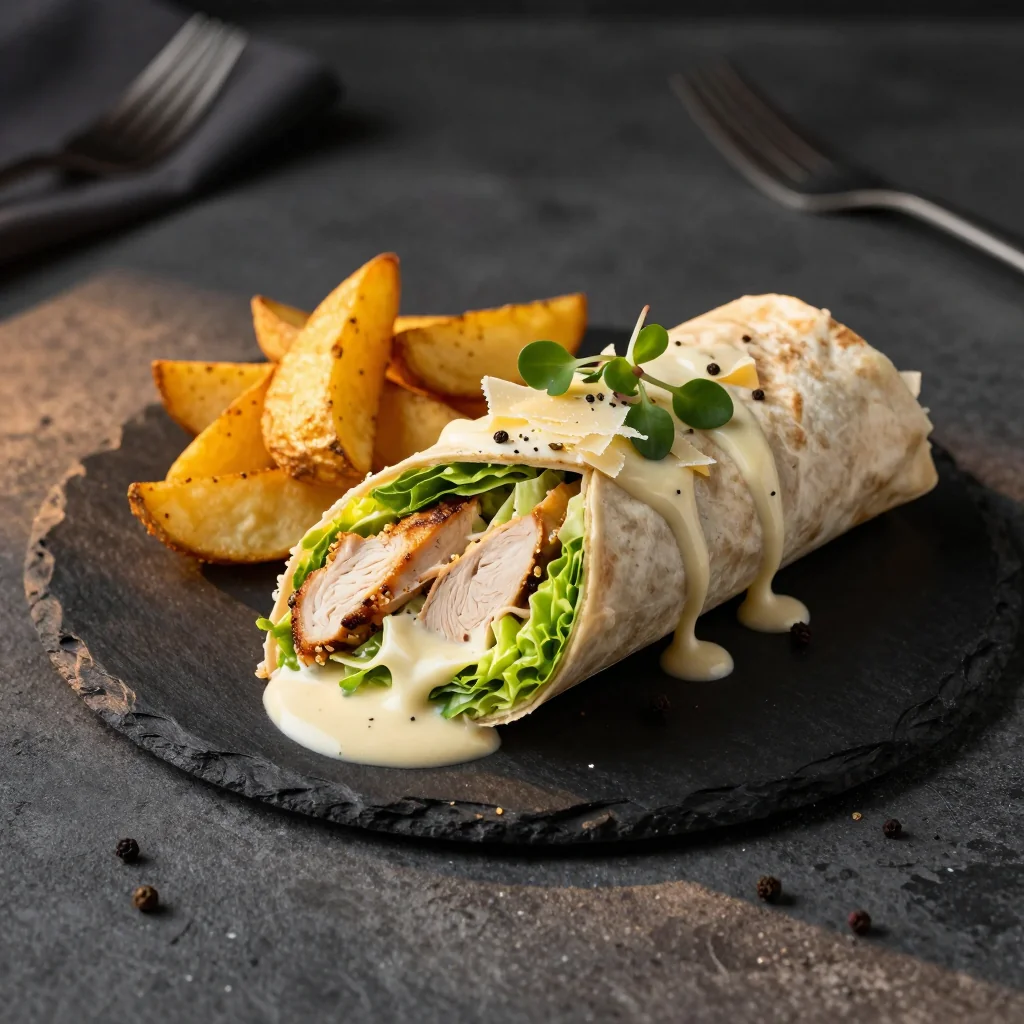
Lay a tortilla flat on a clean surface. Place a generous handful of dressed romaine in the center, followed by sliced chicken, toasted croutons, and a sprinkle of shaved Parmesan. Add a few leaves of fresh parsley for color and a hint of herbaceous brightness.
Drizzle Remaining Dressing
Drizzle the saved dressing over the top of the fillings. This final touch adds moisture and ties all flavors together without making the tortilla soggy.
Roll & Slice
Fold the sides of the tortilla inward, then roll tightly from the bottom up. Slice the wrap diagonally in half for a clean presentation. The cross‑section should reveal layers of vibrant green lettuce, golden chicken, and specks of Parmesan.
💡 Expert Tips & Tricks
🛒 Choosing the Right Ingredients
Look for chicken breasts that are uniform in thickness; this ensures even cooking. When buying romaine, select heads with crisp, dark green leaves and no yellowing. Freshly grated Parmesan releases more aroma than pre‑grated packets, which often contain anti‑caking agents that dull the flavor.
🔪 Preparation Techniques
Pat the chicken dry before seasoning to avoid steaming. Use a sharp chef’s knife to slice the cooked chicken against the grain; this yields tender strips that melt in the mouth. When chopping lettuce, keep the pieces bite‑size to make rolling easier and prevent tearing the tortilla.
🌡️ Mastering the Cooking
Pre‑heat the skillet fully before adding the chicken; a hot surface creates a beautiful sear while sealing in juices. If you prefer a smoky flavor, finish the chicken under a broiler for the last 2 minutes. Always let the meat rest before slicing to retain its moisture.
🍽️ Presentation & Service
For an Instagram‑worthy presentation, cut the wrap at a slight angle and fan the halves on a white plate. Sprinkle a few extra shavings of Parmesan and a drizzle of dressing across the plate for visual contrast. Serve with a wedge of lemon for an extra burst of acidity if desired.
🏆 Pro Tips
Elevate your wrap from great to restaurant‑level with these professional insights.
- 🎯 Brine the Chicken: Soak the breasts in a light brine (1 tbsp salt dissolved in 1 cup water) for 15 minutes before cooking. This technique increases moisture retention, resulting in juicier meat.
- 🎯 Use a Microplane for Cheese: Grating Parmesan with a microplane yields finer particles that integrate more smoothly into the dressing, creating a silkier texture.
- 🎯 Toast the Tortilla Lightly: Warm the tortilla for 10 seconds on each side in the skillet before assembling. This prevents sogginess and adds a subtle toasted flavor.
- 🎯 Add Anchovy Paste Sparingly: For an authentic Caesar flavor, whisk ½ tsp anchovy paste into the dressing. It dissolves completely, delivering depth without a fishy aftertaste.
- 🎯 Balance Acidity: Taste the dressing after mixing; if it feels too sharp, balance it with a pinch of sugar or a dash of honey. This mirrors the classic restaurant technique of fine‑tuning flavor.
- 🎯 Rest the Assembled Wrap: Let the fully assembled wrap sit for 2‑3 minutes before cutting. This allows the flavors to meld and the dressing to settle, ensuring each bite is harmonious.
"A great wrap is all about balance—texture, flavor, and temperature must work together." — Chef Massimo Bottura
🔄 Variations & Adaptations
The Chicken Caesar Wrap is a versatile canvas. Below are ideas to tailor it to dietary preferences, flavor cravings, and seasonal ingredients.
🥬 Vegetarian/Vegan Version
Replace the chicken with grilled marinated tofu or tempeh. Marinate tofu cubes in soy sauce, lemon juice, and a touch of smoked paprika for 30 minutes, then sear until golden. Use a vegan Parmesan alternative made from cashews and nutritional yeast. The dressing can be made vegan by substituting the Parmesan with the same cashew blend and adding a splash of capers for umami.
- Swap chicken for 300 g firm tofu, pressed and cubed.
- Replace dairy Parmesan with ¼ cup blended cashew‑nutritional yeast mixture.
🌶️ Flavor Variations
Play with global inspirations by tweaking the dressing or adding complementary ingredients.
Spicy Version
Add ½ tsp red‑pepper flakes to the dressing and a drizzle of sriracha on the assembled wrap. For extra heat, incorporate thinly sliced jalapeños into the lettuce mix.
Mediterranean Version
Mix in chopped sun‑dried tomatoes and Kalamata olives into the lettuce. Replace the croutons with toasted pine nuts and use feta cheese instead of Parmesan for a briny twist.
Asian‑Inspired Version
Swap the lemon juice for rice vinegar, add a teaspoon of toasted sesame oil to the dressing, and include shredded carrots and cucumber strips. Finish with a sprinkle of toasted sesame seeds.
⚠️ Dietary Adaptations
Gluten‑Free
Use corn or almond flour tortillas, or simply replace the tortilla with a large collard green leaf for a low‑carb, gluten‑free wrap.
Lactose‑Free
Substitute Parmesan with a lactose‑free cheese or a nutritional‑yeast based “cheese” powder. Ensure the dressing uses olive oil and lemon without dairy.
Low‑Calorie
Reduce the olive oil to 1 tbsp, use low‑fat Greek yogurt in place of half the oil for a creamy yet lighter dressing, and opt for a whole‑grain or low‑calorie tortilla.
👶 Kid‑Friendly Version
Kids love milder flavors. Omit the anchovy paste, use a milder cheese such as mild cheddar, and add a few thin strips of apple for a sweet crunch. Serve the wraps cut into bite‑size pinwheels to make them fun and manageable.
📦 Storage & Reheating
🧊 Conservation
Refrigerator
- Duration: 3 days
- Recommended container: Airtight glass or BPA‑free plastic container
- Tip: Store the dressing separately to keep the lettuce crisp.
Freezer
- Duration: 1 month
- Method: Wrap each assembled but uncut wrap tightly in parchment, then place in a freezer bag.
- Defrosting: Transfer to the refrigerator overnight; reheat the chicken separately before assembling.
💡 Note: For best texture, reassemble fresh lettuce after thawing.
♨️ Reheating
🔥 Oven (Recommended)
- Preheat to 180 °C (350 °F).
- Wrap the wrap in aluminum foil to retain moisture.
- Heat for 8‑10 minutes.
- Remove foil and heat an additional 2 minutes to crisp the tortilla.
⚡ Microwave (Quick)
- Cover with a microwave‑safe lid.
- Heat on medium power for 45 seconds.
- Check temperature, stir the dressing, and heat another 15 seconds if needed.
🍳 Skillet
Heat a non‑stick skillet over medium heat, place the wrapped tortilla seam side down, and press gently for 2‑3 minutes until warmed through and slightly crisp.
🍷 Perfect Pairings
🥗 Side Dishes
- Quinoa Salad: Lightly tossed with lemon vinaigrette, it adds protein and a nutty texture.
- Grilled Asparagus: The charred flavor complements the smoky chicken.
- Caprese Skewers: Fresh mozzarella, tomato, and basil bring acidity that balances the rich dressing.
🍷 Wine & Beverage
- Chardonnay (unoaked): Its buttery notes echo the Parmesan while the acidity cuts through the richness.
- Pinot Grigio: Crisp and refreshing, it lifts the herbal elements.
- Non‑alcoholic: Sparkling water with a splash of lemon or a light iced green tea.
🍰 To Complete the Meal
Begin with a simple bruschetta topped with tomatoes and basil, followed by the Caesar wrap as the main course. Finish on a sweet note with a lemon panna cotta or a fresh berry parfait, both of which provide a light, palate‑cleansing finish.
❓ Frequently Asked Questions
Q: Can I use pre‑made Caesar dressing?
While pre‑made dressing is convenient, it often contains added sugars, preservatives, and a higher sodium content. Our homemade version delivers a fresher, more vibrant flavor and allows you to control the seasoning. If you must use store‑bought, choose a brand with minimal additives and add a squeeze of fresh lemon to brighten it.
Q: How do I keep the wrap from getting soggy?
The key is to keep the dressing separate until just before serving. Toss the lettuce with only a thin coating of dressing, and add the remaining dressing as a drizzle after the wrap is assembled. Additionally, lightly toasting the tortilla creates a barrier that helps retain crispness.
Q: What if I don’t have croutons?
Substitute with toasted pumpkin seeds, sliced almonds, or even a handful of crispy chickpeas. Each offers a satisfying crunch while adding a subtle nutty flavor that pairs well with the Caesar profile.
Q: Can I prepare the dressing ahead of time?
Absolutely. The dressing can be made up to 48 hours in advance. Store it in an airtight container in the refrigerator. Before using, give it a quick whisk to re‑emulsify any separation that may have occurred.
Q: How can I make this recipe lower in sodium?
Reduce the added salt when seasoning the chicken, use a low‑sodium Parmesan, and omit or limit the anchovy paste. The lemon juice and fresh herbs provide natural brightness that compensates for reduced salt.
Q: Is it possible to make this recipe gluten‑free?
Yes. Replace the flour tortillas with gluten‑free corn tortillas or large lettuce leaves. Ensure the croutons are gluten‑free, or swap them for toasted gluten‑free breadcrumbs or nuts.
🎉 Let’s Get Cooking!
This Chicken Caesar Wrap blends the timeless appeal of a classic salad with the convenience of a handheld meal. By mastering the homemade dressing, searing the chicken perfectly, and assembling with care, you’ll enjoy a dish that’s both wholesome and indulgent. The recipe’s flexibility means it can adapt to any dietary need or flavor craving, making it a reliable go‑to for weeknight dinners, picnics, or quick lunches.
I can’t wait to hear how you personalize it—whether you add a dash of spice, swap the protein, or experiment with new side dishes. Share your creations, leave a comment, and let’s keep the conversation delicious!
Have you tried this recipe?
Leave a comment and rating below! Share your photos on Instagram with #CaesarWrapMagic for a chance to be featured.
Chicken Caesar Wrap with Homemade Dressing
A handheld Caesar salad that’s fresh, flavorful, and perfect for any season.
📝 Ingredients
Chicken & Dressing
Wrap Assembly
👨🍳 Instructions
- Season the chicken with olive oil, garlic powder, salt, and pepper; let rest 5 minutes.
- Whisk the dressing by combining Dijon, lemon juice, Parmesan, garlic powder, and olive oil until smooth.
- Sear the chicken in a hot skillet 5‑6 minutes per side until internal temp 165 °F.
- Rest and slice the chicken into thin strips.
- Toss lettuce with half the dressing.
- Warm tortillas briefly on the skillet.
- Assemble each wrap with lettuce, chicken, croutons, Parmesan, parsley, and drizzle remaining dressing.
- Roll tightly and slice diagonally.
- Serve immediately with optional side salad or fruit.
- Enjoy! Share your creation on social media.
🥗 Nutrition (per serving)
*Nutrition facts are estimates based on standard ingredient values.
📚 You Might Also Like
Grilled Chicken Pesto Panini
Lemon Garlic Shrimp Tacos
Mediterranean Quinoa Salad
Spicy Thai Basil Beef
💬 Comments & Reviews
No comments yet. Be the first to share your thoughts!


Leave a Comment