
A vibrant, one‑pan Mexican‑inspired dinner that brings the sizzle of fajitas straight to your kitchen without the fuss.

When I first tasted a street‑style fajita in a bustling market in Mexico City, the smoky char of the chicken, the bright crunch of bell peppers, and the burst of citrusy lime created a memory that has lingered in my palate ever since. I tried to recreate that magic at home, but the endless chopping, multiple pans, and timing tricks often left me frustrated. One summer evening, while experimenting with a sheet‑pan method to simplify weeknight meals, the idea clicked: what if the whole fajita experience could be captured on a single pan?
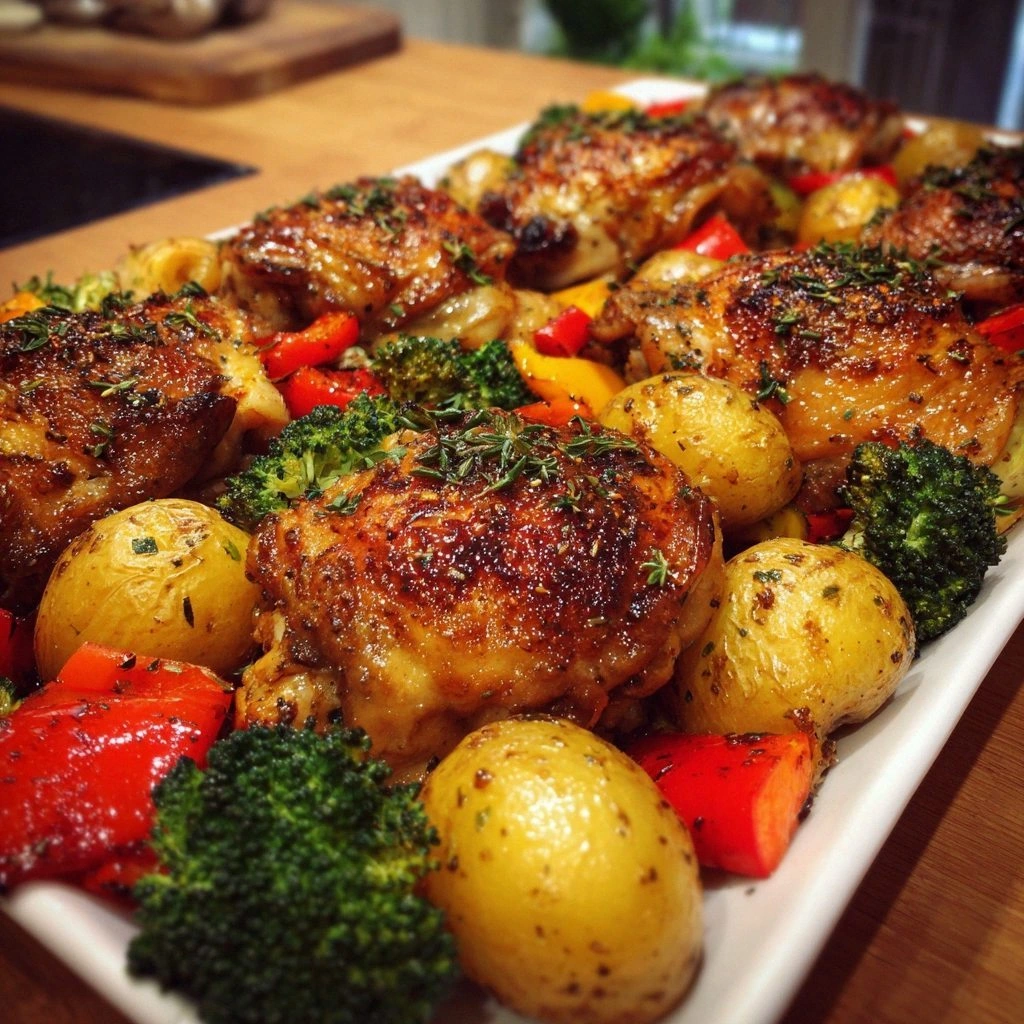
The Chicken Fajitas Sheet Pan is a celebration of Mexican flavors, streamlined for modern kitchens. By roasting the chicken and vegetables together, you get caramelized edges, smoky depth, and a gentle tenderness that mimics the traditional skillet method while cutting down on cleanup. The recipe is flexible enough for busy families, yet flavorful enough to impress guests at a casual dinner party.
In this guide, I’ll walk you through every step—from selecting the best cut of chicken to mastering the perfect balance of spices. You’ll discover why a simple drizzle of lime juice at the end makes all the difference, and how to adapt the dish for gluten‑free, low‑carb, or vegetarian preferences without sacrificing that signature fajita punch.
Grab your sheet pan, preheat the oven, and let’s dive into a fiesta of flavors that will become a staple in your culinary repertoire.
🌟 Why This Recipe Will Captivate You
This sheet‑pan fajita recipe blends convenience with bold, authentic taste, making it a go‑to for any occasion.
- ✨ One‑Pan Simplicity: All ingredients cook together on a single sheet pan, eliminating the need for multiple pots and pans, which means less cleanup and more time enjoying the meal.
- ✨ Balanced Flavors: The combination of smoky paprika, earthy cumin, and tangy lime creates a layered flavor profile that deepens as the vegetables caramelize.
- ✨ Customizable Heat: Adjust the amount of chili powder or add fresh jalapeños for a gentle warmth or a fiery kick, catering to every palate.
- ✨ Nutrient‑Rich: Lean chicken breast provides high‑quality protein while colorful bell peppers deliver vitamins A and C, making the dish both satisfying and wholesome.
- ✨ Versatile Serving: Serve with warm tortillas, over rice, or atop a fresh salad for a low‑carb twist—each option feels fresh and exciting.
- ✨ Crowd‑Pleaser: The vibrant colors and aromatic spices make this dish visually appealing and universally loved, perfect for family gatherings or casual get‑togethers.
🥗 Ingredients
📝 Complete Ingredient List
For the Chicken & Vegetables:
For the Fajita Seasoning:
For Garnish & Serving:

🔍 Focus on Key Ingredients
Chicken Breast
Chicken breast is the protein backbone of this dish, offering lean, tender meat that absorbs the bold spices beautifully. For optimal juiciness, choose breasts with a uniform thickness; if they vary, pound them gently to even them out. This ensures even cooking and prevents dry edges.
Bell Peppers
The trio of red, green, and yellow peppers not only adds a rainbow of colors but also contributes varying levels of sweetness and slight bitterness. Their natural sugars caramelize in the oven, creating a subtle smoky flavor that pairs perfectly with the spices.
Fajita Seasoning Blend
This blend of chili powder, cumin, smoked paprika, and optional cayenne creates a depth of flavor that mimics traditional skillet‑cooked fajitas. Toasting the spices briefly with the oil before they coat the chicken and vegetables helps release aromatic oils, intensifying the overall taste.
🔄 Quick Substitutions
| If you don’t have... | Use instead... |
|---|---|
| Chicken breast | Skinless chicken thighs (more forgiving) |
| Smoked paprika | Regular paprika + a pinch of chipotle powder |
| Cilantro | Fresh parsley or a squeeze of lime for brightness |
👨🍳 Step‑by‑Step Instructions
Follow these detailed steps to achieve perfectly charred chicken and vegetables, all while keeping the kitchen mess to a minimum.
📋 Phase 1: Preparation & Mise en Place
Gather, measure, and prep all components before the oven gets hot.
Preheat the Oven and Prepare the Sheet Pan
Set your oven to 425°F (220°C) and line a large rimmed sheet pan with parchment paper or a silicone mat. This temperature ensures a quick sear on the chicken while allowing the vegetables to caramelize without drying out. Lightly drizzle a thin layer of olive oil on the pan to prevent sticking.
Slice the Chicken and Vegetables
Trim any excess fat from the chicken breasts, then cut them into thin strips about ½ inch wide. Slice the bell peppers into match‑stick sized strips and the onion into thin half‑moons. Uniform pieces ensure even cooking and consistent texture throughout the dish.
Mix the Seasoning Blend
In a small bowl, combine chili powder, cumin, smoked paprika, garlic powder, onion powder, and cayenne (if using). Stir until the spices are evenly distributed. This blend will coat every bite with a balanced heat and smoky aroma.
🔥 Phase 2: Cooking & Assembly
Combine, season, and roast to achieve that signature fajita char.
Season the Chicken and Veggies
In a large mixing bowl, toss the chicken strips, bell pepper slices, and onion with olive oil, ensuring each piece is lightly coated. Sprinkle the seasoning blend over the mixture and toss again until everything is uniformly seasoned. The oil helps the spices adhere and promotes even browning.
Spread on the Sheet Pan
Arrange the seasoned chicken and vegetables in a single, even layer on the prepared sheet pan. Avoid overcrowding; the pieces should have a little space to release steam and develop a caramelized exterior. If needed, use two pans.
Roast in the Oven
Place the pan in the preheated oven and roast for 20‑25 minutes, turning the pieces halfway through. The chicken should reach an internal temperature of 165°F (74°C) and the vegetables should be tender with slightly crisp edges. A quick visual cue: the peppers will develop a gentle char and the chicken edges will turn golden brown.
✨ Phase 3: Finishing Touches & Plating
Add fresh elements and serve while hot.
Finish with Lime and Cilantro
Once out of the oven, immediately drizzle the freshly squeezed lime juice over the hot mixture. This brightens the flavors and cuts through the richness. Toss in chopped cilantro for a fresh, herbaceous finish.
Warm the Tortillas
While the fajita mixture rests, wrap the tortillas in foil and warm them in the oven for 5 minutes, or heat them individually on a dry skillet for 30 seconds per side. Warm tortillas stay pliable and prevent tearing when you load them with the filling.
Assemble and Serve
Place a generous spoonful of the chicken‑pepper mixture onto each tortilla. Top with sour cream, shredded cheese, and avocado slices. Serve immediately with extra lime wedges on the side for those who love an extra zing.
💡 Expert Tips & Tricks
🛒 Choosing the Right Ingredients
Opt for fresh, firm chicken breasts without any pink spots; this ensures safety and flavor. When selecting bell peppers, choose ones that are glossy and free of blemishes. The skin should be taut—soft spots indicate overripeness, which can lead to soggy textures when roasted.
🔪 Preparation Techniques
Slice the chicken against the grain to keep each bite tender. For the vegetables, a uniform thickness of about ¼‑½ inch guarantees that they cook at the same rate as the chicken. Pat the chicken dry with paper towels before seasoning; excess moisture can prevent the spices from adhering.
🌡️ Mastering the Cooking Process
High heat is essential for caramelization. If your oven runs cool, increase the temperature by 10‑15°F. Keep an eye on the pan during the last 5 minutes; a quick broil for 2 minutes can add an extra char without overcooking the meat.
🍽️ Presentation & Service
Arrange the finished fajita strips in a colorful pile on a serving platter, garnish with extra cilantro, and place lime wedges around the edge. Serving on a rustic wooden board adds a tactile element that enhances the dining experience.
🏆 Pro Tips
Elevate your fajitas from delicious to restaurant‑quality with these professional insights.
- 🎯 Brine the Chicken: Submerge the chicken strips in a light brine (1 tsp salt per cup of water) for 15 minutes before seasoning. This simple step increases moisture retention, resulting in juicier meat after roasting.
- 🎯 Use a Cast‑Iron Sheet Pan: A heavy‑duty cast‑iron pan distributes heat evenly, producing a superior crust on both chicken and vegetables while minimizing hot spots.
- 🎯 Add a Touch of Smoke: Sprinkle a pinch of smoked sea salt or a few drops of liquid smoke into the seasoning blend for an authentic outdoor‑grill flavor without the grill.
- 🎯 Layer Flavors with a Finish Sauce: Mix a tablespoon of Greek yogurt with lime zest, a dash of chipotle in adobo, and a drizzle of honey. Drizzle this over the finished fajitas for a creamy, sweet‑heat contrast.
- 🎯 Temperature Check with a Probe: Insert an instant‑read thermometer into the thickest piece of chicken; pulling it out at 160°F (71°C) and letting it rest for 3 minutes brings it to the safe 165°F while keeping it juicy.
- 🎯 Rest Before Serving: Allow the roasted chicken and vegetables to rest for 3‑5 minutes after removing from the oven. This redistribution of juices prevents them from spilling out when you fold the tortilla.
"Great cooking is about balance—heat, flavor, and timing. When you master those, every dish sings." — Thomas Keller
🔄 Variations & Adaptations
Feel free to experiment with this base recipe to suit dietary preferences, flavor cravings, or seasonal produce.
🥬 Vegetarian/Vegan Version
Replace the chicken with firm tofu cubes or sliced portobello mushrooms. Marinate them in the same seasoning blend, adding a tablespoon of soy sauce for depth. For a vegan twist, swap sour cream with cashew crema and use a plant‑based cheese.
- Tofu: Press and cube 14‑oz block, then toss in seasoning.
- Portobello: Slice 4 large caps, brush with oil, and season.
🌶️ Flavor Variations
Switch up the spice profile to keep the dish exciting throughout the year.
Spicy Version
Increase cayenne to 1 tsp, add 1 diced jalapeño, and finish with a drizzle of chipotle hot sauce.
Mediterranean Version
Swap cumin for oregano, add sliced olives and sun‑dried tomatoes, and serve with a side of tzatziki.
Asian‑Inspired Version
Replace the fajita seasoning with a mixture of five‑spice powder, ginger, and soy sauce; garnish with sesame seeds and sliced scallions.
⚠️ Dietary Adaptations
Gluten‑Free
Use corn tortillas instead of flour, and ensure any pre‑made seasoning blend is certified gluten‑free.
Lactose‑Free
Swap sour cream for coconut yogurt and use dairy‑free cheese alternatives.
Low‑Calorie
Reduce olive oil to 1 tablespoon, increase the proportion of vegetables, and serve with lettuce wraps instead of tortillas.
👶 Kid‑Friendly Version
Omit the cayenne and reduce the lime juice to a mild drizzle. Serve the chicken and veggies over a bed of rice or quinoa, and let kids assemble their own soft tacos with mild cheese and a dollop of plain yogurt.
📦 Storage & Reheating
🧊 Conservation
Refrigerator:
- Duration: 3 days
- Container: Airtight glass or BPA‑free plastic container
- Tip: Store the sauce separately to keep tortillas from getting soggy.
Freezer:
- Duration: 2 months
- Method: Portion the cooked chicken and veggies into freezer‑safe bags, remove excess air.
- Defrost: Overnight in the refrigerator or use the microwave’s defrost setting.
💡 For best texture, reheat only the protein and vegetables; add fresh toppings after reheating.
♨️ Reheating
🔥 Oven (Recommended):
- Preheat to 350°F (175°C).
- Cover the dish with aluminum foil to retain moisture.
- Heat for 10‑12 minutes, then uncover and bake an additional 3‑4 minutes to restore crispness.
⚡ Microwave (Quick):
- Place a portion on a microwave‑safe plate, cover with a microwave‑safe lid.
- Heat on medium power for 1‑2 minutes, stir, then continue in 30‑second bursts until hot.
🍳 Stovetop:
Heat a splash of oil in a skillet over medium heat, add the leftovers, and sauté for 4‑5 minutes, stirring occasionally, until warmed through.
🍷 Perfect Pairings
🥗 Side Dishes
- Mexican Street Corn (Elote): Char‑grilled corn slathered with mayo, cotija, chili powder, and lime adds a sweet‑savory contrast.
- Black Bean Salad: A refreshing mix of black beans, corn, cilantro, and a citrus vinaigrette balances the richness.
- Guacamole: Creamy avocado with red onion, jalapeño, and lime provides a cool, buttery counterpoint.
🍷 Wine & Beverage Pairings
- Rosé (dry): Its crisp acidity cuts through the richness of the chicken and cheese.
- Mexican Lager (e.g., Pacifico): Light and refreshing, it complements the spices without overwhelming.
- Non‑Alcoholic: A sparkling lime‑mint agua fresca adds a bright, festive note.
🍰 Complementary Courses
Start with a light cucumber‑lime soup or a fresh pico de gallo salsa. For dessert, consider a churro‑style cinnamon‑sugar doughnut or a mango‑coconut sorbet to cleanse the palate.
❓ Frequently Asked Questions
Q: Can I use bone‑in chicken thighs instead of breasts?
A: Absolutely. Bone‑in thighs add extra flavor and stay juicier during roasting. Reduce the cooking time by 3‑4 minutes to avoid overcooking, and ensure the internal temperature reaches 165°F.
Q: How do I prevent the vegetables from becoming soggy?
A: Make sure the vegetables are dry before tossing with oil and spices. Spreading them in a single layer on the pan and avoiding overcrowding allows steam to escape, resulting in caramelized edges rather than steamed softness.
Q: Is it necessary to use a sheet pan, or can I use a regular baking tray?
A: A rimmed sheet pan works best because the sides keep any juices from spilling over. If you only have a standard baking tray, line it with parchment and keep an eye on the liquid level, basting as needed.
Q: What can I substitute for lime juice if I don’t have fresh limes?
A: A mix of 1 tablespoon white wine vinegar plus a splash of orange juice mimics the acidity and subtle sweetness of lime. Add a pinch of zest if you have dried lime peel.
Q: Can I make this recipe ahead of time for a party?
A: Yes. Prepare the seasoned chicken and vegetables, store them in the fridge, and roast them just before serving. This reduces on‑the‑spot prep time and ensures everything stays hot and fresh.
Q: How do I adjust the recipe for a larger crowd?
A: Multiply all ingredient quantities by the desired factor (e.g., double for 8 servings). The portion adjuster on the recipe card will automatically recalculate quantities for you.
🎉 Let’s Get Cooking!
Chicken Fajitas Sheet Pan brings together the bold, smoky flavors of classic fajitas with the convenience of a single‑pan method. The caramelized vegetables, juicy chicken, and fresh lime‑cilantro finish make every bite a celebration. Whether you’re feeding a family of four or scaling up for a gathering, the built‑in portion adjuster ensures you have the right amounts every time.
Give this recipe a try tonight, snap a photo of your colorful platter, and share your experience in the comments below. Your feedback helps us refine the recipe and inspire others to bring a little fiesta to their kitchens.
Have you tried this recipe?
Leave a comment and rating below! Share your photos on Instagram with #FajitaSheetPan to be featured.
Chicken Fajitas Sheet Pan
A vibrant one‑pan Mexican‑inspired dinner that’s quick, tasty, and perfect for any night.
📝 Ingredients
Chicken & Veggies
Seasoning
Garnish & Serving
👨🍳 Instructions
- 1 Preheat oven to 425°F (220°C) and line a sheet pan with parchment.
- 2 Slice chicken, bell peppers, and onion into uniform strips.
- 3 Toss everything with olive oil and the fajita seasoning blend.
- 4 Spread the mixture evenly on the pan; roast 20‑25 minutes, turning halfway.
- 5 Drizzle fresh lime juice and sprinkle cilantro once out of the oven.
- 6 Warm tortillas in foil for 5 minutes or on a skillet.
- 7 Assemble tacos with chicken, veggies, sour cream, cheese, and avocado.
- 8 Serve immediately with lime wedges and extra cilantro.
- 9 Store leftovers in airtight containers; reheat using recommended methods.
- 10 Enjoy the vibrant flavors and share your creation on social media!
🥗 Nutritional Information (per serving)
*Values are estimates based on standard ingredient brands.
📚 You Might Also Like
Shrimp Fajita Sheet Pan
Vegetarian Black Bean Fajitas
Steak Fajita Burrito Bowls


💬 Comments & Reviews
Leave a Comment
No comments yet. Be the first to share your thoughts!