It was a Saturday night, the kind of night that starts with a burnt lasagna and ends with a kitchen that smells like disappointment. I stared at the charred edges of the pasta, feeling the sting of regret that could have been avoided with a simple timer. Then, in a moment of culinary desperation, I opened the pantry and found a bag of dark chocolate sandwich cookies, a tub of unsalted butter, and an unopened jar of cocoa powder. That was the spark that turned a disaster into a daring experiment: a custard that would melt on the tongue and a crust that would crunch like a fresh snowfall. If you’re still clinging to that burnt lasagna memory, consider this a fresh start.
Picture the first bite: a silky custard that pours like molten chocolate, the cookie crust giving way with a satisfying crack, and the aroma of dark chocolate mingling with the faintest hint of sea salt. The texture is a study in contrasts—soft, rich, and utterly indulgent—while the flavor is a deep, bittersweet chocolate that lingers like a secret whispered in a quiet room. The moment you taste it, I dare you to stop and not go back for seconds. I’ll be honest—I ate half the batch before anyone else even got a spoon. That’s the kind of confidence that comes from knowing every ingredient, every step, every trick that makes this recipe a masterpiece.
What sets this version apart is not just the combination of ingredients but the way they’re brought together with precision and a dash of audacity. Most chocolate custard recipes end up too watery or too dense, but this one balances the richness of dark chocolate with the lightness of a cookie crumb base. The crust is buttery and crisp, yet it holds the custard without soaking through. The secret is a simple technique that turns ordinary chocolate into a velvety sauce that coats the palate like a velvet blanket. And that’s just the tip of the iceberg—there’s a hidden layer of flavor that only emerges when you let the custard set just right.
Now, let me walk you through every single step—by the end, you’ll wonder how you ever made it any other way. The first thing you’ll notice is the way the kitchen feels alive, the hum of the mixer, the faint crackle of butter melting. The aroma of chocolate will rise, promising a dessert that is both comforting and daring. This isn’t just a recipe; it’s a revelation that will change the way you think about chocolate desserts forever.
What Makes This Version Stand Out
- Depth of Flavor: The use of dark chocolate sandwich cookies as a base adds a subtle nutty undertone that elevates the custard from ordinary to extraordinary. The combination of chocolate and sea salt creates a dynamic flavor profile that dances on the tongue. This depth is what makes the dessert unforgettable.
- Texture Mastery: The cookie crust is buttery and crisp, while the custard is silky and thick enough to hold its shape. The result is a harmonious contrast that feels like a perfectly balanced symphony. The crust’s crunch is a delightful counterpoint to the custard’s smoothness.
- Ingredient Simplicity: With just a handful of high‑quality ingredients, you get a dessert that feels luxurious without the fuss. The recipe uses pantry staples in a way that feels both approachable and sophisticated. It’s the kind of dish that makes a crowd swoon.
- Make‑Ahead Flexibility: The custard sets quickly, allowing you to assemble the dessert hours before the party starts. The crust can be pre‑baked and stored, and the custard can be refrigerated for up to 24 hours. This makes it ideal for entertaining.
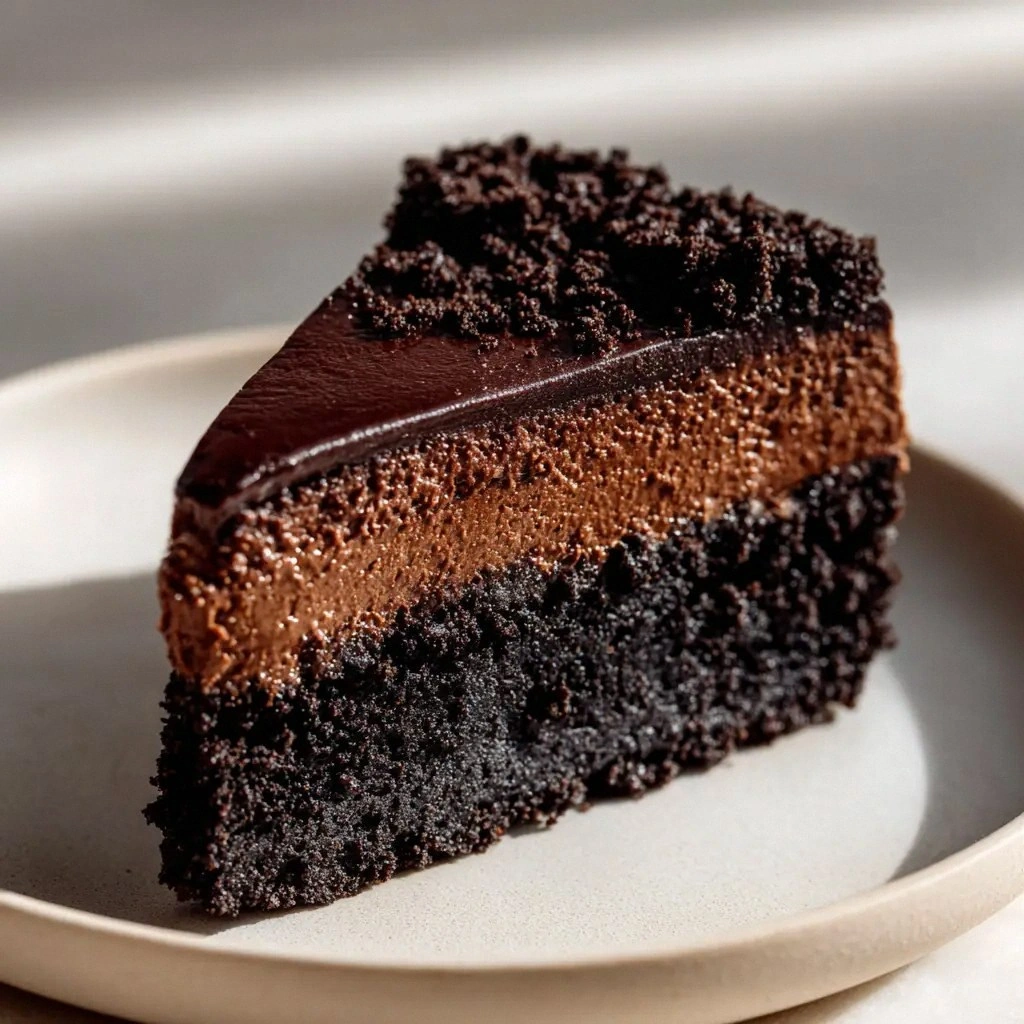
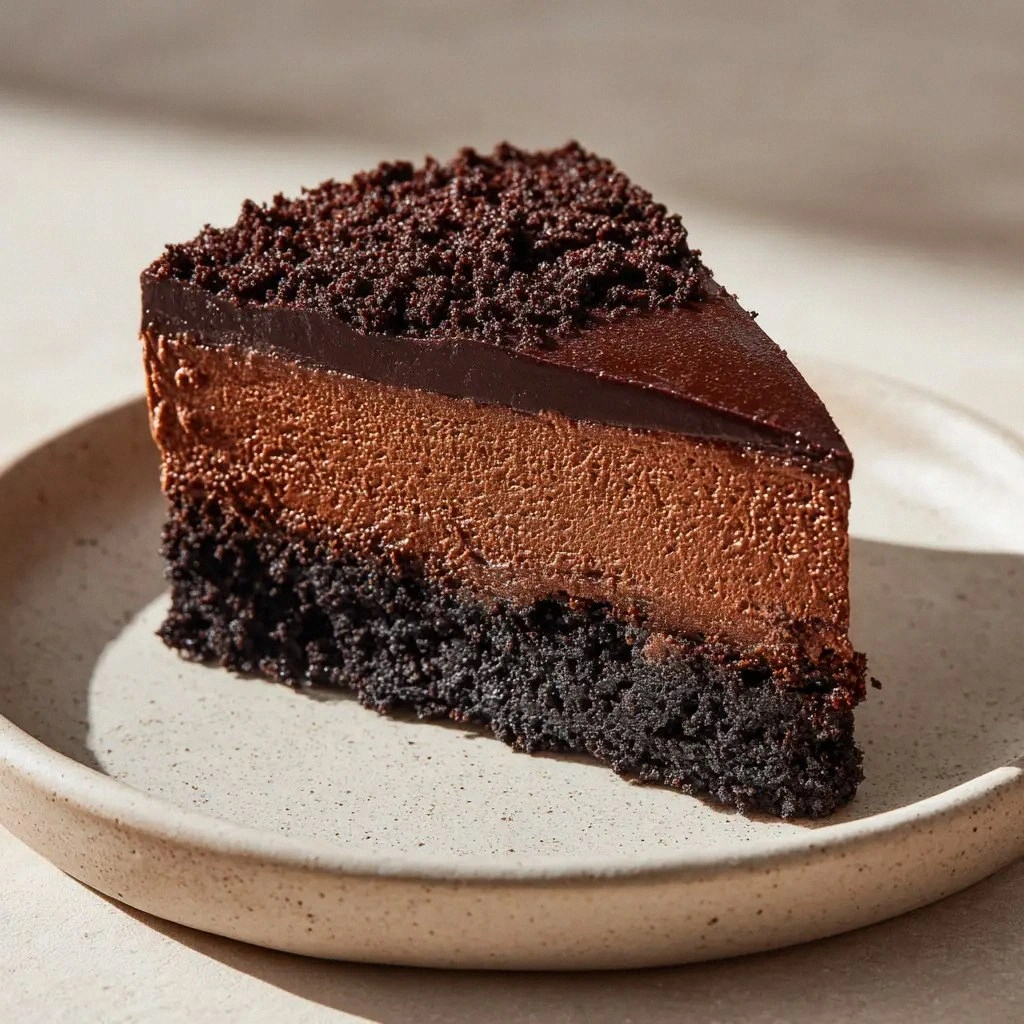
- Visual Appeal: The glossy custard atop a dark, crumbly crust looks like a piece of art. When you slice into it, the custard oozes, creating a dramatic, Instagram‑ready presentation. This visual drama is part of what makes the dessert irresistible.
- Flavor Versatility: The base can be adapted with different chocolate types or cookie varieties, letting you tailor it to any palate. You can swap dark chocolate for milk chocolate or add a splash of espresso for a mocha twist. The recipe’s flexibility keeps it fresh and exciting.
Inside the Ingredient List
The Flavor Base
Dark chocolate sandwich cookies are the cornerstone of this dessert. Their caramelized sugar and buttery crumbs provide a savory backdrop that balances the richness of the custard. If you skip them, the crust will be bland and the custard will feel flat. A good rule of thumb is to choose a cookie that contains real chocolate chips rather than artificial flavoring.
Unsalted butter is used twice, first for the crust and then for the custard. The butter melts into the cookie crumbs, creating a cohesive base that holds the custard together. In the custard, butter adds a silky mouthfeel and enhances the chocolate’s depth. If you’re watching calories, you can substitute half the butter with a neutral oil, but the texture will change slightly.
The Texture Crew
Whole milk and heavy cream form the liquid foundation of the custard. The milk provides body, while the heavy cream adds richness and a velvety finish. Together, they create a custard that’s thick enough to hold its shape but not so dense that it becomes heavy. If you prefer a lighter dessert, replace the heavy cream with half‑and‑half or a splash of milk.
Egg yolks are the secret glue that binds everything together. They give the custard its glossy sheen and a slightly custardy bite. The yolks also help the custard set firmly, preventing it from sliding off the crust. Using fresh, large yolks is essential; don’t try to substitute with a mix of whites and yolks, as that will alter the texture.
Cornstarch is the thickening agent that gives the custard its perfect consistency. It’s added in small increments to avoid lumps and to maintain a silky mouthfeel. If you’re gluten‑free, cornstarch is a safe choice, but you can also use arrowroot for a slightly different texture. Keep in mind that cornstarch needs to be cooked fully to neutralize its raw taste.
The Unexpected Star
Granulated sugar is the sweetener that balances the bitterness of dark chocolate. It also helps the custard caramelize slightly at the edges, creating a subtle contrast in flavor. If you prefer a sugar‑free version, you can replace it with a low‑glycemic sweetener, but the texture may change.
Cocoa powder adds depth and a hint of earthy bitterness that complements the chocolate. It’s also responsible for the custard’s vibrant color. When using cocoa powder, sift it into the mixture to avoid lumps. If you’re short on cocoa, a small amount of melted chocolate can serve as a substitute.
The Final Flourish
Dark chocolate is the star of the custard, giving it a luxurious, bittersweet flavor. It’s melted and folded into the mixture, ensuring a smooth, uniform taste. Use a high‑quality chocolate with at least 70% cacao for the best flavor profile. If you’re using a lower‑cacao chocolate, you may need to adjust the amount of sugar to balance the bitterness.
Fine sea salt is the finishing touch that brightens every bite. It cuts through the sweetness and enhances the chocolate’s richness. A pinch is enough; too much will overpower the delicate balance. This is where the magic happens—salt is the unsung hero of desserts.
Everything’s prepped? Good. Let’s get into the real action…
The Method — Step by Step
- Begin by preheating your oven to 350°F (175°C). In a medium bowl, combine the cookie crumbs, 6 Tbsp of unsalted butter, and a pinch of sea salt. Use a fork or a rolling pin to ensure the butter is evenly distributed. When the butter is fully melted, the mixture should feel like wet sand. This is the moment that sets the foundation for a crisp, buttery crust.
- Press the mixture firmly into the pan, forming a tight, even layer. Bake for 12 minutes, or until the edges turn a light golden brown. Remove from the oven and let it cool completely on a wire rack. Cooling is crucial; if you try to add the custard while the crust is still warm, it will become soggy. Once the crust is cool, it will hold the custard perfectly.
- While the crust cools, whisk together the milk, heavy cream, egg yolks, cornstarch, and sugar in a saucepan. Keep the mixture at a low heat, stirring constantly. The mixture should thicken and become glossy. This is the stage where the custard starts to develop its silky texture. Be careful not to let it boil; that will cause the eggs to scramble.
- Melt the dark chocolate in a heat‑proof bowl over a pot of simmering water. Stir until smooth, then fold it into the custard mixture. The chocolate should melt fully, giving the custard a deep, glossy sheen. This step is where the dessert’s richness is truly born. The chocolate should not be too hot; otherwise, it will affect the custard’s consistency.
- Add the remaining 2 Tbsp of unsalted butter to the custard. Stir until the butter is fully incorporated, giving the custard a buttery sheen. The butter also helps the custard set properly. Pour the custard over the cooled crust, spreading it evenly with a spatula. The custard should settle into the cracks of the crust, creating a beautiful pattern.
- Return the pan to the oven and bake for 20 minutes, or until the custard is set and the top has a slight golden hue. Watch closely; the custard should not brown too much. The watch‑out here is that if you bake it too long, the custard will become rubbery. Keep an eye on the timer and remove it at the right moment.
- Let the custard cool to room temperature, then refrigerate for at least 4 hours or overnight. This chilling step allows the custard to set fully and the flavors to meld. When you’re ready to serve, run a knife around the edges of the pan to release the custard. The result is a glossy, decadent dessert that will leave your guests begging for more.
- Just before serving, dust the top with a light dusting of cocoa powder or a sprinkle of sea salt for an extra burst of flavor. Optionally, garnish with fresh berries or a swirl of whipped cream. The final presentation should be elegant yet approachable. This dessert is perfect for a special occasion or a casual gathering; it’s a showstopper that will impress anyone.
That’s it—you did it. But hold on, I’ve got a few more tricks that’ll take this to another level.
Insider Tricks for Flawless Results
The Temperature Rule Nobody Follows
The key to a silky custard is maintaining a low, steady temperature. If the mixture gets too hot, the eggs will coagulate too quickly, resulting in a grainy texture. Use a candy thermometer to keep the mixture below 170°F (77°C). This small step saves you from a disastrous custard that feels like a rubbery pudding.
Why Your Nose Knows Best
Smelling the custard as it cooks is a simple yet powerful technique. A subtle, caramelized scent indicates that the custard is developing the right flavor profile. If the scent is flat or overly sweet, the mixture may need more time or a touch more chocolate. Trust your nose; it’s the most reliable indicator of doneness.
The 5‑Minute Rest That Changes Everything
After removing the custard from the oven, let it rest on the counter for exactly five minutes before refrigerating. This pause allows the custard to set gently, preventing cracks from forming. A friend once tried skipping this step and the custard cracked like a fragile vase. That’s why the five‑minute rest is essential.
The Crumb‑Crust Balance
The ratio of butter to cookie crumbs is critical. Too much butter will make the crust soggy; too little will leave it crumbly. Aim for a 1:1 ratio by weight—about 6 Tbsp of butter for every 2.5 cups of crumbs. This balance ensures a crisp, buttery base that holds the custard perfectly.
The Final Dusting
A light dusting of cocoa powder or sea salt right before serving can elevate the flavor profile. The cocoa powder adds a subtle bitterness that complements the chocolate, while the sea salt enhances the sweetness. Experiment with different salts—coconut salt or smoked sea salt can add a unique twist.
These tricks are not optional; they’re the difference between a good dessert and a legendary one.
Creative Twists and Variations
This recipe is a playground. Here are some of my favorite ways to switch things up:
Espresso Infusion
Add 1 Tbsp of cold espresso to the custard mixture before baking. The espresso deepens the chocolate flavor and adds a subtle bitter note that pairs wonderfully with the sweetness. It’s a perfect choice for coffee lovers and adds a sophisticated edge.
Minty Freshness
Stir in 1 Tbsp of chopped fresh mint into the custard before pouring it over the crust. The mint adds a refreshing contrast to the rich chocolate, making it ideal for a summer gathering. A few fresh mint leaves as garnish give it a pop of color.
Nutty Crunch
Fold in ½ cup of toasted almond or hazelnut pieces into the crust before baking. The nuts add a delightful crunch and a nutty undertone that complements the chocolate. This variation is great for those who love a bit of texture.
Coconut Twist
Replace half of the dark chocolate with unsweetened shredded coconut and add 1 Tbsp of coconut oil to the custard. The coconut adds a tropical flavor that pairs well with the chocolate. A sprinkle of toasted coconut on top gives a final crunchy finish.
Lemon Zest Surprise
Add 1 Tbsp of lemon zest to the custard for a bright, citrusy note that cuts through the richness. The lemon zest also adds a subtle aroma that makes the dessert feel fresh and vibrant. Pair it with a drizzle of lemon curd for an extra zing.
Chocolate Ganache Finish
After the custard has set, pour a thin layer of dark chocolate ganache over the top. The ganache adds a glossy finish and an extra layer of chocolate intensity. Let it set before slicing for a dramatic, multi‑layered dessert.
Storing and Bringing It Back to Life
Fridge Storage
Store the custard in an airtight container in the refrigerator for up to 3 days. The custard will remain firm and flavorful. Before serving, let it sit at room temperature for about 10 minutes to soften slightly. This ensures a silky mouthfeel when you cut a slice.
Freezer Friendly
Wrap the custard tightly in plastic wrap and place it in a freezer‑safe container. Freeze for up to 2 weeks. Thaw in the refrigerator overnight before serving. The texture may be slightly firmer, but the flavor remains intact.
Best Reheating Method
To revive a chilled custard, place it in a heat‑proof bowl and set it over a pot of simmering water. Stir gently until warmed through, being careful not to overheat. Add a tiny splash of water before reheating—this steams the custard back to perfection, restoring its silky texture.