It began with a kitchen catastrophe that still haunts my kitchen dreams. I was attempting a classic sugar cookie, but the dough collapsed into a soggy mess that looked more like a melted puddle than a cookie. The aroma of burnt sugar filled the air, and my friends stared at me with pitying eyes. That night, I swore I would never again serve a cookie that tasted like a failed experiment. The next morning, I found a recipe online that promised a buttery, condensed milk cookie that melts in your mouth, and I decided to give it a shot.
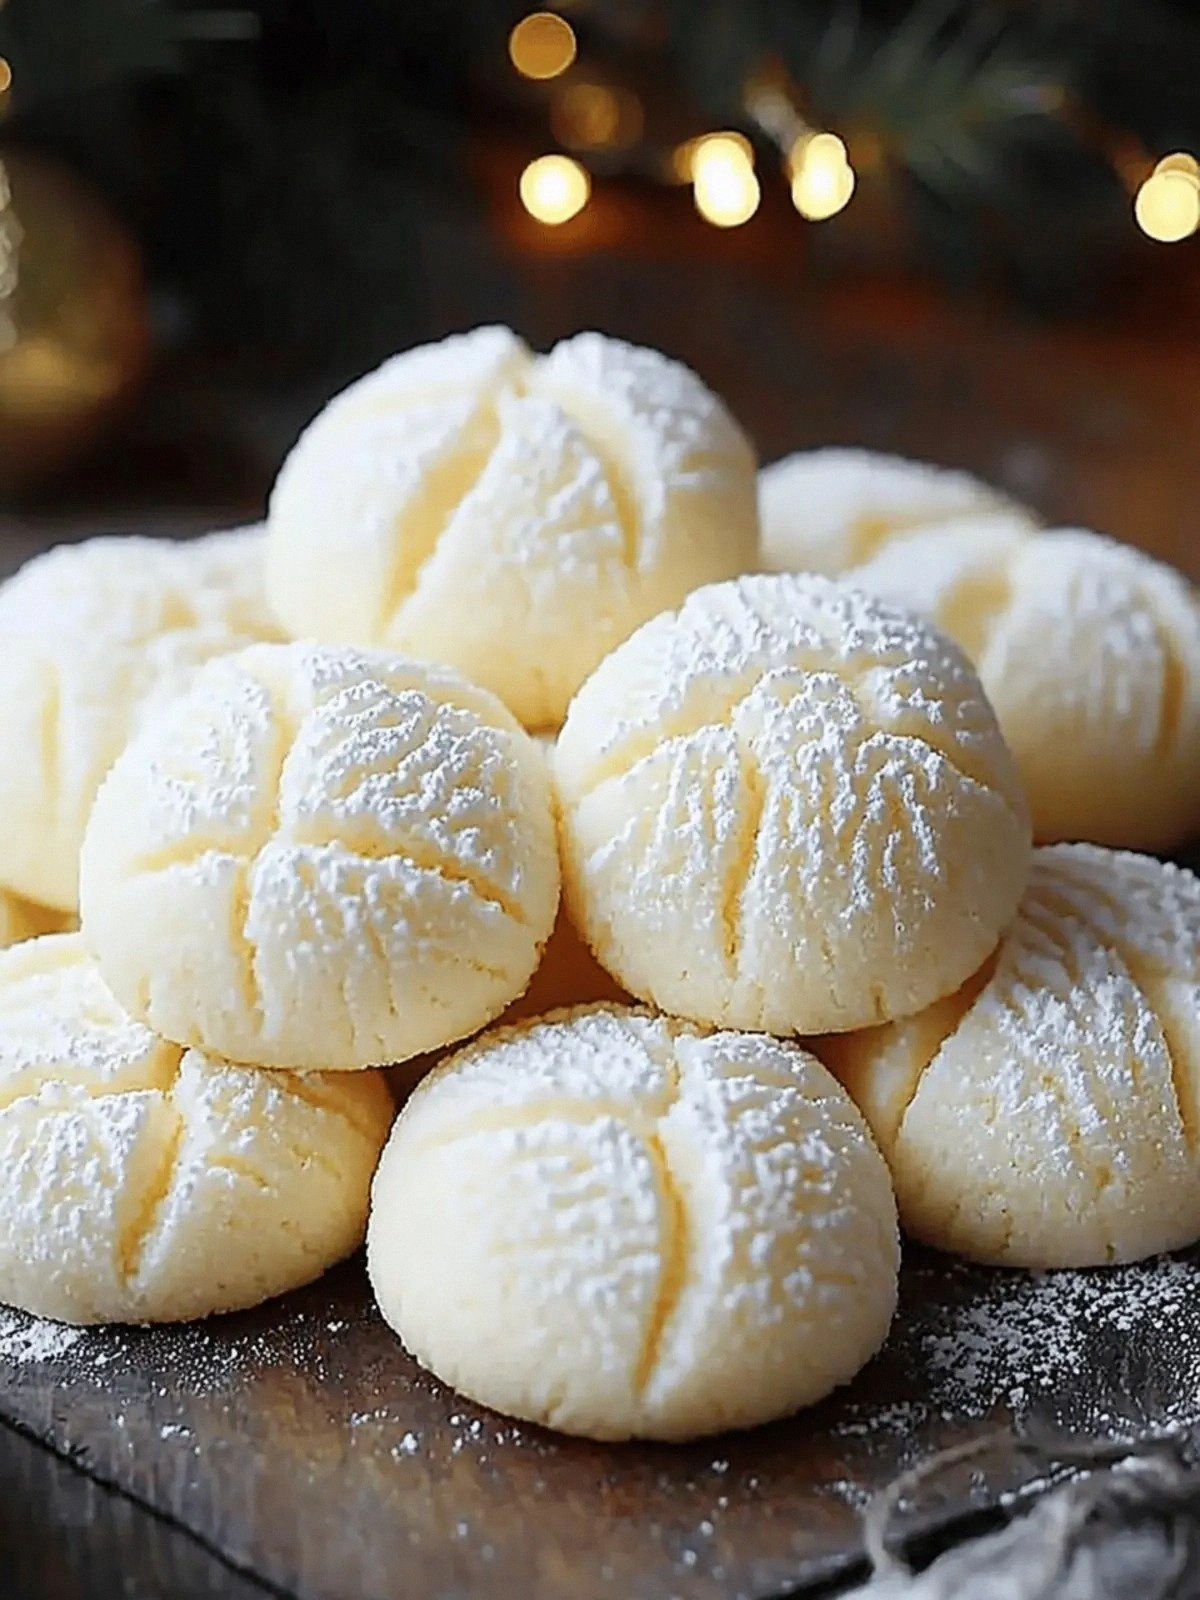
When I first opened the can of sweetened condensed milk, the scent was rich, caramel-like, and utterly irresistible. The buttery smell that followed as I melted the butter in a saucepan was like a warm hug from a childhood memory. The sound of the butter sizzling was a comforting crackle, and the texture of the dough felt silky smooth as I mixed it. When I finally baked the cookies, the aroma that filled the kitchen was a sweet, buttery perfume that made my mouth water even before I tasted the first bite. The moment I took that first bite, the cookie’s exterior was crisp, while the center was a gooey, creamy cloud that melted instantly.
What makes this version stand out is that it balances texture and flavor perfectly. The condensed milk provides a deep caramel sweetness that cuts through the buttery richness without overpowering it. The addition of baking powder gives the cookies a subtle lift, ensuring they are not too dense or heavy. The simple ingredient list keeps the recipe approachable for even novice bakers. The technique I discovered—browning the butter before adding the condensed milk—creates a nutty undertone that elevates the entire cookie. Most recipes get this completely wrong by skipping the butter browning step or using the wrong ratio of ingredients. I dare you to taste this and not go back for seconds.
This is hands down the best version you'll ever make at home. The combination of silky dough, crisp edges, and a caramelized butter finish is a game-changer. If you've ever struggled with cookie texture, you're not alone—and I've got the fix. Picture yourself pulling this out of the oven, the whole kitchen smelling incredible, and everyone lining up for a bite. Let me walk you through every single step—by the end, you'll wonder how you ever made it any other way.
What Makes This Version Stand Out
- Flavor: The condensed milk brings a deep, caramelized sweetness that pairs beautifully with the buttery base, creating a cookie that feels indulgent yet balanced.
- Texture: The careful browning of butter gives a nutty crunch on the edges while keeping the center delightfully soft and almost melt-in-your-mouth.
- Ease: With only five ingredients and no specialized equipment, this recipe is a breeze even for the most inexperienced bakers.
- Uniqueness: The use of sweetened condensed milk instead of powdered sugar is a twist that many cookie recipes overlook, giving this version a signature flavor.
- Crowd Reaction: Friends who taste these cookies often comment that they taste like a bakery treat, and they keep asking for the recipe.
- Ingredient Quality: Using high‑quality butter and fresh condensed milk elevates the flavor profile, making each bite a luxurious experience.
Inside the Ingredient List
The Flavor Base
Butter is the heart of any cookie, and in this recipe, it takes center stage. The 1 cup of butter provides a rich, creamy foundation that melts beautifully when baked. If you use a lower‑fat butter, the cookies will turn out drier and less flavorful. A good tip: let the butter sit at room temperature for 30 minutes before melting it; this helps achieve an even melt without clumping.
The Sweetener
Sweetened condensed milk is the star that gives these cookies their signature caramel sweetness. The 1 can of condensed milk is a thick, syrupy liquid that coats the dough like velvet, ensuring every bite is moist and decadent. If you’re looking for a slightly lighter version, you can replace half of the condensed milk with whole milk, but the texture will shift toward a more traditional cookie.
The Texture Crew
All‑purpose flour and baking powder work together to create the cookie’s structure. The 2 cups of flour provide the bulk and hold everything together, while the 1 teaspoon of baking powder gives a subtle lift that keeps the cookies from being too flat. Skipping the baking powder will result in denser cookies that may not spread properly during baking.
The Final Flourish
Powdered sugar is used sparingly to sweeten the dough without adding extra moisture. The 1 cup of powdered sugar balances the sweetness from the condensed milk, ensuring the cookies are not overwhelmingly sweet. If you prefer a crunchier texture, you can substitute the powdered sugar with a light dusting of cocoa powder for a chocolatey twist.
Everything's prepped? Good. Let's get into the real action.
The Method — Step by Step
- Step 1: Prepare the butter. In a medium saucepan, melt the butter over medium heat. Stir constantly until it turns a golden amber color and releases a nutty aroma. This process, called browning, adds depth to the flavor and ensures the cookies have a crisp edge. Once browned, remove the pan from heat and allow it to cool slightly before adding the condensed milk.
- Step 2: Combine butter and condensed milk. Pour the sweetened condensed milk into the browned butter while stirring vigorously. The mixture should look silky and slightly thickened. Taste a small amount; it should have a caramelized note with a hint of toasted butter. This step is crucial for achieving the signature melt-in-your-mouth center.
- Step 3: Whisk in the dry ingredients. In a separate bowl, sift together the all‑purpose flour and baking powder to avoid clumps. Add the powdered sugar gradually, whisking until the mixture is smooth. Gradually fold the dry mixture into the wet batter, stirring until just combined. Overmixing will create tough cookies, so stop as soon as the flour is incorporated.
- Step 4: Chill the dough. Cover the dough with plastic wrap and refrigerate for at least 30 minutes. Chilling helps the butter solidify slightly, giving the cookies a better rise and preventing excessive spreading. If you’re short on time, you can bake the cookies immediately, but the texture will be slightly different.
- Step 5: Preheat the oven. Set your oven to 350°F (175°C) and line a baking sheet with parchment paper. A preheated oven ensures even baking and a golden crust. While the oven heats, scoop tablespoon-sized portions of dough onto the sheet, spacing them 2 inches apart.
- Step 6: Bake to perfection. Place the sheet in the oven and bake for 12–15 minutes. The cookies should appear lightly golden at the edges but still soft in the center. Watch the time closely; overbaking will turn them hard and lose the melt-in-your-mouth quality.
- Step 7: Cool on a rack. Remove the cookies from the oven and let them rest on the sheet for 3 minutes before transferring them to a wire rack. This brief rest allows the cookies to set and the center to firm slightly, making them easier to handle.
- Step 8: Serve and enjoy. Serve the cookies warm for the ultimate melt-in-your-mouth experience. Pair them with a glass of cold milk or a cup of espresso for a balanced flavor. If you’re preparing for a gathering, keep the cookies in an airtight container at room temperature; they stay fresh for up to a week.
That's it — you did it. But hold on, I've got a few more tricks that'll take this to another level. Keep reading for insider tips that will make your cookies even more unforgettable.
Insider Tricks for Flawless Results
The Temperature Rule Nobody Follows
Many bakers bake at a high heat to get a quick crust, but this cookie thrives at a moderate temperature. Baking at 350°F (175°C) allows the butter to melt slowly, creating a tender center while the edges crisp just enough. If you bake at 375°F, the cookies will spread too much and lose their characteristic texture.
Why Your Nose Knows Best
Before you even touch the dough, give it a sniff. A slight nutty aroma indicates the butter has browned properly. If the scent is flat, it means the butter didn’t get enough time on the heat, and the cookies will taste bland.
The 5-Minute Rest That Changes Everything
After you take the cookies out of the oven, let them rest on the baking sheet for exactly 5 minutes. This brief pause allows the heat to distribute evenly, ensuring the center stays moist while the edges finish crisping. Skipping this step can result in a cookie that is too soft to hold its shape.
Use a Baking Sheet with a Lightly Oiled Rim
If you prefer a more pronounced crisp on the bottom, lightly oil the rim of your baking sheet before placing parchment paper on top. The oil creates a slight barrier that prevents the cookies from sticking and encourages even browning.
Cool the Dough Before Baking
Refrigerating the dough not only helps the butter solidify but also reduces the spread of the cookies. A chilled dough results in a thicker cookie that maintains its shape better during baking.
Creative Twists and Variations
This recipe is a playground. Here are some of my favorite ways to switch things up:
Cocoa‑Infused Delight
Swap the powdered sugar with an equal amount of unsweetened cocoa powder and add a splash of vanilla extract. The result is a rich, chocolatey cookie that still retains the melt-in-your-mouth center. Perfect for chocolate lovers.
Nutty Crunch
Fold in a cup of chopped toasted almonds or pecans before baking. The nuts add a satisfying crunch and a nutty aroma that complements the caramelized butter. A delightful variation for those who enjoy texture.
Spiced Surprise
Add a pinch of cinnamon, nutmeg, or cardamom to the dry mix. The spices give the cookies a warm, aromatic profile that pairs well with a cup of chai or coffee. Ideal for cooler evenings.
Sea‑Salted Caramel
After baking, sprinkle a pinch of flaky sea salt over the warm cookies. The salt enhances the caramel sweetness and creates a delightful contrast. A simple tweak that elevates the flavor.
Mini Cookie Bars
Press the dough into a baking pan to make bars instead of individual cookies. Bake until golden and slice into squares. These bars are perfect for parties or as a portable snack.
Storing and Bringing It Back to Life
Fridge Storage
Store the cookies in an airtight container in the refrigerator for up to two weeks. The cold temperature preserves the buttery flavor and prevents the cookies from becoming stale. When ready to eat, let them sit at room temperature for 10 minutes to soften.
Freezer Friendly
For longer storage, place the cookies in a freezer bag and freeze for up to three months. When you’re ready to indulge, thaw them at room temperature for 30 minutes. The cookies will retain their texture and flavor.
Best Reheating Method
Reheat the cookies in a preheated oven at 300°F (150°C) for 5 minutes. Add a tiny splash of water to the baking sheet before reheating; the steam helps revive the soft center without drying out the edges. This technique brings the cookies back to their original melt-in-your-mouth glory.