I was halfway through a midnight snack, the kitchen lights flickering like a campfire, when I realized I had no idea how to salvage the last cake mix box that had somehow ended up in my pantry. The scent of chocolate wafted through the air, and my stomach growled louder than a bass drum. I stared at the box, then at the handful of candy eyes I had left from last Halloween, and a wild idea sparked like a firecracker. I was going to turn that abandoned cake mix into the most unforgettable dessert anyone could ever taste. I dare you to taste this and not go back for seconds.
Picture the kitchen as a stage: the clatter of bowls, the hiss of the mixer, the gentle hum of the fridge. The chocolate aroma is the spotlight, the sweet frosting the spotlight’s glow, and the white chocolate glaze the shimmering curtain. The sound of the spoon scraping the bowl is the applause, and the first bite is the standing ovation. I could almost hear the crunch of the candy eyes as they pop against a velvet tongue. That moment feels like a fireworks display in your mouth, with every bite echoing a burst of flavor.
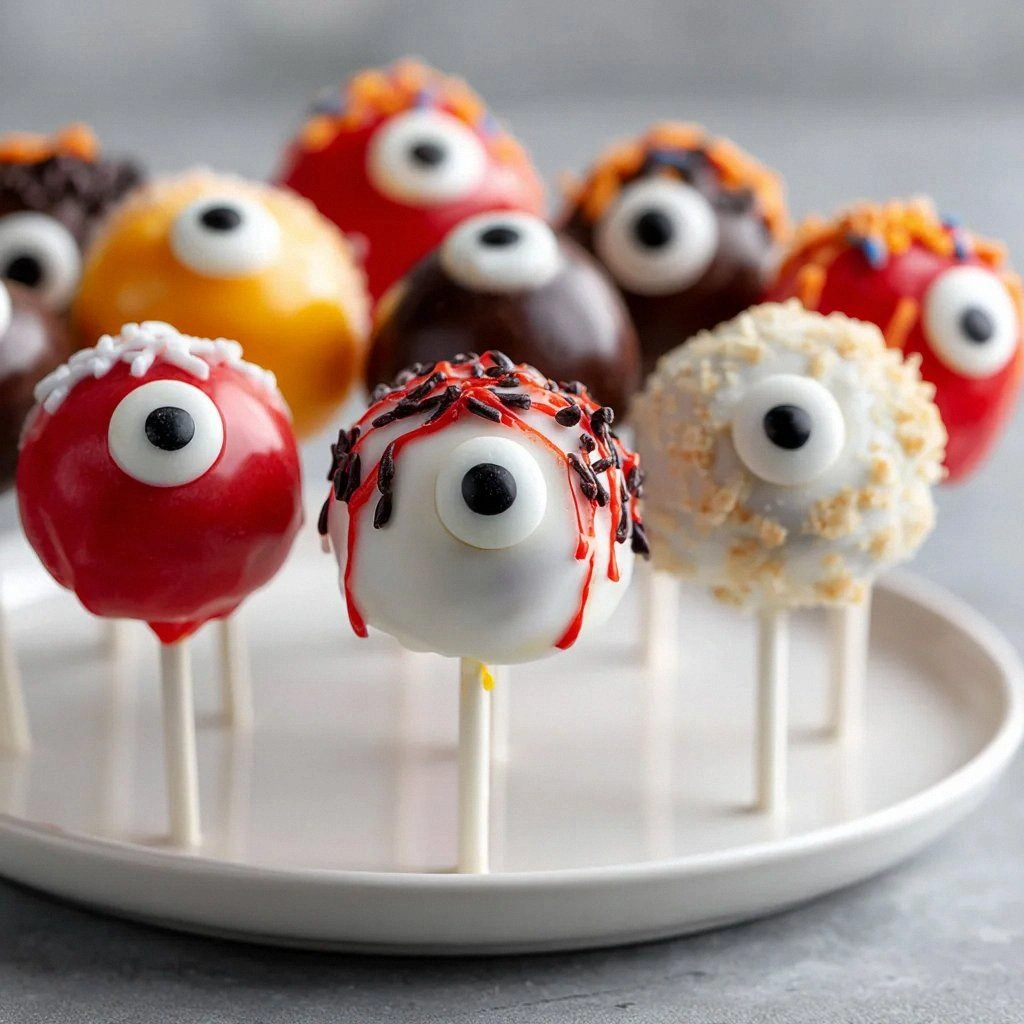
This recipe is not just another cake pop. It’s a meticulously engineered confection that balances rich chocolate, silky buttercream, and glossy white chocolate into a single bite. The candy eyes provide a playful crunch that contrasts the creamy interior, while the black veins give a dramatic, almost macabre twist. The result is a dessert that is both visually stunning and irresistibly tasty. Most cake pop recipes get this completely wrong—here’s what actually works. The secret is in the proportions, the timing, and the little details that make each pop a masterpiece.
I’m not just telling you how to make it; I’m inviting you to join me in a culinary adventure. I’ll walk you through every single step, from mixing the batter to decorating the final product. By the end, you’ll wonder how you ever made it any other way. Let me walk you through every single step — by the end, you'll wonder how you ever made it any other way.
What Makes This Version Stand Out
- Taste: The chocolate base is deep and velvety, while the buttercream adds a subtle tang that cuts through the richness. The white chocolate glaze gives a silky finish that melts in your mouth. Together they create a flavor profile that feels both indulgent and balanced.
- Texture: The cake pop core is moist but firm enough to hold its shape, and the candy eyes add a satisfying crunch. The glaze coats the surface like a velvet blanket, providing a smooth contrast to the popping candy. The result is a multi-sensory experience that keeps your mouth moving.
- Simplicity: Every step uses common pantry staples, and the process can be completed in under an hour. Even if you’re a beginner, you’ll find the instructions clear and straightforward. The only specialized items are the candy eyes and lollipop sticks, both of which are widely available.
- Uniqueness: The eyeball motif gives this dessert a spooky, playful aesthetic that stands out at parties. The black veins and candy eyes transform ordinary cake pops into a carnival of visual intrigue. It’s a conversation starter that’s as delicious as it is eye-catching.
- Crowd Reaction: Friends and family will rave about the fun design and the addictive flavor. The bite‑sized portions are perfect for sharing, and the spooky look is especially popular during Halloween. This recipe is guaranteed to become a favorite at any gathering.
- Ingredient Quality: Using a high‑quality cake mix ensures a rich base, while a creamy buttercream adds depth. The white chocolate melts are smooth and glossy, preventing any chalky residue. The candy eyes are fresh, bright, and add a fun crunch.
- Make‑Ahead Potential: Once coated, the cake pops can be stored for up to a week in the fridge or frozen for longer. They reheat quickly and retain their texture. This makes them a perfect make‑ahead dessert for busy weeks.
- Versatility: Swap the cake mix flavor or frosting type to create new variations. The recipe is flexible enough to accommodate dietary preferences, such as dairy‑free frosting or vegan cake mix. It’s a recipe that can evolve with your tastes.
Inside the Ingredient List
The Flavor Base
The cake mix is the heart of these eyeball cake pops. It provides the foundational sweetness and chocolate depth that makes every bite feel indulgent. If you opt for a vanilla mix, the result will be lighter, but the contrast between the vanilla and white chocolate glaze will still be delightful. Skipping the cake mix would leave the pops too bland and lacking structure. A high‑quality mix ensures a moist crumb that holds up during the coating process. When selecting a mix, look for one with a balanced sugar content; too sweet, and the frosting will taste cloying.
The Texture Crew
Frosting is the glue that binds the cake mixture to the lollipop stick and gives the pops a creamy interior. A classic buttercream works best, as its silky consistency allows it to be rolled into neat balls. If you prefer a tangier flavor, switch to a cream cheese frosting; the slight tartness complements the chocolate base. The frosting also serves as a barrier against the glaze, preventing the white chocolate from soaking into the cake. If you skip the frosting, the pops will feel dry and lack the rich mouthfeel that makes them addictive. For an extra touch of decadence, swirl in a few drops of espresso or liqueur into the frosting.
The Unexpected Star
White chocolate melts are the secret to that glossy, almost ethereal coating. They melt smoothly at low temperatures, creating a silky glaze that sets into a perfect sheen. If you use chocolate chips instead of melts, the glaze will be uneven and might crack as it cools. A pinch of sea salt in the glaze can enhance the chocolate flavor and add a subtle contrast. When melting, keep the heat low and stir constantly to avoid scorching. The white chocolate also carries the food coloring, giving the veins a vibrant, realistic look.
The Final Flourish
Food coloring is essential for the spooky veins that give these cake pops their iconic look. A few drops of red and black gel food coloring create a striking contrast that looks almost photographic. If you’re worried about the colors fading, mix the food coloring into the frosting before rolling the pops; this distributes the pigment evenly. The candy eyes are the crowning glory, adding a playful crunch and a pop of color. Without them, the pops would feel incomplete and less engaging. Finally, lollipop sticks provide the structural support that keeps the pops upright and ready for serving.
Everything's prepped? Good. Let's get into the real action...
The Method — Step by Step
- Start by preheating your oven to 350°F (175°C). Line a baking sheet with parchment paper. This ensures a clean release and prevents sticking. The aroma of the baking batter will begin to fill the kitchen, signaling that the adventure is underway. Keep an eye on the timer—overbaking will dry out the cake base, which is a nightmare for cake pops.
- In a large bowl, combine the cake mix with the required wet ingredients—water, oil, and eggs—following the package instructions. Whisk until the batter is smooth and free of lumps. A smooth batter ensures that the cake pops will be uniform in texture. If you notice any clumps, give it another quick whisk to dissolve them.
- Transfer the batter to the prepared pan and bake for 18–22 minutes, or until a toothpick inserted in the center comes out clean. This step is crucial; a partially baked cake will collapse when you roll it. While the cake is baking, melt the white chocolate melts in a double boiler or microwave, stirring every 20 seconds until smooth.
- Once baked, let the cake cool completely on a wire rack. A hot cake will melt the frosting and glaze. Cooling also helps the cake absorb the buttercream without becoming soggy. This step might feel tedious, but patience is the secret to a perfect pop.
- Cut the cooled cake into small cubes, about 1 inch each. The cubes should be uniform in size to ensure even coating. If they’re too large, they’ll be hard to roll into balls. If they’re too small, they’ll crumble easily. Use a sharp knife or a cookie cutter for precision.
- Place the cubes in a mixing bowl and fold in the buttercream until each cube is fully coated. The buttercream acts as a binding agent, allowing the cubes to be rolled into neat spheres. Use a spatula to gently mix, ensuring each cube is evenly covered. This step can be a bit sticky—wear gloves if you’re prone to a messy kitchen.
- Roll the coated cubes into balls, about the size of a golf ball. Insert a lollipop stick into each ball, pushing it through the center. The sticks keep the pops upright and make them easy to eat. If the balls are too soft, refrigerate them for 10 minutes to firm up before inserting the sticks.
- Dip each ball into the melted white chocolate, ensuring a complete coating. Tap off excess glaze and place the coated pops on a parchment-lined tray. Let the glaze set for about 5 minutes. This is the moment of truth—watch the glaze harden into a glossy shell.
- While the glaze is still tacky, apply a few drops of red food coloring to create veins. Use a small paintbrush or a toothpick to spread the color, mimicking the look of an eyeball. The veins should be thin and realistic; too thick will look artificial. Let the veins dry for a minute before adding the candy eyes.
- Place the candy eyes on each pop, positioning them to look like living eyes. The candy should be pressed gently so it sticks without cracking the glaze. If you’re nervous about the placement, use a toothpick to guide the eye. Once all pops are decorated, refrigerate them for an additional 10–15 minutes to set the glaze completely.
That's it — you did it. But hold on, I've got a few more tricks that'll take this to another level. Stay with me here — this is worth it.
Insider Tricks for Flawless Results
The Temperature Rule Nobody Follows
Many bakers assume that room temperature is fine for frosting, but a slight chill in the frosting makes it easier to roll. Keep the buttercream in the fridge for 10 minutes before mixing it with the cake. The colder frosting holds its shape better, preventing the cake from sinking into the glaze. If you’re in a hurry, a quick dip in the freezer works just as well.
Why Your Nose Knows Best
When the cake is baking, trust the scent rather than the timer. A golden-brown top and a faint chocolate aroma indicate that the cake is ready. If the cake smells undercooked, give it a few extra minutes. The aroma is the best indicator of doneness, especially when you’re juggling multiple tasks.
The 5-Minute Rest That Changes Everything
After you roll the cake into balls, let them rest for 5 minutes before coating. This pause allows the buttercream to set, giving the balls a firm structure. It also reduces the likelihood of the glaze cracking when you dip the pops. A quick rest is a small step that saves you from a big mess later.
The Quick Chill Trick
If your kitchen is warm and the glaze is drying too fast, place the coated pops in the fridge for a few minutes. The cold air helps the glaze set evenly, preventing streaks and cracks. This trick is especially useful when you’re prepping a large batch.
The Color Balance Play
Use a small amount of black food coloring to create the veins, but don’t overdo it. A light touch gives a more realistic look. If you find the veins too pale, add a second drop, but mix thoroughly to avoid a muddy color. The right balance makes the pops look like they’re truly alive.
The Final Touch
After all pops are decorated, give them a final rinse with a little water to remove any dust from the glaze. This step keeps the pops looking pristine and ready for display. A quick wipe with a damp cloth works well, but be gentle to avoid smudging the glaze.
Creative Twists and Variations
This recipe is a playground. Here are some of my favorite ways to switch things up:
Minty Madness
Swap the chocolate cake mix for a mint chocolate chip version and add a few drops of green food coloring to the glaze. The fresh mint flavor pairs beautifully with the creamy buttercream, creating a refreshing twist on the classic pop.
Caramel Crunch
Use a caramel frosting instead of buttercream and drizzle a thin caramel glaze over the top. The caramel adds a buttery sweetness that complements the chocolate base, while the candy eyes give a fun visual contrast.
Nutty Delight
Add chopped toasted almonds or hazelnuts to the cake mixture before baking. The nutty crunch provides an unexpected texture, and the nuts pair well with the chocolate and buttercream flavors.
Vegan Vibes
Replace the buttercream with a dairy‑free frosting made from coconut cream. The coconut adds a subtle tropical note, making the pops a perfect treat for vegan gatherings.
Spiced Surprise
Incorporate a pinch of cinnamon or pumpkin spice into the cake mix. The warm spices give the pops a seasonal feel, ideal for fall parties or holiday celebrations.
Chocolate Explosion
Use a double chocolate cake mix and a chocolate frosting for a rich, chocolate‑heavy pop. The extra chocolate layers create an indulgent experience for chocolate lovers.
Storing and Bringing It Back to Life
Fridge Storage
Store the finished cake pops in an airtight container in the refrigerator for up to a week. The glaze will firm up, making the pops easier to handle. When you’re ready to serve, let them sit at room temperature for 10 minutes to soften the glaze slightly.
Freezer Friendly
For longer storage, place the cake pops on a parchment‑lined tray and freeze them for up to three months. Once frozen, transfer them to a zip‑lock bag. When you’re ready to enjoy them, thaw at room temperature for 15 minutes before serving.
Best Reheating Method
To revive the glaze, gently warm the cake pops in a microwave at 50% power for 10–15 seconds. Add a tiny splash of water before reheating to create steam that helps the glaze soften without melting. This trick keeps the pops looking fresh and glossy.