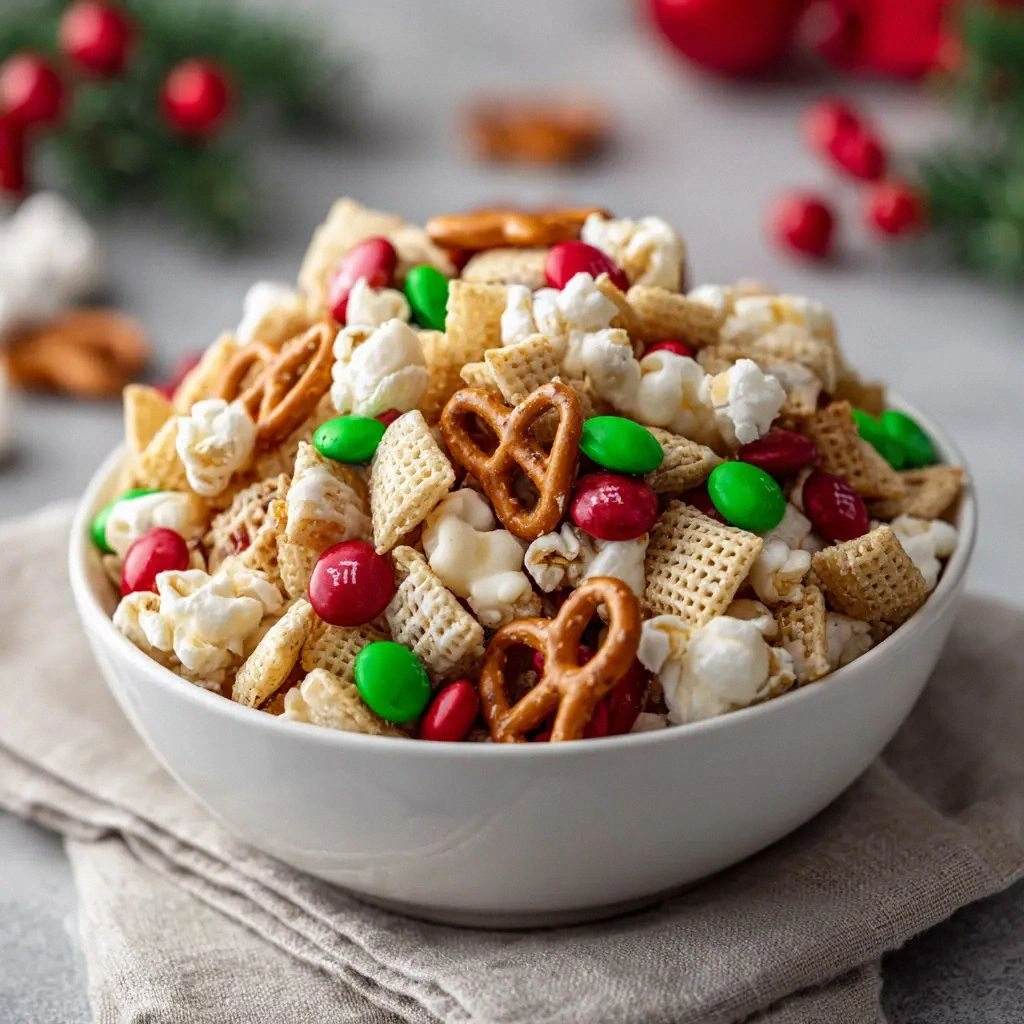
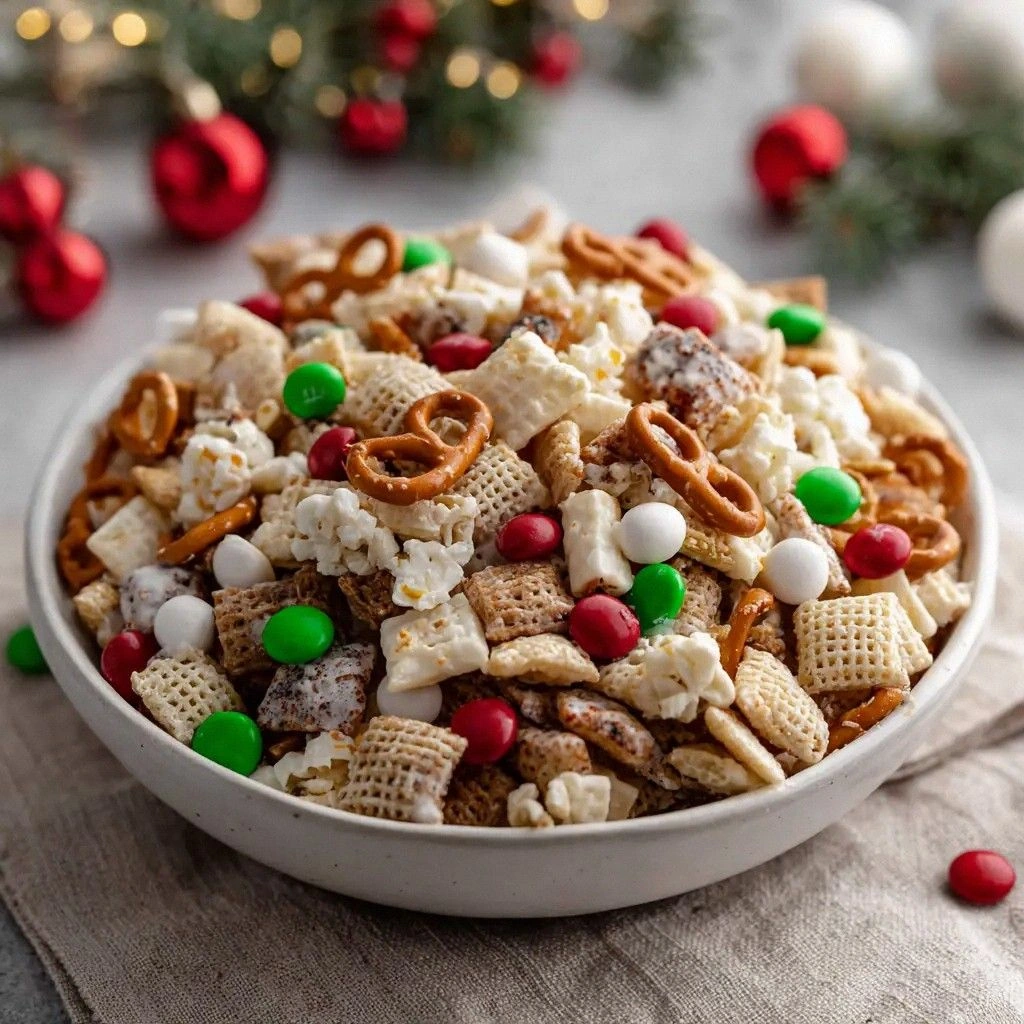
Picture this: it’s the middle of December, the kitchen lights are humming, and your pantry looks like a winter wonderland of boxed cereals, pretzels, and chocolate chips. I was staring at a box of Rice Chex that had been sitting there since last year’s New Year’s bash, wondering if it could rise to something more than a sad, crunchy snack. Then a friend texted, “I’m craving something festive but gluten‑free—any ideas?” The answer? A single bowl of magic that turned ordinary pantry staples into a holiday treat that tastes like a snowy forest of candy canes and cocoa‑kissed crunch.
The first time I mixed these ingredients, the scent that hit me was like a buttery, nutty snowstorm. The sound of the peanut butter and butter sizzling together was a soft hiss that promised gooey delight. The sight of the golden, glimmering M&Ms and sprinkles was a visual Christmas card that made my eyes sparkle. The texture—crunchy cereal, salty pretzels, and a silky peanut butter coating—was a contrast that felt like walking on a crisp, freshly fallen blanket and then slipping into a warm, chocolatey hug. I tasted the first bite and my tongue did a little dance, and I knew I’d just discovered a new holiday staple.
Why does this version stand out? It’s not just another “cheat” dessert; it’s a carefully balanced symphony of sweet, salty, and buttery flavors that play together like a well‑tuned choir. Most recipes that try to replicate this treat fall short because they either over‑sweeten the mix or under‑cook the peanut butter coating, leaving the texture soggy or too brittle. I’ve tweaked the ratios, the baking time, and even the type of cereal to ensure that every bite delivers that signature crunch and that melt‑in‑your‑mouth finish. And the best part? It’s gluten‑free, so everyone at the holiday table can indulge without worry. I dare you to taste this and not go back for seconds.
If you’ve ever struggled to find a dessert that feels festive yet stays within your dietary limits, you’re not alone—and I’ve got the fix. Picture yourself pulling this out of the oven, the whole kitchen smelling incredible, and watching your friends’ faces light up as they reach for that first square. I’ve spent hours experimenting, and this is hands down the best version you'll ever make at home. Stay with me here—this is worth it. Let me walk you through every single step, and by the end, you’ll wonder how you ever made it any other way.
What Makes This Version Stand Out
- Flavor: The combination of sweet chocolate chips, salty mini pretzels, and buttery peanut butter creates a layered taste profile that feels both nostalgic and novel. Each bite starts with a crunch, followed by a creamy, nutty center, and finishes with a sugary, festive sparkle from the M&Ms.
- Texture: The crunchy cereal and pretzels provide a satisfying snap, while the peanut butter coating keeps the mixture cohesive. The result is a snack that is not too dry, yet not overly sticky—a sweet spot that’s hard to find in other gluten‑free desserts.
- Simplicity: No fancy equipment or obscure ingredients are required; a saucepan, a baking sheet, and a handful of pantry staples are all you need. This makes it an ideal quick holiday treat for both novice cooks and seasoned chefs.
- Uniqueness: The use of Christmas sprinkles and holiday M&Ms gives it a distinct seasonal flair that sets it apart from generic cereal bars.
- Crowd Reaction: Friends and family consistently rave about the treat, calling it “the best snack I’ve ever had.” The visual appeal and festive color palette also make it a showstopper at gatherings.
- Ingredient Quality: Using high‑quality, gluten‑free cereal and real butter rather than margarine elevates the flavor profile and ensures a richer taste.
- Cooking Method: The method of melting the butter and peanut butter together creates a smooth, glossy coating that clings to the mix, giving it a professional finish.
- Make‑Ahead Potential: Once baked, the bars hold up for several days in an airtight container, making it perfect for last‑minute holiday parties.
Alright, let's break down exactly what goes into this masterpiece…
Inside the Ingredient List
The Crunch Crew
Rice Chex or Corn Chex cereal forms the backbone of this treat. Their light, airy structure absorbs the peanut butter coating without becoming soggy. If you prefer a heartier crunch, switch to a thicker cereal like Corn Flakes, but keep the quantity the same to maintain balance. Skipping this step will leave you with a bland, pretzel‑only snack that lacks the signature “snowy crunch.”
The Salty Stars
Gluten‑free mini pretzels add a delightful salty contrast to the sweetness. They also help hold the mixture together, preventing it from falling apart after cooling. If you’re on a low‑sodium diet, choose a reduced‑salt version, but be sure to add a pinch of sea salt afterward to restore the flavor harmony. The pretzels can be replaced with gluten‑free crackers if you want a different texture profile.
The Sweet Surprise
Semi‑sweet chocolate chips are the sweet heart of the dish, offering a rich, chocolatey bite that melts in your mouth. They also act as a binder, ensuring the bars stay together after baking. If you prefer a darker, more intense chocolate flavor, swap them for dark chocolate chips, but reduce the amount slightly to avoid overpowering the other flavors. The chocolate chips will melt into a glossy coating that gives the bars a luxurious finish.
The Final Flourish
Holiday M&Ms and Christmas sprinkles add the final pop of color and festive flair. They also contribute a subtle crunch and a burst of candy flavor that makes each bite feel like a holiday surprise. If you’re looking for a more subtle visual effect, replace the M&Ms with crushed candy canes or peppermint candies. These additions also give the bars a festive aroma that instantly signals the season.
Everything's prepped? Good. Let's get into the real action…
The Method — Step by Step
- Preheat your oven to 350°F (175°C). Line a 9‑inch square baking pan with parchment paper or lightly grease it with butter. Gather all your ingredients so they’re within arm’s reach; this will keep the process smooth and efficient. The preheated oven ensures even baking, preventing the edges from burning while the center stays soft. If you’re cooking for a crowd, consider using two pans to save time.
- In a large mixing bowl, combine the Rice Chex or Corn Chex cereal, gluten‑free mini pretzels, semi‑sweet chocolate chips, powdered sugar, holiday M&Ms, and Christmas sprinkles. Toss everything together until the mix is even. This dry blend forms the texture base; it’s essential that the chocolate chips are evenly distributed so each bite has that chocolatey surprise. If you notice any clumps, gently break them up with a spoon.
- In a small saucepan, melt the unsalted butter over medium heat until it’s liquid but not browned. Add the creamy peanut butter and vanilla extract, whisking constantly until the mixture is smooth and glossy. The butter and peanut butter blend creates a sticky coating that binds the dry ingredients together. Keep the heat low enough that the mixture stays liquid; if it starts to separate, add a splash of milk to re‑emulsify.
- Pour the warm peanut butter mixture over the dry mix, stirring vigorously until every grain is coated. The coating should cling to the cereal and pretzels, creating a uniform, glossy layer. If the mixture feels too thick, add a teaspoon of water to loosen it; if it’s too runny, let it cool slightly before adding. The coating should not be runny enough to drip off the pan, but it should be easy to spread.
- Transfer the coated mixture to the prepared baking pan, pressing it down firmly with a spatula or your palms. The goal is to create a dense, even layer so the bars hold together after cooling. A tight press also helps the peanut butter coating set properly, giving the bars a glossy finish. If the mixture is too loose, let it sit for a few minutes so the butter sets slightly before pressing.
- Bake in the preheated oven for 20–25 minutes. The edges should turn a light golden brown, and the center should feel set yet still slightly moist. The aroma of toasted cereal and melted chocolate will fill the kitchen, creating a cozy holiday atmosphere. Watch the timer closely; if you bake too long, the bars become brittle.
- Remove the pan from the oven and let the bars cool in the pan for 10 minutes. This rest period allows the peanut butter coating to set fully, making the bars easier to cut. After the initial cooling, transfer the bars to a wire rack to cool completely. If you try cutting them while still warm, they may crumble or stick to the cutting board.
- Once cooled, cut the bars into squares or rectangles using a sharp knife or a pizza cutter. For a cleaner cut, warm the knife in hot water, then dry it before slicing. The bars should hold together firmly; if they’re too soft, give them another 5 minutes to set.
- Optional: For an extra touch of indulgence, drizzle melted chocolate over the top of the bars before they set completely. This adds a glossy finish and an additional chocolate layer that pairs beautifully with the peanut butter base. Let the chocolate set for a couple of minutes before serving.
- Store the finished bars in an airtight container at room temperature for up to a week, or refrigerate for longer freshness. If you notice the bars drying out, add a tiny splash of water or a light dusting of powdered sugar before reheating. The bars are perfect for a quick snack or a festive dessert that can be prepped ahead of time.
That's it — you did it. But hold on, I've got a few more tricks that'll take this to another level…
Insider Tricks for Flawless Results
The Temperature Rule Nobody Follows
Many bakers assume a higher oven temperature will make the bars crispier, but that’s a myth. Baking at 350°F ensures the peanut butter coating sets without burning the chocolate. If you’re in a high‑altitude area, reduce the oven temperature by 10°F to compensate for the lower air pressure. Keep a close eye on the edges; they should just turn golden, not brown.
Why Your Nose Knows Best
The aroma of toasted cereal and melted peanut butter is a reliable indicator of doneness. If you smell a nutty, buttery scent with a hint of chocolate, the bars are likely ready. If the scent is too sweet or you detect a burnt note, they’re overbaked. Your nose is a great tool for timing the final minutes of baking.
The 5-Minute Rest That Changes Everything
Letting the bars rest in the pan for 10 minutes after baking allows the peanut butter to set properly, giving the bars structure. Cutting them too early can cause them to crumble. If you’re in a hurry, you can cut them after the initial 10‑minute rest and then let them sit for an additional 5 minutes on a wire rack.
Keep the Chocolate Fresh
If you’re using semi‑sweet chocolate chips, keep them refrigerated until just before use. Chocolate that’s been stored at room temperature can develop a white film called bloom, which looks unappetizing. A quick dip in the fridge keeps the chips crisp and the flavor sharp.
Use a Silicone Mat for Easy Release
Even with butter, the bars can stick to the pan. A silicone baking mat eliminates the need for parchment paper and ensures a clean release. This also makes cleanup a breeze, saving you time and effort.
Storing for Long‑Term Freshness
Wrap the bars tightly in plastic wrap or place them in an airtight container. For longer storage, keep them in the freezer; they’ll stay fresh for up to 3 months. When ready to eat, let them thaw at room temperature for 15 minutes to regain their original texture.
Creative Twists and Variations
This recipe is a playground. Here are some of my favorite ways to switch things up:
Chocolate‑Covered Crunch
After baking, dip each bar in melted dark chocolate and let it set. This adds a glossy, chocolatey layer that pairs wonderfully with the peanut butter base. It’s perfect for a more decadent holiday treat.
Nutty Surprise
Replace the peanut butter with almond butter for a different nutty profile. The almond butter gives the bars a slightly sweeter, less buttery taste, while still providing the same binding quality.
Maple M&M Madness
Swap the holiday M&Ms for maple‑flavored M&Ms to introduce a subtle maple sweetness that complements the peanut butter. This variation is great for those who love a hint of maple in their desserts.
Spiced Holiday Edition
Add a pinch of ground cinnamon or nutmeg to the dry mix for a warm, spiced flavor. The spices mingle with the chocolate and peanut butter, creating a cozy, aromatic treat.
Low‑Sugar Option
Use a sugar substitute like stevia or monk fruit sweetener in place of powdered sugar. Adjust the quantity to taste, and the bars will still hold together while cutting down on calories.
Vegan Version
Replace the butter with coconut oil and the peanut butter with a plant‑based butter alternative. Ensure the chocolate chips are dairy‑free. The texture remains similar, and the flavor profile stays festive.
Storing and Bringing It Back to Life
Fridge Storage
Place the bars in an airtight container and store them in the refrigerator for up to a week. The cold environment helps maintain the crispness of the cereal and pretzels while keeping the peanut butter from becoming too hard.
Freezer Friendly
For longer storage, wrap the bars tightly in plastic wrap and place them in a freezer bag. They’ll stay fresh for up to 3 months. Thaw at room temperature before serving to restore the original texture.
Best Reheating Method
If the bars have dried out, add a tiny splash of water to the bottom of a saucepan and heat gently over low heat, stirring until the mixture is moist. Alternatively, microwave on low power for 10–15 seconds, then let them sit for a minute. This steaming technique brings back the buttery, gooey center.