I still remember the exact moment when my holiday spirit hit rock bottom. It was 6:47 AM on December 23rd, standing in my kitchen wearing mismatched socks and a bathrobe that had seen better decades, staring at a mountain of dirty dishes from three failed attempts at making festive pancakes for my kids. The first batch looked like sad yellow Frisbees, the second batch glued itself to the pan like it had commitment issues, and the third batch turned an unappetizing shade of brownish-green that would make even the Grinch himself cringe. My daughter had already announced she hated Christmas breakfast, my son was campaigning for cold cereal, and I was dangerously close to canceling the whole holiday season.
But here's where the story gets good, because right when I was about to admit defeat, something magical happened. I remembered my grandmother's words from decades ago: "Sometimes the best recipes come from the biggest disasters, sweetheart." So I grabbed that box of just-add-water pancake mix — the one I kept around for emergency situations when my culinary pride took a backseat to hungry children — and decided to embrace the chaos. If I couldn't make perfect pancakes, I'd make perfectly imperfect ones that captured the true spirit of the season. That's how these Grinch Pancakes were born, and let me tell you, they didn't just save Christmas morning — they became the stuff of family legend.
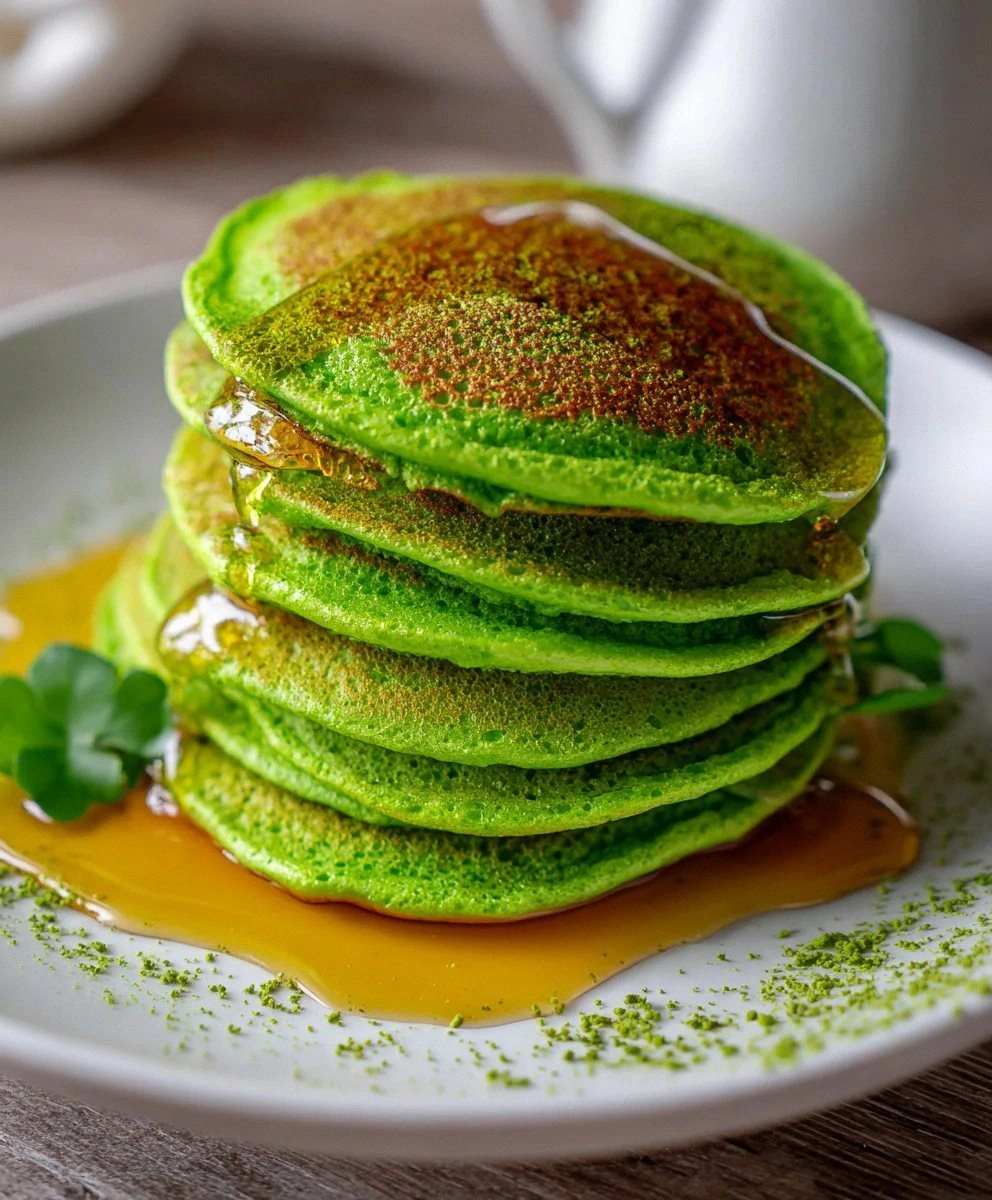
Picture this: vibrant green pancakes that look like they came straight from Whoville, with that perfect fluffy texture that makes you close your eyes with the first bite. The edges get these tiny crispy lacy bits that shatter like spun sugar, while the inside stays so tender and light it's like eating a Christmas cloud. The neon green color isn't just for show — it's a conversation starter, a mood lifter, and somehow makes the pancakes taste even better through the sheer power of holiday magic and food psychology. I dare you to serve these at your next holiday breakfast and watch every single person at the table transform from grumpy morning zombies into excited children again.
This recipe is everything you need when you're juggling gift wrapping, last-minute shopping, and trying to create magical memories that'll last longer than the batteries in those toys. It uses pantry staples, requires zero culinary school training, and delivers results that'll have everyone asking for seconds before they've even finished their first helping. And the best part? You'll spend more time sipping coffee and less time scrubbing pans, because this version is practically foolproof. Let me walk you through every single step — by the end, you'll wonder how you ever made it any other way.
What Makes This Version Stand Out
Zero-Stress Magic: This recipe embraces the beautiful simplicity of just-add-water pancake mix, which means you can literally make these with your eyes half open while the coffee brews. No separate bowls for wet and dry ingredients, no measuring out buttermilk at dawn, no wondering if your baking powder is still active. Just grab, mix, and watch the holiday magic happen while you're still deciding whether today calls for regular or peppermint coffee.
Color That Pops: We're not talking about the sad, muted green of overcooked broccoli here. Neon green food coloring creates a shade so vibrant it practically glows on the plate, turning even the grumpiest morning person into a believer. The color stays true through cooking, creating pancakes that look like they were painted by Dr. Seuss himself, complete with that perfect golden edge that makes the green even more spectacular by contrast.
Texture That Dreams Are Made Of: The secret lies in not overmixing — leave those lumps alone, people! They create air pockets that puff up into the fluffiest pancakes you've ever tasted. We're talking cloud-like centers with lacy, crispy edges that provide the perfect textural contrast. It's like having two desserts in one, except it's socially acceptable to eat a whole stack for breakfast.
Speed Demon Approved: From box to plate in under fifteen minutes, which means you can whip these up while the kids are hunting for presents or when surprise guests announce they're staying for breakfast. The batter comes together faster than you can say "triple dog dare," and the cooking process is so streamlined you'll feel like you've unlocked a cheat code for holiday hosting.
Crowd Psychology Magic: The moment these hit the table, something incredible happens. Adults start talking about their favorite Christmas memories, kids forget they're too cool for family breakfast, and suddenly everyone's taking photos and sharing stories. It's like edible therapy that tastes like childhood and looks like a party.
Make-Ahead Holiday Savior: Mix the dry ingredients the night before, add water in the morning, and boom — you're three minutes away from Christmas magic. Or make the whole batch, freeze between sheets of wax paper, and reheat in the toaster for instant holiday cheer any morning between now and New Year's. Future you is already thanking present you for this level of breakfast foresight.
Inside the Ingredient List
The Foundation Players
Let's talk about that box of just-add-water pancake mix sitting in your pantry right now. This isn't admitting defeat — it's embracing smart cooking strategy. The manufacturers have already perfected the ratio of flour to leavening agents, figured out the salt balance, and ensured consistent results every single time. You're not being lazy; you're being brilliant by letting food science do the heavy lifting while you focus on the fun parts. Plus, during the holidays when your kitchen counter looks like a wrapping paper explosion and your brain is juggling twenty different tasks, having one less thing to think about is worth its weight in gold.
The Color Catalyst
Neon green food coloring is where the holiday magic really happens, and here's why it matters more than you'd think. Regular green food coloring gives you a subdued, almost olive tone that screams "spinach pancakes" — not exactly the festive vibe we're going for. But neon green? That's the color of Christmas trees lit up at midnight, of Grinch hearts growing three sizes, of pure childhood wonder captured in liquid form. Just a few drops transform the entire emotional impact of your breakfast, turning ordinary pancakes into edible holiday cheer that makes even the grumpiest family member crack a smile.
The Liquid Gold
Water might seem boring, but it's actually your secret weapon for controlling the final texture. Cold water from the tap creates a slightly thicker batter that produces taller, fluffier pancakes. Room temperature water gives you thinner cakes with more surface area for crispy edges. And if you want to get really fancy, use sparkling water for extra lift — the carbonation creates even more air pockets for maximum fluff factor. I'll be honest: I once used flat ginger ale when I ran out of water, and my kids declared them the best pancakes ever, so don't be afraid to experiment when the holiday spirit moves you.
The Optional Upgrades
While the basic recipe is perfect as-is, a few strategic additions can take these from great to legendary. A teaspoon of vanilla extract deepens the flavor profile and makes your kitchen smell like a Christmas bakery. A tablespoon of melted butter in the batter creates richer flavor and helps those edges crisp up like nobody's business. And if you're feeling really wild, a pinch of cinnamon brings warmth that plays beautifully against the cool green color for a sensory experience that screams holiday comfort food.
Everything's prepped? Good. Let's get into the real action...
The Method — Step by Step
- Start by clearing a space on your counter big enough to work comfortably — trust me, trying to mix batter while dodging coffee makers and toaster ovens is a recipe for disaster. Grab your largest mixing bowl or that big measuring cup I mentioned earlier, and let's begin the holiday transformation. Pour in your just-add-water pancake mix, and take a moment to appreciate the simplicity of what's about to happen. No mountain of dirty bowls, no complicated measurements, just pure breakfast magic waiting to happen.
- Now comes the moment of truth — add your water slowly while whisking gently. The key here is restraint: you want to stop adding water when the batter is still slightly lumpy and thick, like slightly melted ice cream. If you've ever struggled with tough, rubbery pancakes, overmixing was probably your downfall. Those lumps aren't your enemy — they're tiny pockets of air that'll expand during cooking, creating the fluffy texture that makes these legendary. The batter should coat your whisk but still flow off in thick ribbons.
- Time for the star of the show — add your neon green food coloring one drop at a time, stirring gently between additions. Watch in amazement as the pale batter transforms into something that looks like liquid Christmas. You'll need less than you think — start with three drops for a standard box mix, then add more until you achieve that perfect Grinch-green hue. The color will intensify slightly during cooking, so aim for a shade that's just a touch brighter than your target final color.
- Heat your griddle or largest skillet over medium heat — and here's where most recipes get it wrong. Too hot and your pancakes burn on the outside while staying raw inside. Too cool and they spread into sad, pale disks that never develop those gorgeous golden edges. The perfect temperature is when a drop of water dances across the surface for about two seconds before evaporating. If it immediately sizzles away, turn down the heat. If it just sits there looking bored, turn it up.
- Lightly grease your cooking surface — and I mean lightly. A quick swipe with a butter wrapper or a paper towel dipped in oil is all you need. Too much fat and your pancakes fry instead of griddle, creating greasy edges that ruin the texture. You want just enough to prevent sticking while still allowing those lacy crispy bits to form around the edges. That sizzle when the batter hits the pan? Absolute perfection.
- Pour your batter using a quarter-cup measure or that handy spout on your measuring cup. Resist the urge to spread or shape the batter — let gravity do the work for you. Each pancake should spread into a perfect circle about four inches across, with the edges starting to set while the center still looks shiny and liquid. This is exactly what you want. If you're adding chocolate chips or blueberries, now's the time to sprinkle them on top.
- Watch for the telltale signs that it's time to flip: the edges will start to look set and slightly dry, small bubbles will form and pop on the surface, and the pancake will release easily when you slide a spatula underneath. This usually takes about two to three minutes, but trust your eyes more than the clock. When you flip — and this is crucial — do it quickly and confidently. A hesitant flip results in folded, broken pancakes that look like they lost a fight with your spatula.
- Cook the second side for about half the time of the first side — you're looking for a beautiful golden brown color that contrasts spectacularly with the green interior. The second side cooks faster because the batter is already partially set, so stay alert. When done, slide onto a warm plate and keep in a 200-degree oven while you finish the rest. This is when your kitchen starts smelling like a Christmas bakery exploded in the best possible way.
- Serve immediately for maximum impact — these look incredible when they're still steaming slightly, the green color vibrant against white plates. Stack them high, add a pat of butter that melts into golden pools, and drizzle with maple syrup that cascades down the sides like liquid amber. Watch faces light up as you carry them to the table, because these aren't just pancakes anymore — they're edible holiday joy that transforms breakfast into a celebration.
That's it — you did it. But hold on, I've got a few more tricks that'll take this to another level...
Insider Tricks for Flawless Results
The Temperature Rule Nobody Follows
Here's the game-changer that separates pancake masters from mere mortals: let your batter rest for five minutes after mixing. I know, I know — when you're juggling hungry kids and holiday chaos, waiting feels impossible. But this brief pause lets the flour fully hydrate and the leavening agents activate, creating taller, fluffier pancakes that'll make you look like a breakfast wizard. During this sacred five minutes, heat your griddle and set out your serving plates. Future you will thank present you for this tiny bit of patience.
Why Your Nose Knows Best
Your sense of smell is your secret weapon for perfect timing — when the pancakes start releasing that sweet, slightly nutty aroma, they're about 30 seconds from needing a flip. This olfactory cue is more reliable than any timer, because it accounts for variations in heat, batter thickness, and atmospheric conditions that affect cooking time. A friend tried skipping this step once — let's just say her pancakes could have doubled as hockey pucks. Trust your nose; it evolved specifically to prevent breakfast disasters.
The 5-Minute Rest That Changes Everything
After cooking, let your pancakes rest for just two minutes before serving — this allows the steam to redistribute throughout the cake, ensuring every bite is equally tender and preventing that disappointing cold center/hot exterior situation. Stack them on a warm plate covered loosely with foil, and use this time to pour coffee, set the table, or just bask in the glory of your breakfast success. These two minutes of patience transform good pancakes into legendary ones that stay perfect throughout the entire meal.
The Flip Technique That Prevents Disasters
Here's my confession: I ate half the first batch before anyone else got to try them, because I kept "testing" my flip technique and ending up with broken, folded disasters. The secret? Slide your spatula completely underneath, pause for a split second to ensure you're centered, then flip with a quick upward motion followed by a gentle forward movement. Think of it like a tiny pancake somersault, not a violent fling. Once you master this move, you'll feel like a breakfast ninja capable of handling any griddle situation.
Creative Twists and Variations
This recipe is a playground. Here are some of my favorite ways to switch things up:
The Cindy Lou Who Edition
Add a teaspoon of strawberry extract and a handful of white chocolate chips to create pink-speckled pancakes that taste like strawberry shortcake. The white chips melt into creamy pockets that contrast beautifully with the green cake, creating a breakfast that looks like it came straight from Whoville's most famous resident's kitchen. Kids go absolutely wild for these, and they photograph beautifully for those obligatory holiday social media posts.
The Mount Crumpit Extreme
For the chocolate lovers in your life, substitute chocolate milk for the water and add cocoa powder until the batter turns a deep forest green. The result is intensely chocolatey pancakes that still maintain that festive color but taste like you're eating dessert for breakfast. Top with crushed candy canes for a mint-chocolate combination that'll have everyone asking for your secret recipe.
The Roast Beast Remix
Savory pancakes might sound weird, but hear me out: reduce the sugar in your mix, add chopped fresh herbs and a handful of shredded cheese, and serve these alongside scrambled eggs and bacon. The green color becomes a quirky conversation piece, and the herbaceous flavor pairs beautifully with traditional breakfast meats. It's like having your very own Dr. Seuss-inspired brunch restaurant right in your kitchen.
The Whoville Sunrise
Create a tie-dye effect by mixing half your batter with extra food coloring for a deeper green, then swirl the two shades together in the pan. The result looks like abstract Christmas art that's almost too pretty to eat — almost. Each pancake becomes unique, turning breakfast into a gallery opening where every plate is different. This is my go-to when I want to impress guests without any extra effort.
The Holiday Leftover Makeover
Chop up leftover Christmas cookies into small pieces and fold them into the batter — gingerbread cookies add warm spice, while sugar cookies provide sweet surprises. The green batter hides the cookie pieces until you bite in, creating unexpected flavor bombs that make eating these feel like a treasure hunt. It's the perfect way to use up those cookie platters while creating a new tradition that helps prevent holiday food waste.
Storing and Bringing It Back to Life
Fridge Storage
Let your pancakes cool completely before stacking between sheets of wax paper — this prevents them from turning into a solid green brick that requires a chisel to separate. Store in an airtight container for up to five days, though honestly, they've never lasted more than two in my house. The color stays vibrant, and the flavor actually improves as the vanilla and green coloring meld together overnight. Reheat in the toaster for best results, or microwave for 15 seconds if you're in a rush.
Freezer Friendly
These freeze beautifully for up to three months, making them perfect for holiday meal prep or surprising sleepy college students during finals week. Flash freeze them first on a baking sheet, then transfer to freezer bags with the air pressed out. Label them clearly — green pancakes can be alarming when discovered by unsuspecting family members at 6 AM. To reheat, pop them straight from freezer to toaster, or microwave for 30 seconds then finish in a hot skillet for that fresh-cooked texture.
Best Reheating Method
Add a tiny splash of water to your skillet before reheating — it creates steam that brings the pancakes back to life without drying them out. Cover with a lid for 30 seconds, then remove and let the bottom crisp up again. This method preserves the texture better than microwaving alone and takes less time than making a fresh batch. Pro tip: reheat them cut into fun shapes with cookie cutters for kids who turn up their noses at leftovers.