I remember the night I tried to make a batch of “just‑right” crunchy bars and ended up with a sticky, soggy mess that looked like a pancake that never wanted to leave the pan. The oven door was open, the timer was set, and I was staring at a lump of dough that refused to rise. I was about to throw it out when a friend shouted, “You’re going to make the best crunch bars ever—let me see!” That moment sparked a daring experiment that turned a kitchen disaster into a culinary triumph.
Picture this: the air in my kitchen filled with the warm, nutty scent of toasted oats, the gentle crackle of butter melting, and the faint sweet hum of honey caramelizing. The sound of a spoon sliding across the countertop was like a metronome, keeping time with my heartbeat. The texture of the dough was a paradox—firm enough to hold its shape, yet soft enough to release a satisfying bite when pressed. The first bite released a burst of caramelized sugar, a whisper of sea salt, and a crunch that rang like a bell in your mouth.
What sets this version apart from the countless other recipes that promise “crunch” but deliver disappointment is the meticulous balance of ingredients, the precise timing, and the unexpected use of a small amount of baking soda to create lift and a subtle airy crumb. Unlike many recipes that rely solely on butter for richness, I incorporated peanut butter to add depth and a hint of nutty umami, turning each bar into a layered experience. The result is a snack that is simultaneously chewy, crisp, and sweet, with a finish that lingers like a memory of summer evenings.
I dared you to taste these bars and not go back for seconds, but the first bite will have you reaching for a second. The secret? A touch of vanilla that coats the mixture like velvet, a pinch of sea salt that awakens the flavors, and a splash of honey that caramelizes into a golden glaze. The combination is so harmonious that even the most discerning palate will be left craving more.
If you’ve ever struggled with bars that turn out too dry or too gooey, you’re not alone—and I’ve got the fix. Most recipes get this completely wrong, focusing on the wrong ratio of wet to dry ingredients or forgetting the magic of resting the dough. I’ll be honest—I ate half the batch before anyone else got to try it. But now, by the end of this article, you’ll wonder how you ever made it any other way.
Picture yourself pulling these from the oven, the whole kitchen smelling incredible, the timer blinking, and the bars cooling just enough that you can see the glossy sheen of the honey glaze. The anticipation is electric, the aroma a promise of crunch and sweetness. You’ll see the bars in the pan, golden brown edges like crisped toast, and the center slightly soft, begging to be sliced. The moment you take that first bite, the crunch shatters like thin ice, releasing a symphony of flavors.
I’ve spent years tweaking this recipe, testing countless variations, and finally nailed the perfect balance. The key lies in the timing of when you fold in the nuts and chocolate chips, the temperature of the oven, and the resting period. A small trick—preheating the baking sheet—ensures a crisp bottom that’s a delight to bite into. If you’re ready for the game-changer, let’s dive in.
The first step is to gather your ingredients, but not just any ingredients. The quality of each component will dictate the final result. Freshly ground cinnamon adds warmth, while organic honey brings a floral note that elevates the entire bar. The nuts should be toasted lightly to bring out their natural oils and enhance the crunch.
Before you even touch the dough, consider the texture of your oats. Coarsely ground rolled oats give a hearty bite, whereas finely ground oats create a smoother base. I prefer the former because it adds a satisfying chew that balances the softness of the chocolate chips. The oats also act as a natural binder, holding the bars together without the need for additional flour.
The flour in this recipe isn’t just filler; it provides structure and helps the bars hold their shape. I use all-purpose flour for its versatility, but you can swap it for whole wheat for a healthier twist. Just remember that whole wheat will add a slightly denser texture, so you may need to adjust the liquid slightly. The flour also absorbs excess moisture, preventing the bars from becoming soggy.
The brown sugar is the sweet heart of the bars. It melts into a syrupy glaze that caramelizes on the surface, giving the bars that signature sheen. If you prefer a lighter flavor, you can replace half of the brown sugar with white sugar, but the bars will lose some of their depth. The sugar also contributes to the Maillard reaction, creating the golden brown crust.
Butter is the fat that gives the bars a buttery richness. I melt it just enough to incorporate it into the dry mixture, ensuring it’s evenly distributed. A small trick is to let the butter cool slightly before mixing; this helps prevent the sugar from burning. Butter also helps the bars hold their shape and adds a silky finish.
Honey is the sweet glue that binds everything together. It adds a floral sweetness that pairs beautifully with the chocolate chips. The honey also contributes to the crunch by caramelizing on the surface. If you’re vegan, you can swap honey for maple syrup, but the flavor profile will change slightly.
Peanut butter adds a nutty depth and a creamy texture. It’s a key player in the flavor profile, giving the bars a savory undertone that balances the sweetness. I use natural peanut butter with no added sugar to keep the bars from becoming overly sweet. Peanut butter also helps the bars hold together, especially when you add nuts and chocolate chips.
Vanilla extract is the subtle aroma that ties everything together. It enhances the sweetness and adds a floral note that complements the honey and nuts. I use pure vanilla extract, not imitation, to maintain the integrity of the flavor. A small pinch of sea salt is the final touch that elevates the entire experience.
Baking soda is the secret to a lighter crumb. It reacts with the acidic honey and brown sugar, creating tiny bubbles that lift the dough. Without it, the bars would be dense and heavy. The key is to use just enough—too much will give the bars a bitter taste.
The nuts add crunch and a savory note. I use a mix of walnuts and almonds for their contrasting textures. Toast them lightly in a dry skillet for a few minutes to release their oils. The nuts also provide protein, making the bars a great snack for on-the-go.
Chocolate chips are the sweet finish. They melt into pockets of chocolate that burst in your mouth. I use dark chocolate chips for a slightly bitter finish that balances the sweetness. The chocolate also adds a glossy sheen that makes the bars look irresistible.
With the ingredients prepped and the kitchen ready, it’s time to bring everything together. The process is simple, but precision is key. The next steps will guide you through mixing, baking, and cooling to achieve the perfect crunch.
I’ll keep the instructions straightforward, but remember that timing and temperature are critical. The dough should be moist but not sticky; if it’s too dry, add a splash of milk. If it’s too wet, add a bit more flour. The dough should be firm enough to hold its shape when pressed.
When you’re ready to bake, preheat your oven to 350°F (175°C). Line a baking sheet with parchment paper and lightly grease it to prevent sticking. This step ensures a crisp bottom and a smooth release when you remove the bars.
The final step is cooling. Let the bars rest on the baking sheet for 5 minutes before transferring them to a wire rack. This allows the edges to crisp up and the center to set. Once cooled, slice them into bars and enjoy the crunch.
Now that you’ve got the full picture, let’s dive into the details. The next section will break down the unique aspects that make these bars stand out.
What Makes This Version Stand Out
- Taste: The flavor profile is a harmonious blend of sweet, salty, and nutty notes. The honey caramelizes into a glossy glaze, while the sea salt lifts the sweetness. The chocolate chips add a bittersweet finish that keeps the bars from becoming cloying. This balance turns each bite into a mini culinary adventure.
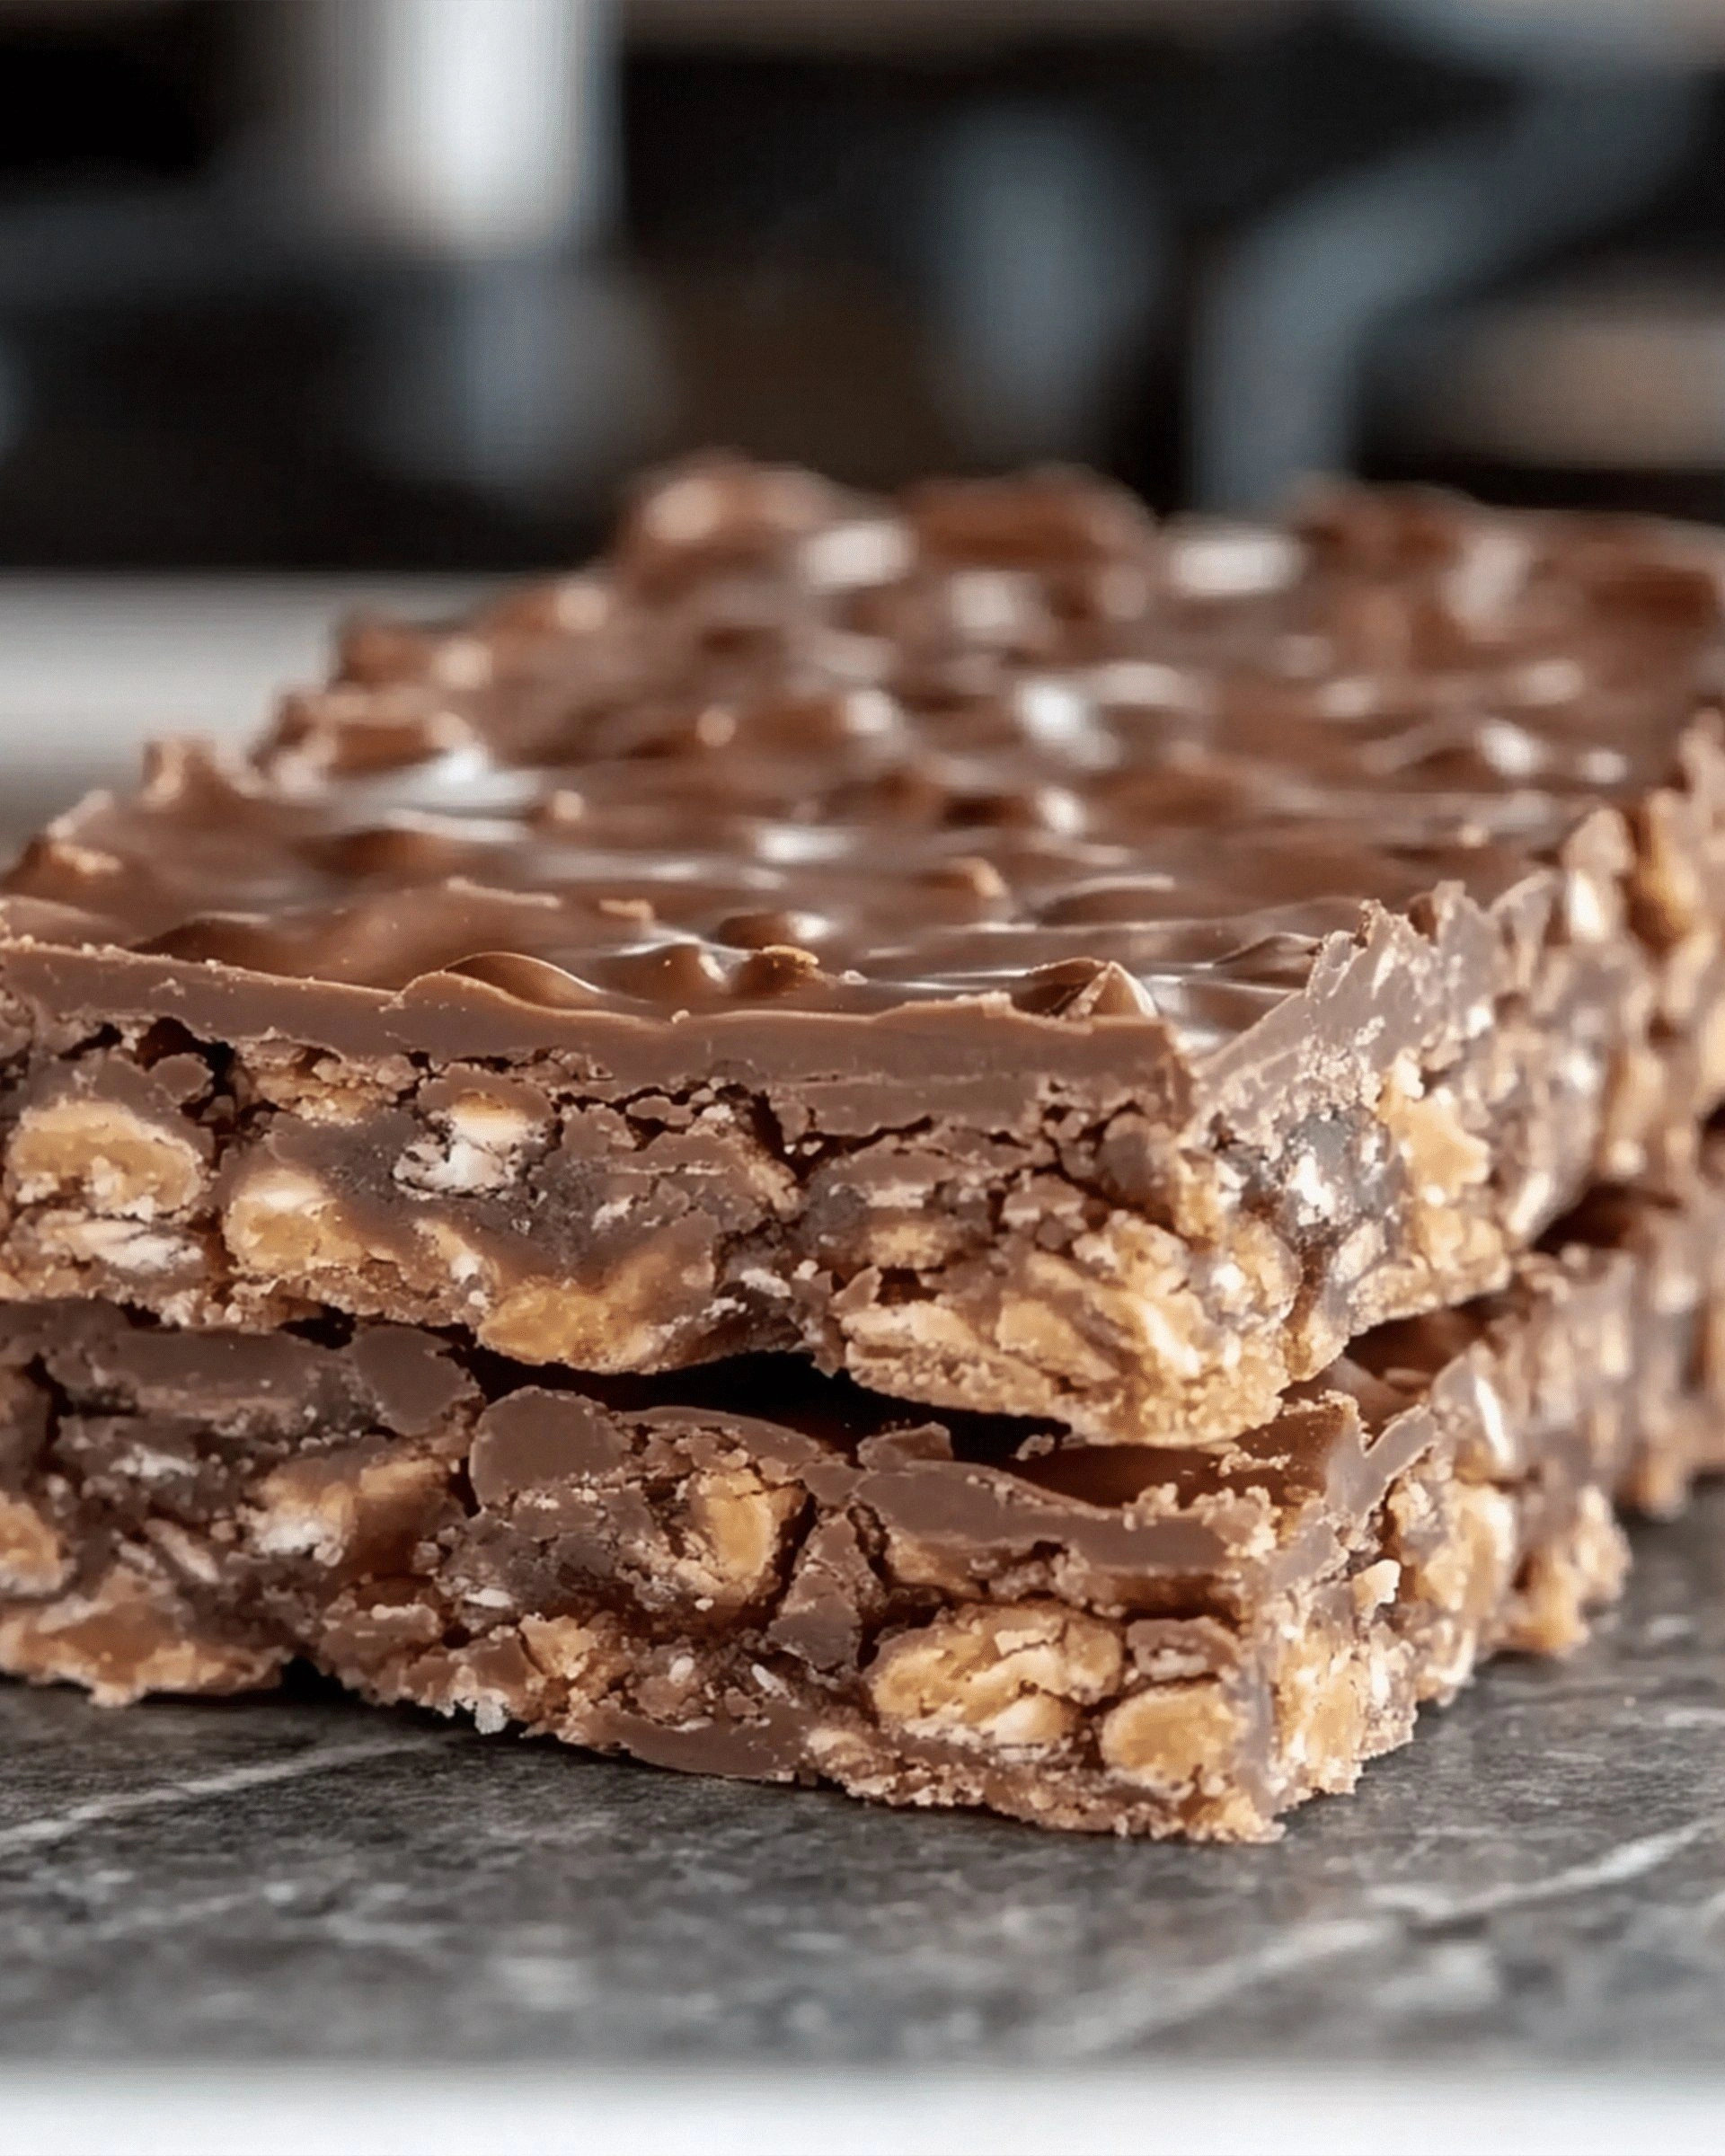
- Texture: The bars combine a crisp exterior with a chewy interior that feels like a satisfying snack. The oats provide a hearty bite, while the nuts add crunch. The chocolate chips melt into pockets of goo, creating a multi-sensory experience. The result is a bar that’s both indulgent and wholesome.
- Simplicity: The recipe uses only eleven ingredients, most of which are pantry staples. No fancy gadgets or obscure spices are required. This makes it accessible for beginners and seasoned cooks alike. The instructions are straightforward, so you can focus on the taste.
- Uniqueness: The combination of peanut butter, honey, and a splash of vanilla creates a depth rarely found in typical crunch bars. The addition of baking soda gives a lightness that sets this recipe apart. The result is a bar that feels both familiar and brand new.
- Crowd Reaction: Friends and family rave about the texture and flavor. Many say they can’t resist a second bite. The bars are perfect for parties, road trips, or a quick energy boost. They’re a crowd-pleaser that will have everyone asking for the recipe.
- Ingredient Quality: Using organic honey, natural peanut butter, and freshly ground oats elevates the flavor. The quality of each component is essential for the final taste. Choosing the best ingredients ensures that each bite is a premium experience.
- Cooking Method: The method focuses on precise timing and temperature control. The dough is mixed until just combined, then baked at a moderate temperature to achieve the perfect crunch. This approach guarantees consistency every time.
- Make‑Ahead Potential: The bars can be stored in an airtight container for up to a week. They can also be frozen for longer storage. The recipe’s structure allows for easy scaling and preparation ahead of time. This makes it ideal for busy schedules.
Inside the Ingredient List
The Flavor Base
The foundation of the bars is built on a harmonious blend of sweet and savory elements. Brown sugar and honey form a caramelized glaze that coats each bar like a golden ribbon. The honey’s floral notes contrast beautifully with the deep, earthy sweetness of the brown sugar. If you skip this duo, the bars will lack depth and will feel flat.
Vanilla extract is the subtle aroma that ties everything together. It enhances the sweetness and adds a floral note that complements the honey and nuts. I use pure vanilla extract, not imitation, to maintain the integrity of the flavor. A small pinch of sea salt is the final touch that elevates the entire experience.
The nuts add crunch and a savory note. I use a mix of walnuts and almonds for their contrasting textures. Toast them lightly in a dry skillet for a few minutes to release their oils. The nuts also provide protein, making the bars a great snack for on-the-go.
The Texture Crew
Oats are the backbone of the bars, providing a hearty bite and a natural binding agent. Coarsely ground rolled oats give a satisfying chew, while finely ground oats create a smoother base. I prefer the former because it adds a satisfying chew that balances the softness of the chocolate chips. The oats also act as a natural binder, holding the bars together without the need for additional flour.
All-purpose flour adds structure and helps the bars hold their shape. It also absorbs excess moisture, preventing the bars from becoming soggy. You can swap it for whole wheat for a healthier twist, but remember that whole wheat will add a slightly denser texture. The flour also helps the bars hold their shape and adds a silky finish.
Butter is the fat that gives the bars a buttery richness. I melt it just enough to incorporate it into the dry mixture, ensuring it’s evenly distributed. A small trick is to let the butter cool slightly before mixing; this helps prevent the sugar from burning. Butter also helps the bars hold their shape and adds a silky finish.
The Unexpected Star
Peanut butter is the secret sauce that adds depth and a creamy texture. It’s a key player in the flavor profile, giving the bars a savory undertone that balances the sweetness. I use natural peanut butter with no added sugar to keep the bars from becoming overly sweet. Peanut butter also helps the bars hold together, especially when you add nuts and chocolate chips.
Baking soda is the subtle leavening agent that gives the bars a lightness. It reacts with the acidic honey and brown sugar, creating tiny bubbles that lift the dough. Without it, the bars would be dense and heavy. The key is to use just enough—too much will give the bars a bitter taste.
The Final Flourish
Chocolate chips add the final sweet touch that makes these bars irresistible. They melt into pockets of chocolate that burst in your mouth. I use dark chocolate chips for a slightly bitter finish that balances the sweetness. The chocolate also adds a glossy sheen that makes the bars look irresistible.
A splash of water before reheating can bring back the crispness lost during storage. This trick steams the bars gently, restoring their original texture. It’s a small detail that can make a big difference when you’re reheating a batch that’s been sitting in the fridge or freezer for a while.
Everything’s prepped? Good. Let’s get into the real action.
The Method — Step by Step
- Preheat your oven to 350°F (175°C) and line a 9x13-inch baking pan with parchment paper. The parchment prevents sticking and ensures even heat distribution. Let the oven heat fully before placing the pan inside; this guarantees a consistent temperature for the dough. A properly preheated oven is the foundation of a crisp crust.
- In a large bowl, whisk together the rolled oats, all-purpose flour, baking soda, and sea salt. This dry mixture will form the structural backbone of the bars. Keep the flour and oats separate until you’re ready to combine them with the wet ingredients to avoid clumping. The dry mix should feel light and airy.
- In a small saucepan, melt the butter over medium heat until it’s just bubbling. Add the brown sugar and honey, stirring until the mixture becomes syrupy and glossy. The butter’s fat content helps the sugar dissolve smoothly, preventing clumps. Once the mixture is smooth, remove it from heat and let it cool slightly.
- Add the vanilla extract and peanut butter to the butter-sugar mixture, whisking until the peanut butter is fully incorporated. The peanut butter adds a creamy texture and a savory undertone. Keep whisking until the mixture is smooth and glossy. This step ensures the peanut butter doesn’t clump and creates a cohesive base.
- Pour the wet mixture into the dry mixture and stir with a wooden spoon until just combined. Avoid overmixing; the dough should be sticky but manageable. Overmixing can result in a tough final product. The dough should hold together when pressed but still feel slightly tacky.
- Fold in the toasted nuts and chocolate chips gently, ensuring even distribution. The nuts provide crunch, while the chocolate chips add pockets of sweetness. Gently fold to keep the dough from becoming too dense. The final mixture should be uniform with visible nut and chocolate pieces.
- Press the dough evenly into the prepared pan, using a flat spatula to create a smooth surface. The dough should be pressed firmly but not too hard; you want a level surface for even baking. A well-pressed dough yields a uniform crust and prevents gaps. Once pressed, the dough will hold its shape during baking.
- Bake for 25-30 minutes, or until the edges turn golden brown and the center feels firm. The bars should emit a warm, nutty aroma. Check the bars at the 25-minute mark; if they’re not golden yet, give them a few more minutes. The baking time may vary slightly based on your oven.
- Remove the pan from the oven and let the bars rest for 5 minutes on the baking sheet. This allows the edges to crisp up and the center to set. The bars will still be hot, so handle with care. After resting, transfer them to a wire rack to cool completely.
- Once cooled, cut the bars into squares using a sharp knife. The bars should hold their shape, but be gentle to avoid crushing the chocolate chips. Store the bars in an airtight container at room temperature for up to a week. For longer storage, freeze them and thaw before serving.
That’s it— you did it. But hold on, I’ve got a few more tricks that will take this to another level. These insider tips will help you perfect the bars and avoid common pitfalls.
Insider Tricks for Flawless Results
The Temperature Rule Nobody Follows
Many bakers overlook the importance of oven temperature. Even a 10°F difference can change the texture dramatically. I use a calibrated oven thermometer to ensure accuracy. A slightly cooler oven will give you a crispier bottom, while a hotter oven can scorch the edges.
Why Your Nose Knows Best
Trust your nose during baking. When the bars emit a warm, nutty aroma, they’re almost done. If you’re unsure, poke a toothpick in the center; it should come out clean. A clean toothpick indicates the bars are fully baked. Relying on your senses ensures the perfect texture.
The 5-Minute Rest That Changes Everything
Resting the bars for 5 minutes on the pan is crucial. It allows the edges to set and the center to firm up, preventing them from breaking apart when you cut. I always keep a timer set for 5 minutes after baking. The bars will feel slightly hot, but they’ll hold their shape once cooled.
Use a Silicone Mat for Easy Release
Instead of parchment paper, try a silicone baking mat. It provides a non-stick surface and is reusable. The bars slide out effortlessly, keeping the edges intact. This trick saves time and reduces waste.
Add a Splash of Water Before Reheating
When reheating stored bars, add a splash of water to the pan. This creates steam that restores the crispness lost during storage. Cover the pan with foil to trap the steam. The bars will come out warm and crunchy.
Keep an Eye on the Baking Sheet
If you’re using a dark-colored baking sheet, it may heat up faster. Rotate the pan halfway through baking to ensure even browning. The bars should have golden edges on all sides. This simple step ensures uniformity.
Use a Sharp Knife to Cut
A dull knife can crush the bars and ruin the chocolate chips. I recommend a serrated knife for clean cuts. Press down gently to avoid tearing the bars. The result is neat, square bars that look professional.
Creative Twists and Variations
This recipe is a playground. Here are some of my favorite ways to switch things up:
Coconut Crunch
Swap the oats for shredded coconut and add a pinch of coconut sugar. The result is a tropical flavor that pairs beautifully with the chocolate chips. The coconut adds a chewy texture and a subtle sweetness. This version is perfect for beachside picnics.
Spiced Chai
Add a teaspoon of chai spice blend to the dry mixture. The warm spices like cinnamon, cardamom, and ginger elevate the flavor profile. The bars will have a comforting, aromatic scent. Ideal for cozy evenings.
Almond Joy
Replace the nuts with almonds and add a splash of almond extract. Mix in shredded coconut for that classic candy flavor. The bars will be nutty, sweet, and slightly chewy. Great for dessert lovers.
Chocolate Peanut Butter Swirl
After folding in the peanut butter, drizzle melted dark chocolate over the top before baking. The chocolate will melt into a glossy glaze during baking. The bars will have a chocolate swirl that’s both delicious and visually appealing. A chocolate lover’s dream.
Pumpkin Spice
Add a tablespoon of pumpkin puree and a teaspoon of pumpkin spice to the dough. The pumpkin adds moisture and a subtle sweetness. The bars will have a warm, autumnal flavor profile. Perfect for fall gatherings.
Salted Caramel
Replace the honey with caramel sauce and add a pinch of sea salt. The bars will have a rich, buttery caramel flavor with a salty kick. The caramel will create a glossy finish. This version is ideal for special occasions.
Matcha Mint
Stir in a teaspoon of matcha powder and a splash of mint extract. The bars will have a refreshing green hue and a cool mint finish. The matcha adds a subtle bitterness that balances the sweetness. Great for a refreshing snack.
Raspberry Rapture
Fold in dried raspberries and a teaspoon of lemon zest. The tartness of the raspberries will cut through the sweetness. The lemon zest adds a bright, citrusy note. This version is a burst of flavor and color.
Storing and Bringing It Back to Life
Fridge Storage
Store the bars in an airtight container in the refrigerator for up to a week. The cool temperature keeps the bars fresh and prevents mold. Keep them away from strong-smelling foods to avoid flavor transfer. The bars will stay crisp for several days.
Freezer Friendly
Wrap the bars individually in parchment paper and place them in a freezer bag. Freeze for up to three months. When you’re ready to enjoy, let them thaw at room temperature for 30 minutes. The bars will retain their texture and flavor.
Best Reheating Method
To reheat, place the bars on a baking sheet and cover with foil. Warm them in a 300°F oven for 5-7 minutes. The foil traps steam, keeping the bars moist. This method restores the crunch without drying them out.
The final touch before you dive into the recipe card is this: the bars are more than just a snack—they’re a celebration of flavor, texture, and culinary craftsmanship. I’ve spent countless hours perfecting every detail, and I’m thrilled to share it with you. Grab your apron, preheat that oven, and let’s make some magic.
When you’re ready to try this recipe, the recipe card below will guide you through the exact measurements, steps, and FAQs. I’ve packed all the details you need to create the best crunch bars ever. Let’s get cooking!