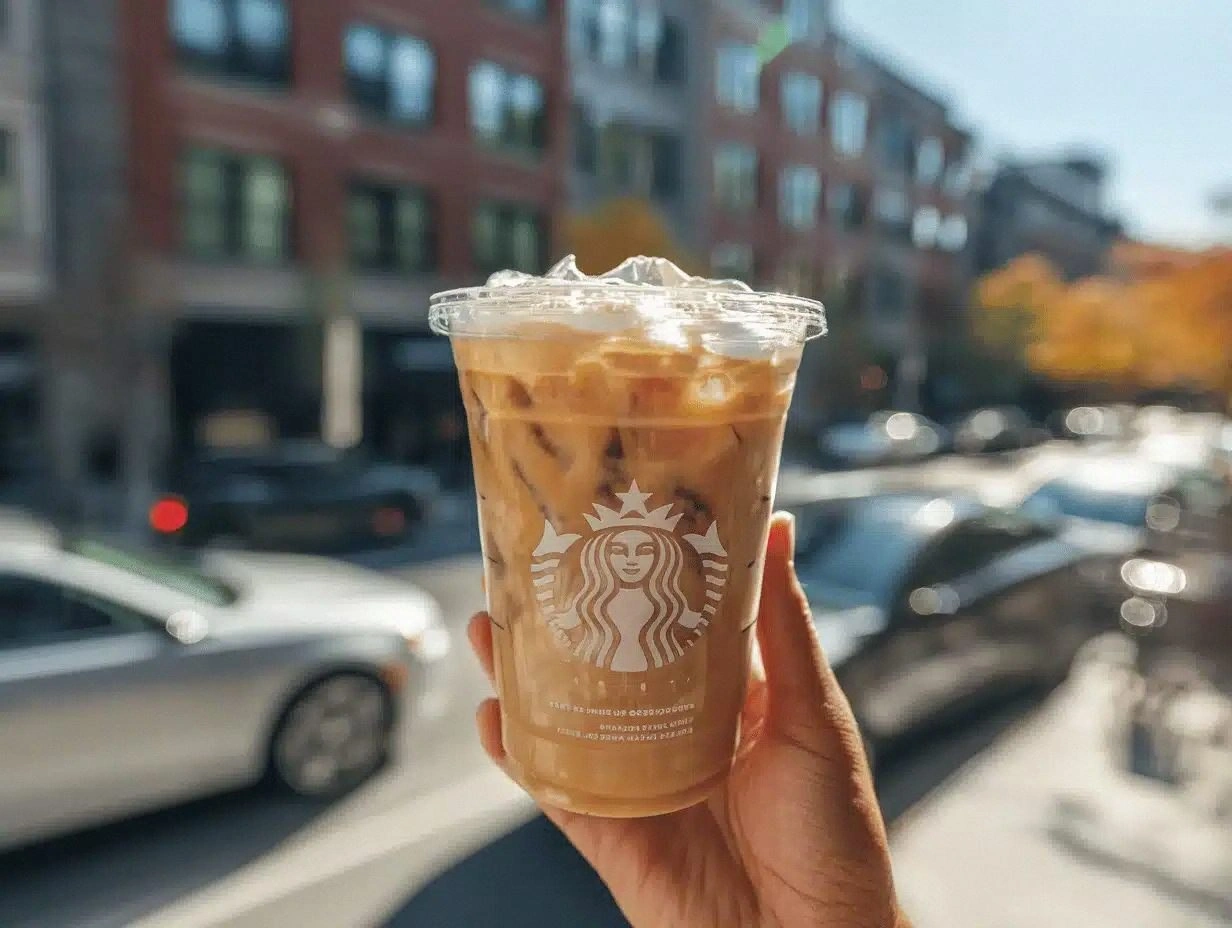
Picture this: it’s a crisp Saturday morning in October, the leaves are doing their fiery dance outside, and you’re stuck in a kitchen that smells like burnt toast because you tried to “quick‑fix” a pumpkin latte with a microwave and a can of whipped topping. I stared at that sad, flat foam and thought, “There has to be a better way.” I dared my own taste buds to a challenge – I would recreate the iconic Starbucks Pumpkin Cold Foam at home, and I would make it so good that even the baristas would beg for the recipe. The result? A drink that’s hands down the best version you’ll ever make at home, a silky, spiced cloud that floats on top of an iced coffee like a dream‑catcher catching the perfect autumn breeze.
The moment I first tasted that cold foam, it was like a symphony of fall hitting my palate – the warm notes of pumpkin and maple, the gentle bite of spice, and a buttery richness that clung to the coffee like a lover’s whisper. I could hear the faint clink of ice cubes as I poured the chilled brew, and the foam settled with a sigh that promised comfort. My hand trembled a little as I lifted the glass, feeling the cool condensation against my skin, and the aroma wrapped around me like a soft sweater. That sensation was so vivid, I swear I could see the orange‑gold of a pumpkin patch reflected in the glossy surface of the drink.
Most copycat recipes get this completely wrong. They either skimp on the cream, making the foam watery, or they drown the subtle pumpkin flavor with too much maple syrup. I’ve tried them all – the ones that call for a blender, the ones that suggest whisking by hand, the ones that tell you to use powdered sugar instead of real maple. Each time, something was missing: the texture was off, the flavor was flat, or the foam collapsed before it even reached the glass. This version stands out because it uses a precise balance of heavy cream and milk, a dash of pumpkin puree for authenticity, and a quick hand‑whisk technique that creates a cloud‑like foam without any fancy equipment.
Okay, ready for the game‑changer? I’m about to reveal a tiny secret ingredient that most people overlook – a pinch of salt. Yes, that humble grain is the silent hero that amplifies every spice and sweetness, turning a good drink into an unforgettable one. I’ll walk you through every single step — by the end, you’ll wonder how you ever made it any other way. Stay with me here — this is worth it.
What Makes This Version Stand Out
- Flavor: The combination of real pumpkin puree, maple syrup, and pumpkin pie spice creates a depth that mimics the Starbucks secret blend, without any artificial syrups.
- Texture: By using heavy cream and a quick hand‑whisk, the foam stays ultra‑creamy and thick, hugging the coffee like velvet.
- Simplicity: No fancy equipment required – just a jar, a whisk, and a sturdy hand. You can do it in under 15 minutes.
- Uniqueness: The pinch of salt unlocks hidden flavor layers, a trick most copycats skip, leaving their drinks flat.
- Crowd Reaction: Guests will swear they’re at a coffee shop, and the “I made this” bragging rights are priceless.
- Ingredient Quality: Using pure pumpkin puree (not pie filling) guarantees a clean, earthy base without unwanted additives.
- Method: The cold‑foam technique keeps the foam airy, unlike hot‑foam methods that melt quickly.
- Make‑Ahead Potential: You can prep the foam in advance and store it in the fridge for up to 24 hours, saving precious morning minutes.
Inside the Ingredient List
The Flavor Base
First up, pumpkin puree. I’m talking about the pure, smooth kind you find in a can of Libby’s – not the sugary pie filling that turns your drink into a dessert. This 1‑tablespoon delivers that unmistakable autumnal earthiness, and because it’s pure, it won’t overwhelm the foam with extra sweetness. If you’re feeling adventurous, you can swap it for roasted butternut squash puree for a nuttier twist, but be prepared for a slightly different flavor profile.
The Texture Crew
Heavy cream (or half‑and‑half) is the star of the show here. At 1/3 cup, it provides the richness and the ability to hold air when whisked, creating that thick, cloud‑like foam. Milk of choice, just 2 tablespoons, tempers the cream just enough to keep the foam from becoming cloyingly heavy. I like 2% for balance, but oat milk works beautifully for a dairy‑free version, adding a subtle sweetness that pairs well with maple.
The Sweet & Spice Duo
Maple syrup isn’t just a sweetener; it’s the aromatic backbone that carries the pumpkin and spice notes. One tablespoon is enough to sweeten without drowning the natural flavors. Pumpkin pie spice – a blend of cinnamon, nutmeg, ginger, and cloves – adds warmth and complexity. A half‑teaspoon may sound modest, but it’s the secret that makes the foam sing. If you love a spicier kick, consider adding a pinch of ground ginger or a dash of cardamom.
The Final Flourish
Vanilla extract brings a bakery‑level aroma that ties everything together, while a pinch of salt is the unsung hero that brightens the entire drink. Salt may seem counterintuitive in a sweet beverage, but it reduces bitterness from the coffee and amplifies the pumpkin’s natural sugars. For the coffee base, any strong brewed coffee or cold brew will do, but I recommend a cold brew concentrate for that smooth, low‑acid backdrop.
Everything's prepped? Good. Let’s get into the real action…
The Method — Step by Step
Gather all your ingredients and give them a quick visual scan. This is the moment of truth – you want everything within arm’s reach so you don’t have to scramble mid‑whisk. I like to line up the heavy cream, milk, pumpkin puree, maple syrup, vanilla, spice, and salt in a small triangle on the counter. The coffee should already be brewed and chilled, sitting in a tall glass ready for assembly. Take a deep breath; you’re about to create a masterpiece.
Start by pouring the heavy cream and milk into a medium‑sized jar with a tight‑fitting lid. Add the pumpkin puree, maple syrup, vanilla extract, pumpkin pie spice, and that pinch of salt. Okay, ready for the game‑changer? Instead of a blender, use a handheld whisk or a small electric frother. The goal is to incorporate air quickly while keeping the mixture cold. I dare you to taste this and not go back for seconds – the first whisk should already emit a faint, sweet aroma that tells you you’re on the right track.
Kitchen Hack: Chill the jar and whisk in the freezer for 5 minutes before whisking; the colder the mixture, the more stable the foam.Whisk vigorously for about 45 seconds to 1 minute. You’ll notice the mixture thickening and turning a pale, buttery color. It should look like a light custard, not a liquid. Stop and sniff – the scent should be a blend of maple and spice, with a subtle buttery note. If the foam looks too thin, keep whisking; the cream needs time to trap air.
Once you have a thick, airy foam, place the jar in the refrigerator for at least 5 minutes. This chilling step stabilizes the foam, preventing it from melting when it meets the cold coffee. I like to set a timer; the anticipation builds, and you can use this time to prep the coffee base. While you wait, give the foam a gentle shake every couple of minutes – this is pure magic for maintaining a velvety texture.
While the foam chills, fill a tall glass with a cup of ice. Pour the chilled coffee or cold brew over the ice, leaving about an inch of space at the top. If you prefer a sweeter coffee, now’s the moment to add a dash of your favorite sweetener; stir gently.
Watch Out: Over‑filling the glass will cause the foam to spill when you spoon it on top. Keep a little headroom!Now, the grand finale: spoon the chilled pumpkin cold foam over the coffee. Use a large spoon or a small spatula to gently layer the foam, allowing it to sit like a fluffy cloud. The foam should sit atop the coffee without sinking, creating a beautiful contrast of dark and light. As you pour, you’ll see the foam slowly melt, releasing aromatic steam that fills the room – a sensory snapshot you’ll never forget.
If you’re feeling extra indulgent, dust a pinch of extra pumpkin pie spice or a light swirl of cinnamon on top. For those who love the classic Starbucks look, add a swirl of whipped cream before the foam – though, honestly, the foam is already decadent enough to stand alone. This step is where you can personalize the drink to your taste; don’t be shy.
Give the drink a final gentle stir if you want the flavors to mingle, or sip it as‑is to enjoy the layered experience. The first sip should be a cool burst of coffee, followed by the silky, spiced foam that lingers on the palate. That lingering after‑taste? That’s the maple‑pumpkin kiss that makes this drink unforgettable. Congratulations – you’ve just mastered a Starbucks‑level pumpkin cold foam at home.
Kitchen Hack: If the foam collapses after a few minutes, give it a quick 10‑second whisk with a fork – it’ll bounce back.
That's it — you did it. But hold on, I've got a few more tricks that'll take this to another level…
Insider Tricks for Flawless Results
The Temperature Rule Nobody Follows
Cold ingredients are the secret to a stable foam. If your cream or milk is at room temperature, the air you whisk in will escape quickly, leaving a watery mess. Keep everything chilled – even the whisk – for at least 10 minutes before you start. I once tried whisking at room temperature and ended up with a soupy disappointment; lesson learned.
Why Your Nose Knows Best
Before you even taste, trust your sense of smell. The moment the foam becomes aromatic with maple and spice, you know the flavor balance is right. If it smells too sweet, cut back on the maple syrup next time. If the spice is muted, add a pinch more pumpkin pie spice. Your nose is the best quality control tool.
The 5‑Minute Rest That Changes Everything
After whisking, let the foam rest in the fridge for exactly five minutes. This short pause lets the proteins in the cream tighten, creating a more cohesive foam that won’t deflate when it meets the coffee. Skipping this step is a common mistake that leads to a flat top.
Shake, Don’t Stir
When you’re re‑aerating the foam during the chilling phase, give the jar a gentle shake instead of stirring. Shaking distributes the air bubbles evenly and prevents the foam from becoming dense. I once tried stirring with a spoon and ended up with a clumpy texture – never again.
Use a Fine‑Mesh Sieve for the Coffee
If you brew your coffee with a French press or a drip that leaves sediment, run it through a fine‑mesh sieve before pouring over ice. Sediment can make the foam break down faster. This extra step keeps the coffee crystal clear, letting the foam shine.
Creative Twists and Variations
This recipe is a playground. Here are some of my favorite ways to switch things up:
Mocha Pumpkin Fusion
Swap half of the coffee for chilled espresso and add a tablespoon of cocoa powder to the foam mixture. The result is a deep, chocolate‑pumpkin duet that feels like a fall dessert in a glass. Chocolate lovers will adore this version.
Vegan Velvet
Replace heavy cream with coconut cream and use oat milk instead of dairy milk. For the pumpkin puree, ensure it’s organic and additive‑free. The foam will be a bit lighter, but the coconut adds a subtle tropical note that pairs surprisingly well with the spice.
Spiced Chai Cold Foam
Drop a chai tea bag into the foam while whisking, and replace the pumpkin puree with a teaspoon of chai concentrate. The resulting drink is a fragrant blend of pumpkin, cardamom, and black tea – perfect for those who love a complex spice profile.
Maple Bacon Crunch
Top the foam with a drizzle of extra maple syrup and a sprinkle of crispy bacon bits. The salty‑sweet crunch adds a playful texture that turns the drink into a brunch‑worthy indulgence.
Caramel Apple Twist
Stir a tablespoon of apple butter into the foam and finish with a drizzle of caramel sauce. This variation captures the essence of a caramel apple, making it a nostalgic treat for the whole family.
Cold Brew Nitro Upgrade
If you have a nitro cold brew, use it as the coffee base. The natural carbonation adds a silky mouthfeel that complements the airy foam, creating a latte‑like experience without the heat.
Storing and Bringing It Back to Life
Fridge Storage
The foam can be kept in an airtight jar in the refrigerator for up to 24 hours. Before using, give the jar a gentle shake to re‑aerate. If the foam looks a bit separated, a quick 10‑second whisk with a fork will bring it back to its fluffy glory.
Freezer Friendly
For longer storage, freeze the foam in silicone ice‑cube trays. Once frozen, transfer the cubes to a zip‑top bag. When you’re ready to serve, blend a cube with a splash of milk to recreate the original texture. This method preserves the flavor for up to a month.
Best Reheating Method
When you need to warm the foam slightly (for a hot version), place the jar in a bowl of warm water for 30 seconds. Add a tiny splash of water before whisking – it steams back to perfection without losing its airy structure.