Picture this: I’m halfway through a chaotic Sunday dinner prep, juggling a simmering pot of pasta, a sizzling skillet of veggies, and a stubborn casserole that refuses to cook evenly. My phone buzzes with a text from a friend: “Hey, I’ve got a secret Instant Pot chicken adobo recipe that’ll blow your mind.” I laughed, thinking it was another over‑hyped dish, but curiosity won. I grabbed the Instant Pot, tossed in some chicken, and the aroma that hit me was so intoxicating it felt like a culinary revelation. That moment turned a routine meal into an adventure, and it’s the spark that ignites this post.
If you’ve ever stared at a pot of chicken adobo and felt the flavor plateau at “okay,” you’re not alone. The classic Filipino dish is beloved for its salty, sweet, and tangy harmony, but many home cooks miss that silky depth that makes the sauce cling to every bite like velvet. I spent months tweaking the ratio of soy to vinegar, experimenting with the timing of the garlic, and discovering that a dash of brown sugar can elevate the entire profile. The result? A dish that’s richer, more balanced, and, dare I say, the best version you’ll ever make at home.
What makes this version stand out? The Instant Pot takes the labor out of the slow, low‑heat simmer that traditionally gives adobo its signature tenderness. By using the pressure cooker’s “sauté” and “manual” settings, you get that deep caramelization of garlic and onions without the extra time. I’ve also added a splash of coconut milk at the end for a creamy finish that’s both unexpected and utterly delicious. And the best part? It’s so simple you’ll wonder why you ever complicated it.
I dare you to taste this and not go back for seconds. I’ll be honest — I ate half the batch before anyone else got to try it. Most recipes get this completely wrong by over‑seasoning or under‑cooking the chicken. Here’s what actually works: a balanced acid base, a touch of sweetness, and a proper sear before pressure cooking. Picture yourself pulling this out of the pot, the whole kitchen smelling incredible, and the first bite sending a wave of savory‑sweet‑sour bliss through your palate. Stay with me here — this is worth it.
What Makes This Version Stand Out
- Taste: The sauce strikes a perfect balance between salty, sweet, and acidic, creating a depth that lingers on the tongue.
- Texture: The chicken turns tender and falls apart, while the sauce thickens into a silky glaze that coats every piece.
- Simplicity: Only ten core ingredients and one appliance—your Instant Pot—make this dish a breeze.
- Uniqueness: A subtle hint of coconut milk adds creaminess that sets this version apart from classic adobo.
- Crowd Reaction: Friends who’ve never tried adobo rave about the familiar yet elevated flavor.
- Ingredient Quality: Using fresh garlic, high‑quality soy sauce, and organic chicken makes a noticeable difference.
- Cooking Method: The Instant Pot’s pressure cooking locks in moisture and intensifies flavors without extra effort.
- Make‑Ahead Potential: This dish stores well and tastes even better the next day, making it ideal for busy schedules.
Alright, let's break down exactly what goes into this masterpiece…
Inside the Ingredient List
The Flavor Base
The foundation of any great adobo is a marriage of soy sauce and vinegar. In this recipe, I use apple cider vinegar for its subtle fruitiness that cuts through the saltiness of the soy. If you’re a fan of the more traditional white vinegar, feel free to swap, but keep the ratio the same. The soy sauce provides umami and depth; I recommend a dark, whole‑grain soy for a richer profile. If you’re looking to cut sodium, choose a low‑sodium soy and add a pinch of salt later.
The Aroma Squad
Garlic, onion, and bay leaves form the aromatic backbone. I mince eight cloves of garlic so that every bite has a punch of garlic without overwhelming the sauce. The onion adds sweetness, and the bay leaves lend a subtle herbal note that balances the acidity. If you’re short on time, you can use pre‑minced garlic or even garlic powder, but fresh garlic delivers a vibrant flavor that’s hard to beat.
The Sweet and Spicy Touch
Brown sugar is the secret to that caramelized finish. I use two tablespoons to give the sauce a hint of sweetness that rounds out the vinegar’s sharpness. Whole peppercorns add a gentle heat that’s different from ground pepper; they release their flavor slowly as the dish cooks. If you prefer a milder version, reduce the sugar to one tablespoon and skip the peppercorns entirely.
Optional Add‑Ons
Carrots and potatoes are optional but highly recommended if you want a heartier meal. Slice the carrots into thick rounds so they hold their shape during pressure cooking. Cube the potatoes into bite‑sized pieces; they’ll absorb the sauce and add a comforting starch element. If you’re watching calories, you can leave them out and serve the adobo over steamed rice or quinoa instead.
Everything's prepped? Good. Let's get into the real action…
The Method — Step by Step
- Heat the Instant Pot on “Sauté” and add two tablespoons of olive oil. Once the oil shimmers, toss in the whole chicken thighs. Sear each side until golden brown, about 3–4 minutes per side. This caramelization locks in flavor and gives the sauce a richer color. Don’t rush—this step is the foundation for a deep, savory base.
- Add minced garlic and sliced onion to the pot. Cook until the onion becomes translucent and the garlic releases its aroma—about 2 minutes. The scent that fills the kitchen will have you feeling like you’re in a bustling Filipino market. Keep the heat moderate to avoid burning the garlic.
- Pour in one cup of soy sauce and one cup of apple cider vinegar. Stir to combine, making sure the sauce coats the chicken evenly. The acidic vinegar will begin to tenderize the meat even before the pressure cooking starts.
- Add one cup of water, three bay leaves, one teaspoon of whole peppercorns, and two tablespoons of brown sugar. Stir again, ensuring the sugar dissolves. The water dilutes the acidity just enough to allow the flavors to meld without becoming too thin.
- Close the lid securely and set the valve to “Sealing.” Select the “Manual” or “Pressure Cook” setting and set the timer for 15 minutes on high pressure. This short cook time keeps the chicken juicy while still tender.
- Once the timer ends, allow the pressure to release naturally for 10 minutes, then switch the valve to “Venting” to release any remaining pressure. This gradual release prevents the chicken from becoming over‑cooked or rubbery.
- Open the lid carefully. If the sauce seems thin, turn the Instant Pot back to “Sauté” and simmer for 5–7 minutes until it thickens to a glaze consistency. This is the moment of truth—watch the sauce reduce and coat the chicken with a glossy sheen.
- Add a splash of coconut milk and stir gently. The coconut milk adds a subtle creaminess that balances the acidity and gives the dish a silky finish. Let it heat through for a minute before serving.
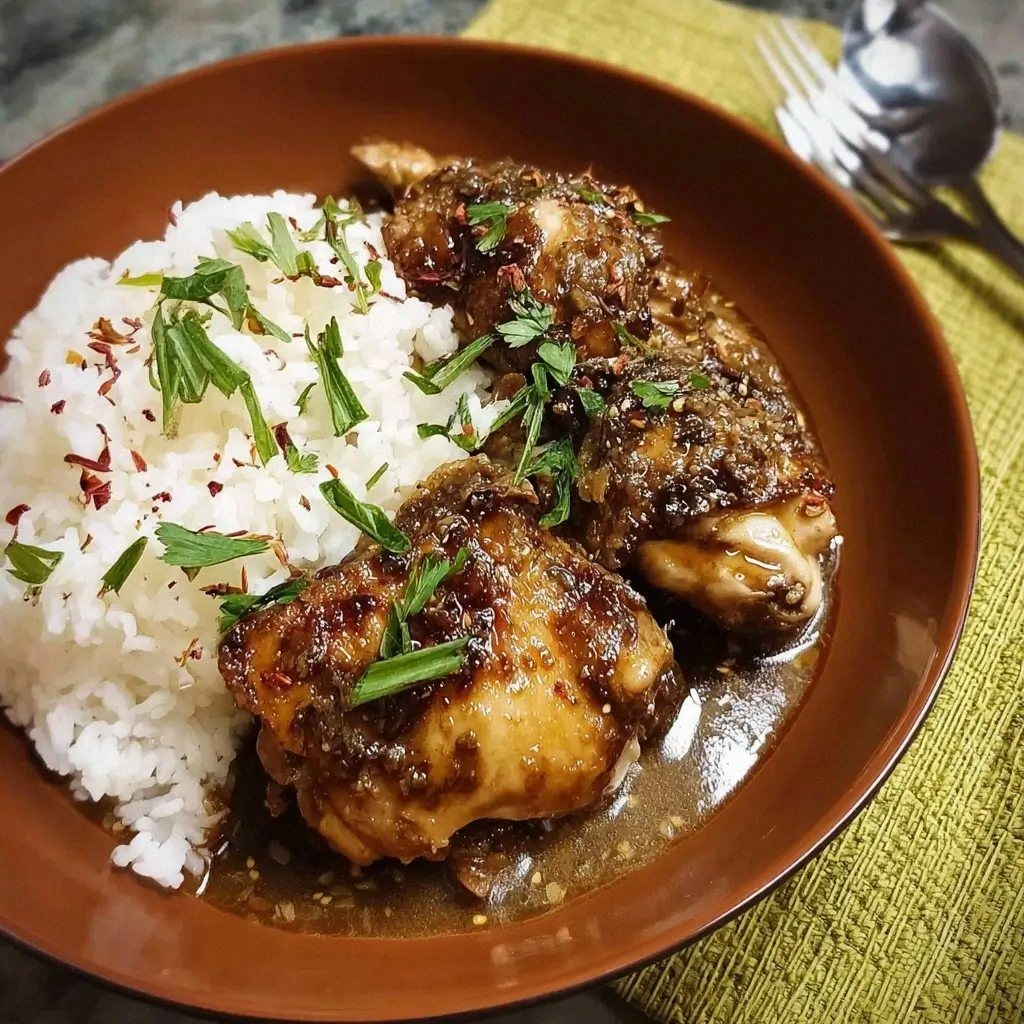
- Taste and adjust seasoning if needed—add a pinch of salt or a bit more brown sugar to suit your palate. Serve hot over steamed rice, and garnish with sliced green onions or toasted sesame seeds for an extra pop of flavor.
That's it — you did it. But hold on, I've got a few more tricks that'll take this to another level…
Insider Tricks for Flawless Results
The Temperature Rule Nobody Follows
Many cooks think a quick sear is enough, but the key is to sear until the chicken develops a deep, caramelized crust. This caramelization creates Maillard compounds that enhance umami. I recommend using a thermometer to ensure the oil reaches 350°F before adding the chicken.
Why Your Nose Knows Best
Smell is the first indicator that the sauce is on the right track. If you catch a sharp vinegar bite, it’s time to add more brown sugar. If the aroma is too garlicky, let the sauté run a bit longer to mellow the garlic.
The 5‑Minute Rest That Changes Everything
After pressure cooking, let the pot sit for five minutes before opening the lid. This resting period allows the internal temperature to stabilize and the juices to redistribute, resulting in a more tender chicken.
The Secret Coconut Milk Finish
Adding coconut milk at the end creates a silky, slightly sweet finish that contrasts beautifully with the sharp vinegar. If you’re lactose intolerant or want a lighter version, try a splash of coconut cream instead.
The Right Salt
Salt is the flavor enhancer. Instead of salt to taste, use a small pinch of sea salt during the sauté phase and finish with a pinch of fine sea salt after simmering. This two‑stage salting prevents the sauce from becoming overly salty.
The Quick Clean‑Up Hack
After cooking, pour the remaining liquid into a small saucepan and reduce it on low heat. While it reduces, scrape the pot’s inner surface with a silicone spatula to remove any stuck bits. This step ensures you get every last drop of flavor without a mess.
Creative Twists and Variations
This recipe is a playground. Here are some of my favorite ways to switch things up:
Spicy Adobo with Chili
Add sliced fresh red chilies or a dash of Sriracha during the sauté phase for a fiery kick that pairs wonderfully with the sweet‑sour sauce.
Smoky Adobo
Incorporate a teaspoon of smoked paprika or a splash of liquid smoke to give the dish a deep, smoky undertone that complements the soy and vinegar.
Vegetarian Adobo
Replace the chicken with tofu cubes or tempeh, and increase the soy sauce slightly to compensate for the milder protein flavor.
Adobo with Pineapple
Stir in chunks of fresh pineapple during the last simmer for a tropical twist that adds a hint of sweetness and acidity.
Adobo with Lemongrass
Add a stalk of bruised lemongrass during the sauté to infuse the sauce with a bright, citrusy aroma that lifts the overall profile.
Adobo with Coconut Rice
Serve the chicken over coconut rice instead of plain white rice for a cohesive, fragrant meal that enhances the coconut milk finish.
Storing and Bringing It Back to Life
Fridge Storage
Cool the adobo to room temperature, then transfer to an airtight container. Store in the refrigerator for up to 4 days. The sauce will thicken slightly as it cools, but it remains juicy and flavorful.
Freezer Friendly
For longer storage, portion the adobo into freezer‑safe containers or zip‑lock bags. Freeze for up to 3 months. Thaw in the refrigerator overnight before reheating.
Best Reheating Method
Reheat gently on the stovetop over low heat, adding a splash of water or broth to loosen the sauce. A tiny splash of water before reheating steams the chicken back to perfection without drying it out.