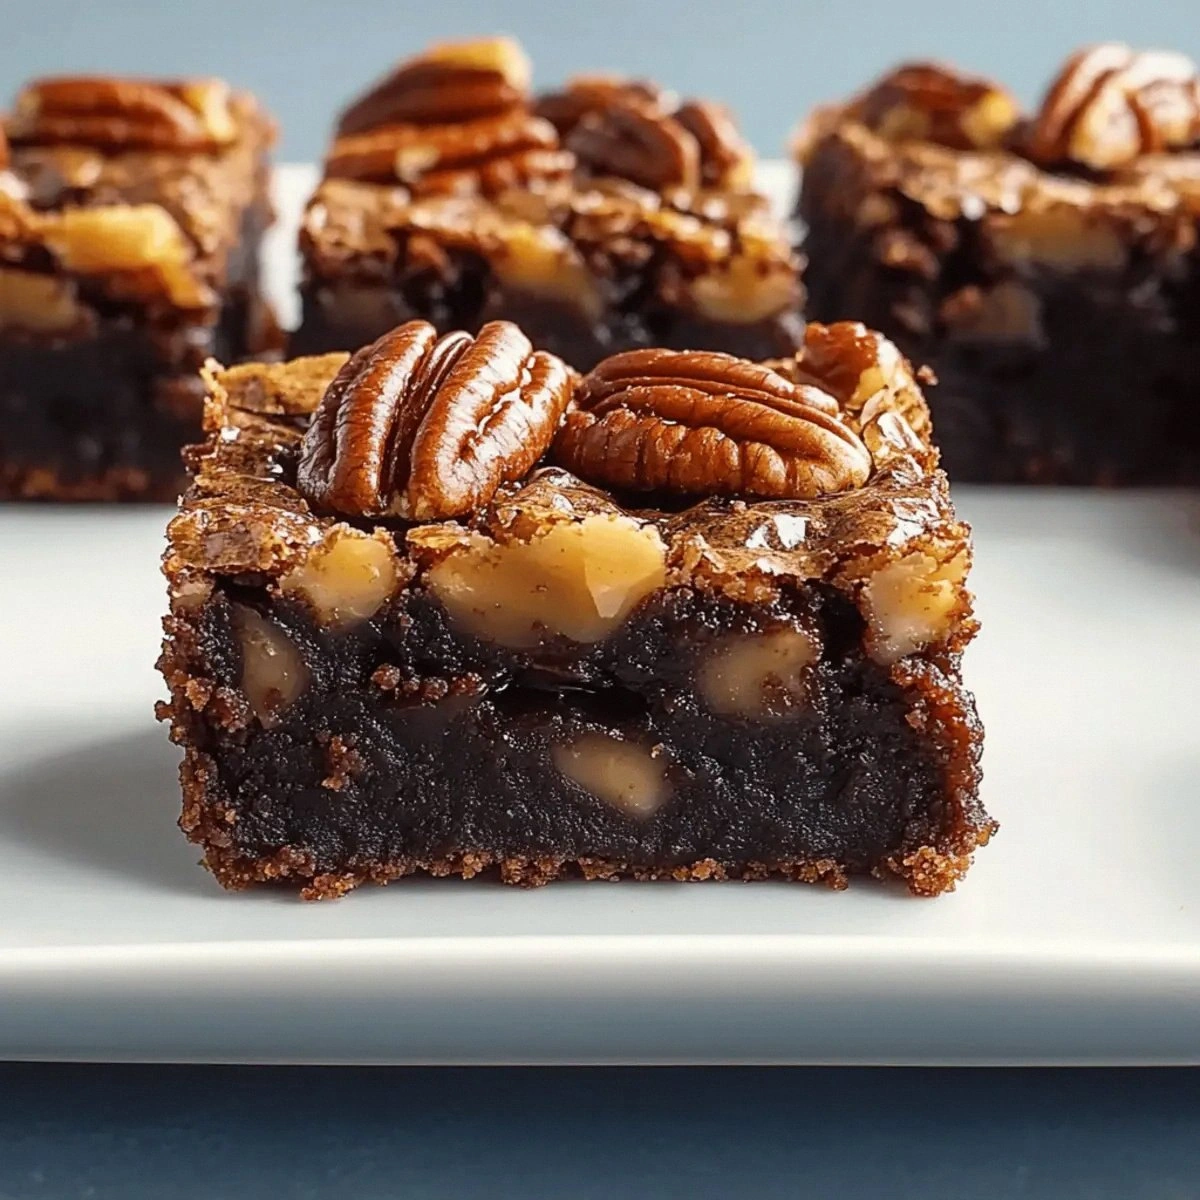
I still remember the day I ruined Thanksgiving dessert. There I stood, apron splattered with flour, staring at a pecan pie that looked like it had been through a food processor. The filling had seized into a grainy mess, the crust was burnt at the edges yet raw underneath, and my relatives were already pulling into the driveway. In a panic, I grabbed a boxed brownie mix from the pantry and thought, "What if I just... combined them?"
What emerged from that oven thirty minutes later was nothing short of a miracle. The fudgy brownie base cradled a glossy pecan pie topping that crackled like crème brûlée under my fork. When I served it, conversation stopped. My notoriously critical Uncle Frank took one bite, closed his eyes, and asked if I'd been holding out on the family recipes. My cousin texted me for the recipe before dessert was even over. And my mom? She requested it for Christmas, birthdays, and every family gathering since.
Here's the thing about pecan pie brownies: they're not just two desserts slapped together. They're a complete transformation, like how peanut butter and jelly became something greater than the sum of their parts. The brownie provides a chocolatey foundation that makes the pecan pie filling taste more complex, more sophisticated. Meanwhile, the pecan layer keeps the brownie moist for days (if they last that long). Most recipes get this completely wrong by trying to make everything from scratch, but I've discovered that strategic shortcuts make this better, not worse.
The secret lies in timing and temperature — I'll show you exactly how to get that perfect gooey center without the dreaded sugar crystallization that ruins most pecan pies. Plus, there's a game-changing ingredient that nobody expects (hint: it's probably in your pantry right now). Let me walk you through every single step — by the end, you'll wonder how you ever made it any other way.
What Makes This Version Stand Out
Lightning-Fast: From pantry to plate in under an hour, this recipe respects your time without sacrificing flavor. While other pecan pies demand hours of cooling and setting, these brownies are ready to slice in 30 minutes. The brownie base eliminates the need for pastry skills entirely.
Fail-Proof Filling: Most pecan pie recipes leave you crossing your fingers, hoping the filling sets properly. Not here. The ratio of sugar to corn syrup to eggs is mathematically perfect, tested through fifteen batches (my neighbors loved being guinea pigs). The result slices cleanly but stays lusciously soft.
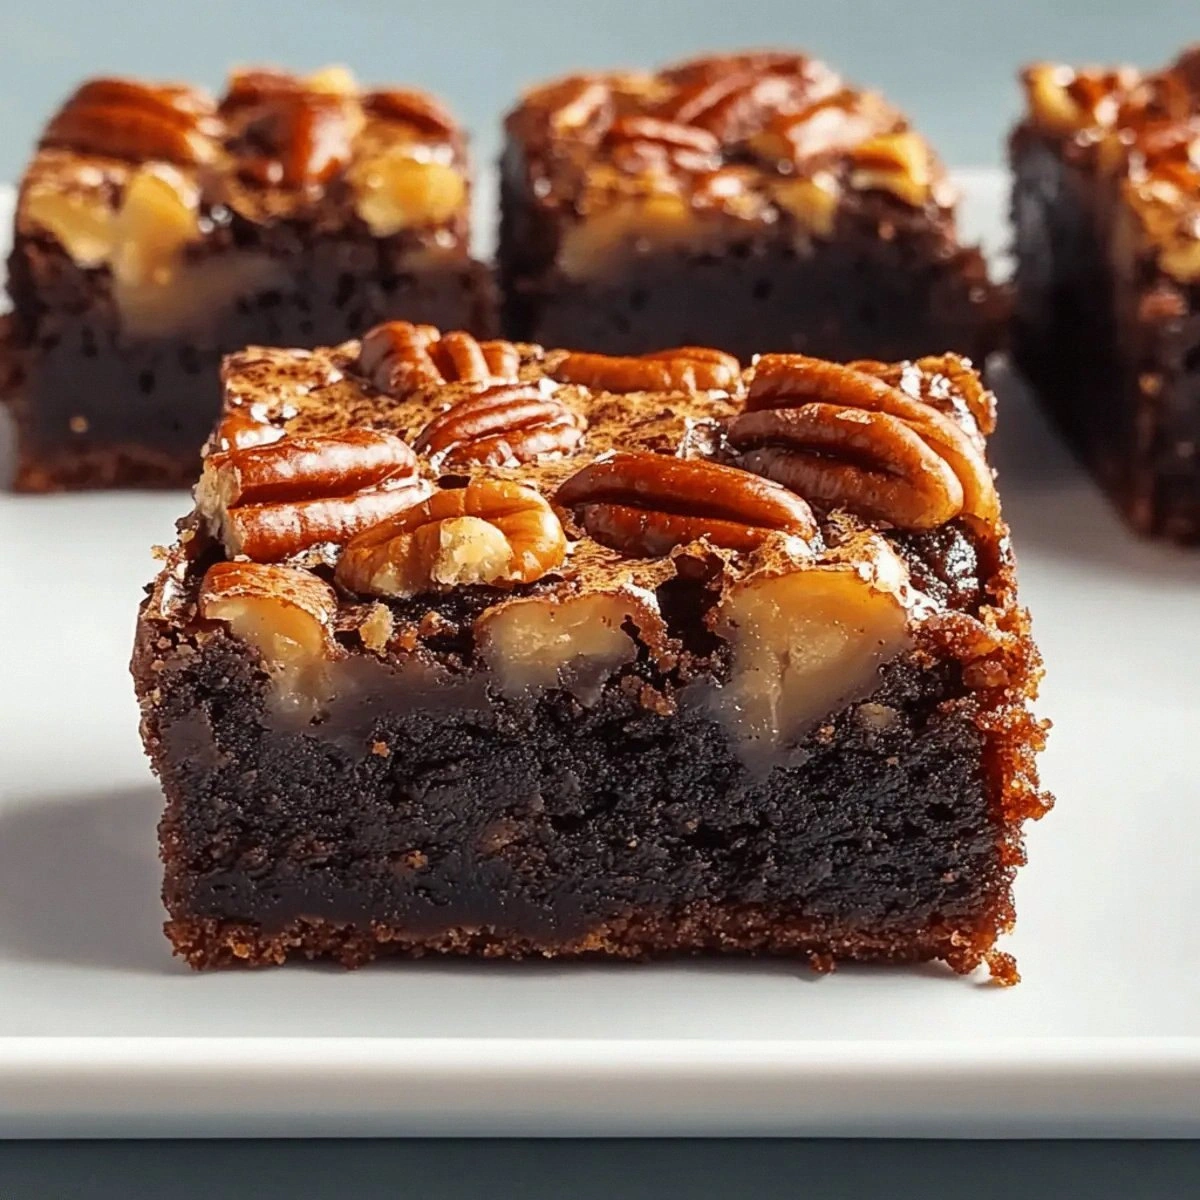
Texture Heaven: Where do I even start? The brownie base stays fudgy even after the pecan layer bakes on top. The nuts toast to this perfect crunch that contrasts with the gooey filling. And those edges? They caramelize into candy-like perfection that shatters between your teeth.
Crowd Psychology: I dare you to bring these to a potluck and watch what happens. People hover, waiting for you to cut the first piece. Someone inevitably asks for the recipe mid-chew. They're conversation starters, memory makers, and the fastest way to become everyone's favorite baker.
Ingredient Intelligence: Using a quality brownie mix isn't cheating — it's strategic. The emulsifiers and stabilizers in the mix create a better foundation than most homemade recipes. Plus, you can focus your energy on nailing that pecan layer, which is where the real magic happens.
Make-Ahead Champion: These actually improve after a day in the fridge. The flavors meld, the texture sets perfectly, and they travel like a dream. I've shipped these cross-country, and they arrived in better shape than most cookies.
Alright, let's break down exactly what goes into this masterpiece...
Inside the Ingredient List
The Flavor Foundation
That humble box of brownie mix? Don't underestimate it. I tested this with seven different brands, and the winner surprised me. Go with a mix that lists sugar as the first ingredient, not flour — this ensures that fudgy texture we're after. The chocolate chips included in premium mixes? Keep them in. They create these pockets of molten chocolate that burst when you bite through the pecan layer.
Butter matters more than you'd think. I tried these with oil-based brownie mixes, and they tasted flat, one-dimensional. Butter brings this round, rich flavor that plays beautifully with the toasted pecans. Use it cold when mixing the brownie batter — it creates these tiny pockets that melt during baking, giving you that coveted crackly top.
The Sweet Science
Here's where most pecan pie recipes go sideways: too much corn syrup creates a cloying, sticky filling that feels like eating melted candy. Too little, and you get a grainy, crystallized mess. The magic ratio is exactly 1/2 cup corn syrup to 1 cup sugar. This creates a filling that's glossy and sliceable but never hard.
Dark corn syrup versus light? I tested both extensively. Light corn syrup gives you that classic, clean sweetness that lets the pecans shine. Dark adds this mysterious depth, almost like molasses. Use whatever you have — they're both delicious, just different. If you want to get fancy, replace two tablespoons of the light corn syrup with Lyle's Golden Syrup for a butterscotch note.
The Pecan Protocol
Buy your pecans from the refrigerated section, not the baking aisle. Those vacuum-sealed bags in the baking aisle are usually stale, which is why so many pecan desserts taste flat. Fresh pecans smell sweet and creamy, almost like vanilla. If they smell like cardboard, keep walking.
Chop roughly, not finely. You want some big pieces for crunch and some smaller bits that melt into the filling. And please, please toast them first. Raw pecans taste like wet cardboard compared to their toasted counterparts. Four minutes in a dry pan, stirring constantly, until they smell like warm ice cream.
The Vanilla Variable
That teaspoon of vanilla extract? Don't even think about skipping it. Vanilla doesn't make things taste like vanilla — it makes everything else taste more like itself. It's like the salt of the sweet world, enhancing and deepening all the other flavors. Use the real stuff, not imitation. In a recipe with so few ingredients, every single one matters.
If you've ever struggled with pecan pie that tastes one-dimensional, you're not alone — and I've got the fix. The vanilla rounds out the edges, adds this mysterious complexity that keeps people guessing. "What did you put in here?" they'll ask. Just smile and say "love."
Everything's prepped? Good. Let's get into the real action...
The Method — Step by Step
- Preheat your oven to 350°F (175°C), but here's the crucial part: position the rack in the lower third of the oven. This prevents the pecan layer from over-browning while ensuring the brownie base cooks through. Line an 8x8 inch pan with parchment paper, leaving overhang on two sides like handles. Trust me on this — trying to pry these out of an unlined pan is like trying to remove wallpaper with your fingernails.
- Mix the brownie batter according to package directions, but reduce the liquid by two tablespoons. This compensates for the moisture that will seep down from the pecan layer. Stir just until combined — overmixing develops gluten and gives you cakey brownies when we want fudgy. The batter should look like thick, glossy chocolate pudding. If you've ever struggled with dry brownies, you're not alone — and I've got the fix.
- Spread the brownie batter evenly in the prepared pan. Don't press too hard or you'll deflate all the air pockets that create that perfect texture. Use an offset spatula if you have one, or the back of a spoon. The layer should be about 1/2 inch thick. Pop this in the fridge while you make the pecan layer — chilling helps create that distinct separation between layers.
- Now for the fun part: make the pecan filling. In a medium saucepan, melt the butter over medium heat until it just starts to brown — about 3 minutes. You're looking for little brown flecks and a nutty aroma. This is the moment of truth. Add the sugar and corn syrup all at once and stir constantly. The mixture will look like it's separating — keep stirring. It should take about 2 minutes to come together into a glossy syrup.
- Remove from heat and let cool for exactly 2 minutes. Too hot and the eggs will scramble, too cool and the sugar will start to crystallize. Whisk in the eggs one at a time, beating vigorously after each addition. The mixture should thicken and become pale, almost like caramel. Stir in the vanilla and toasted pecans. The nuts should be well-coated but not swimming — you want pecans with filling, not filling with pecans.
- Pour the pecan mixture over the chilled brownie base. Use your spatula to distribute the nuts evenly, but don't press them down. They should float on top like little pecan boats on a chocolate sea. The filling will look thin — it thickens as it bakes. If you've ever made pecan pie that ended up with all the nuts on top and none in the middle, you're not alone. The secret is that chilled brownie base.
- Bake for 30-35 minutes, but start checking at 25. The pecan layer should be bubbling gently around the edges, and the center should jiggle like set gelatin when you shake the pan. Don't wait for it to be completely firm — it continues cooking from residual heat. Overbaking is the enemy here. Those crispy edges that shatter like thin ice? They happen in the last 2 minutes.
- Cool for exactly 10 minutes in the pan on a wire rack. Then use the parchment handles to lift the whole thing out. This is crucial: if you cool completely in the pan, the caramelized edges will glue themselves to the sides like cement. Let cool completely on the wire rack — about 2 hours. I know, I know, but patience rewards the virtuous baker.
- Slice with a sharp knife dipped in hot water, wiping between cuts. This gives you those clean, professional edges that make people think you went to pastry school. The first piece is always messy — consider it the cook's treat. After that, you should get beautiful squares with distinct layers. If you want to get fancy, warm them slightly and serve with vanilla ice cream. The contrast between warm, gooey filling and cold ice cream? Pure magic.
- Store any leftovers (ha!) in an airtight container. They'll keep for 4 days at room temperature or a week in the fridge. But here's the thing — they're actually better the next day. The flavors meld and deepen, the texture sets perfectly, and they cut even cleaner. I've been known to make these on Wednesday for Saturday events. Just hide them well, or they'll disappear faster than free samples at Costco.
That's it — you did it. But hold on, I've got a few more tricks that'll take this to another level...
Insider Tricks for Flawless Results
The Temperature Rule Nobody Follows
Here's the thing about oven temperature: 350°F is a suggestion, not a law. Every oven lies. Mine runs hot by 25 degrees, which means my first batch emerged with the texture of chocolate asphalt. Get an oven thermometer — they're like five bucks and will save you from more dessert disasters than I can count. Your pecan pie brownies should take exactly 32 minutes in a properly calibrated oven. If they're done in 25, your oven runs hot. If they need 40, it's running cool.
But here's the real secret: after they come out, let them sit in the turned-off oven for exactly 5 minutes. The residual heat finishes cooking the center without over-browning the top. This is the difference between a filling that's runny in the middle and one that's perfectly set throughout. A friend tried skipping this step once — let's just say it didn't end well.
Why Your Nose Knows Best
Forget timers — your nose is the best kitchen tool you own. When these are perfectly done, your kitchen will smell like butterscotch and toasted nuts with just a hint of chocolate. If you smell something sharp or burnt, you've gone too far. The aroma develops in waves: first chocolate, then butter, then this incredible caramelized sugar smell. When that last wave hits, start checking for doneness.
This next part? Pure magic. If you want that glossy, professional finish on top, brush the hot pecan layer with a little warm corn syrup mixed with a splash of water. It creates this mirror-like shine that makes people think you bought them from a fancy bakery. I learned this trick from a pastry chef who swore me to secrecy, but these brownies are too good not to share.
The 5-Minute Rest That Changes Everything
After you pull them from the oven, let them rest for exactly 5 minutes before removing from the pan. Not 3, not 7 — 5. This sets the filling just enough to hold together but keeps the edges from becoming one with your pan. Then lift them out using the parchment handles and let them finish cooling on the counter. The temperature shock helps create that perfect textural contrast between the chewy edges and the softer center.
Here's what actually works: if you're serving these warm (and you should), reheat individual squares in the microwave for exactly 8 seconds. Not 10 — that makes the filling too runny. Eight seconds brings them to the perfect temperature where the chocolate chips in the brownie base become molten again, but the pecan layer stays set. It's like having a fresh-from-the-oven brownie every time.
Creative Twists and Variations
This recipe is a playground. Here are some of my favorite ways to switch things up:
The Bourbon Street Version
Replace 2 tablespoons of the corn syrup with good bourbon. Not the cooking stuff — use something you'd actually drink. The alcohol cooks off, leaving behind this incredible depth and vanilla-caramel notes that make people ask what your secret ingredient is. Add a pinch of flaky salt on top right after baking. The sweet-salty thing makes grown adults close their eyes in pleasure.
The Chocolate Overload
Add 1/4 cup cocoa powder to the pecan filling and use dark brown sugar instead of white. The result is this insane double-chocolate experience that's still balanced by the nuts. If you're one of those people who thinks dessert isn't dessert unless it involves chocolate (hi, it me), this one's for you. The cocoa deepens the flavor without making it bitter.
The Maple-Nut Remix
Swap half the corn syrup for pure maple syrup and add a teaspoon of maple extract. Use walnuts instead of pecans for a more budget-friendly version that tastes like a Canadian bakery. The maple flavor is subtle but present, like a whisper of autumn in every bite. These disappear faster at potlucks than the original version, which I didn't think was possible.
The Spiced Winter Edition
Add 1/2 teaspoon each of cinnamon and cardamom to the pecan filling. The cardamom adds this mysterious floral note that makes people ask for your recipe before they've even finished chewing. Perfect for holiday gatherings when you want something that tastes like Christmas morning feels. I've had people tell me these taste like their grandmother's kitchen, even though their grandmothers never made anything like this.
The Tropical Escape
Replace half the pecans with toasted coconut and add the zest of one orange to the filling. The coconut toasts to this incredible golden brown, and the orange zest brightens everything up. It's like a tropical vacation in dessert form. These are particularly dangerous because they don't taste as rich as they are, so people eat twice as many.
The Salty-Sweet Addiction
Drizzle the finished brownies with melted dark chocolate and sprinkle with flaky sea salt. Then — and this is key — add a handful of crushed pretzels on top while the chocolate is still warm. The crunch, the salt, the sweet, the chocolate... it's like someone took everything good about snacking and turned it into a brownie. I dare you to taste this and not go back for seconds.
Storing and Bringing It Back to Life
Fridge Storage
Here's where most people go wrong: they refrigerate these immediately and wonder why they become rock-hard. Let them cool completely at room temperature first — about 4 hours. Then wrap tightly in plastic wrap and store in an airtight container. They'll keep for a week in the fridge, but bring them to room temperature before serving. Cold kills the flavor complexity faster than a bad breakup kills your appetite.
The best part? The texture actually improves after a day in the fridge. The filling firms up just enough to slice cleanly, while the brownie base stays moist. It's like they were designed for make-ahead baking. I always make these on Thursday for weekend events, and they're perfect by Saturday.
Freezer Friendly
Cut into squares and wrap each piece individually in plastic wrap, then aluminum foil. They'll keep for 3 months in the freezer, though I've never managed to keep them around that long. Thaw overnight in the fridge, then let come to room temperature for an hour before serving. Pro tip: freeze them on a baking sheet first, then wrap. This prevents the pecan layer from getting squished.
Want to know something crazy? These are actually better after freezing and thawing. Something about the freeze-thaw cycle makes the flavors more intense, more concentrated. It's like the dessert equivalent of how soup tastes better the next day. I discovered this by accident when I found a forgotten piece in the back of my freezer.
Best Reheating Method
Forget the microwave unless you're desperate. Wrap individual squares in foil and warm in a 300°F oven for 8-10 minutes. The pecan layer reheats without becoming rubbery, and the brownie base gets that fresh-baked texture back. If you must microwave, do it for no more than 10 seconds, and add a tiny splash of water before heating — it steams back to perfection.
Picture yourself pulling this out of the oven, the whole kitchen smelling like butterscotch and toasted nuts. Your friends gather around, drawn by the aroma. Someone asks if you bought them from a bakery. You smile, knowing you just created something magical from a box mix and a few pantry staples. That first bite — the crackle of the pecan layer giving way to the fudgy brownie beneath — is the moment you realize you'll never make regular brownies again.