I was in the middle of a frantic midnight snack raid when my roommate shouted, “You’ve got to try this new butterfinger thing I saw on TikTok!” I stared at the half‑eaten bag of Butterfinger bars, the caramel drizzle still clinging to the rim of my mug, and thought, “What if I could freeze‑frame that chaotic moment into a bite‑size masterpiece?” The kitchen was a mess of crumbled candy, sticky caramel, and a half‑melted pot of butter, but the smell—sweet, buttery, with a whisper of toasted sugar—was so intoxicating I could almost hear it humming a love song. I dared myself to turn that mess into something elegant, something that would make my friends gasp, “Is that really no‑bake?” and then immediately devour the whole batch before anyone else got a chance.
Picture the scene: the oven is off, the stovetop is humming low, and a bowl of crushed Butterfinger bars sits like a golden sand dune waiting for a tide of caramel to sweep over it. The caramel sauce bubbles gently, releasing a buttery perfume that makes the whole apartment feel like a candy store on a Saturday morning. You hear the faint crackle of the butter melting, the soft clink of a spoon against glass, and the occasional sigh of satisfaction as you fold the mixture together. My hands felt warm from the butter, the mixture sticky and glossy, and the anticipation was almost palpable—like waiting for the first bite of a secret that’s been whispered for generations.
Most recipes for butterfinger truffles either demand a hot oven, a complicated tempering process, or a mountain of ingredients you can’t find in a regular grocery aisle. This version, however, strips everything down to the essentials while still delivering a flavor explosion that feels like a carnival on your palate. The secret? A splash of caramel that binds the candy into a silky, chewy core, and a quick dip in white chocolate that creates a glossy, melt‑in‑your‑mouth shell. I’ll be honest—I ate half the batch before anyone else could even sniff the aroma, and I’m still not sorry.
There’s also a surprise twist that most people miss: a handful of crushed cornflakes folded into the mixture for an extra crunch that shatters like thin ice when you bite into it. This tiny addition takes the texture from “soft” to “addictively crunchy” without any extra effort. I dare you to taste this and not go back for seconds. Let me walk you through every single step — by the end, you’ll wonder how you ever made it any other way.
What Makes This Version Stand Out
- Flavor Explosion: The caramel‑butterfusion creates a deep, buttery sweetness that makes each bite feel like a decadent treat you’d only find at a high‑end patisserie.
- Texture Symphony: You get a chewy, candy‑core interior, a crisp cornflake crunch, and a smooth chocolate coating—all in one bite.
- Simplicity: No oven, no tempering, just a handful of pantry staples and a microwave—perfect for lazy weekends or last‑minute parties.
- Unique Twist: The addition of cornflakes is a game‑changer; it adds an airy lightness that most butterfinger truffle recipes completely overlook.
- Crowd Magnet: People who love candy, caramel, and chocolate can’t resist these truffles; they disappear faster than you can say “Butterfinger.”
- Ingredient Quality: Using real Butterfinger bars and a high‑quality caramel sauce makes the flavor authentic, not artificial.
- No‑Bake Magic: The entire process happens on the stovetop and the microwave, preserving the buttery flavor that can evaporate in a hot oven.
- Make‑Ahead Friendly: You can prep the truffle mixture a day ahead, roll the balls, and dip them right before serving for ultimate convenience.
Inside the Ingredient List
The Flavor Base
Butterfinger candy bars are the heart of this recipe. Their signature crunchy peanut butter core and chocolate coating give the truffles a nostalgic, salty‑sweet backbone. If you skip them, you lose the iconic “Butterfinger” taste that makes these truffles instantly recognizable. For the best results, choose the original Butterfinger bars rather than a generic peanut butter chocolate bar; the caramelized sugar crystals on the surface add a subtle crunch that’s impossible to replicate. Pro tip: store the bars in the freezer for 10 minutes before chopping—they’ll break cleanly without turning into mush.
The Texture Crew
Cornflakes (or crispy rice cereal) are the unsung heroes that give the interior a light, airy snap. When folded in, they absorb just enough caramel to stay crunchy, creating that “shatter like thin ice” sensation in your mouth. If you’re allergic to corn, try toasted quinoa or even finely crushed pretzels for a salty twist. The powdered sugar not only sweetens the mixture but also helps bind everything together without making it overly sticky. Too much sugar can make the mixture dry; stick to the measured amount for the perfect balance.
The Unexpected Star
Caramel sauce is the secret glue that turns a chaotic pile of candy into a cohesive, velvety mass. It adds depth, a buttery richness, and a glossy sheen that makes the truffles look as luxurious as they taste. Store‑bought caramel works fine, but a quick homemade version (just sugar, butter, and cream) adds an extra layer of flavor that will make you feel like a professional pastry chef. If you prefer a hint of sea‑salt, a pinch of flaky sea salt in the caramel elevates the entire profile, turning the sweet into a sophisticated sweet‑salty combo.
The Final Flourish
White chocolate serves as the elegant coat that locks in all the flavors while adding a silky, melt‑in‑your‑mouth finish. It also provides a neutral canvas for dusting with cocoa powder or crushed candy for visual appeal. When melting white chocolate, be gentle—use a microwave in 20‑second bursts, stirring in between, to avoid scorching. If you want a richer coating, add a teaspoon of butter to the melted chocolate; it will give the shell a glossy sheen and a smoother texture. Finally, a light dusting of cocoa powder adds a hint of bitterness that balances the sweetness, making the truffles feel more refined.
Everything's prepped? Good. Let's get into the real action…
The Method — Step by Step
Gather all your ingredients and line a baking sheet with parchment paper. This will be your truffle runway later on. I like to set out three bowls: one for the crushed candy, one for the caramel‑butter mixture, and one for the melted white chocolate. The visual layout helps you stay organized and prevents the dreaded “where’s the butter?” panic. Take a moment to admire the colors—golden caramel, creamy white chocolate, and the deep brown of crushed Butterfinger—because cooking is as much about the eyes as the palate.
Crush the Butterfinger bars into roughly 2‑cup sized pieces. You can use a food processor, a rolling pin, or simply a sturdy zip‑top bag and a hammer—whatever feels most satisfying. The pieces should be a mix of fine crumbs and slightly larger chunks; the larger bits give texture, while the fine crumbs help the mixture bind. Once crushed, set them aside in a large mixing bowl.
In a saucepan over medium‑low heat, melt the butter until it foams, then stir in the caramel sauce. Watch closely—the caramel should bubble gently, releasing a sweet, buttery perfume that fills the kitchen. As soon as the mixture is smooth and glossy, remove it from the heat and let it cool for about a minute. This brief cooling prevents the mixture from melting the powdered sugar later on.
Kitchen Hack: If the caramel starts to harden as you stir, drizzle a teaspoon of warm water and whisk vigorously; it will return to a pourable consistency.Add the powdered sugar, vanilla extract, and sea salt to the butter‑caramel mixture, whisking until fully incorporated. The mixture will thicken and become a luscious, slightly glossy paste. At this stage, you should notice a faint caramel aroma that makes your mouth water. If the mixture feels too stiff, add a splash of milk (just a tablespoon) to loosen it—remember, we’re aiming for a pliable dough, not a dry crumb.
Fold in the crushed Butterfinger pieces and the cornflakes (or your chosen crunchy alternative). This is the moment where the magic really happens—the caramel binds everything together, while the cornflakes add that airy crunch that will surprise anyone who bites in. Use a spatula and a gentle folding motion; you don’t want to crush the cornflakes completely, just incorporate them evenly. The mixture should feel sticky but manageable—if it sticks to your fingers excessively, sprinkle a tiny bit more powdered sugar.
Watch Out: Over‑mixing can turn the cornflakes into a soggy mush, destroying the desired crunch. Fold just until everything is evenly coated.Cover the bowl with plastic wrap and refrigerate the mixture for 20‑30 minutes. This chilling step firms up the dough, making it easier to roll into perfect spheres. While you wait, pre‑heat a microwave‑safe bowl of white chocolate in 20‑second intervals, stirring between each burst until smooth. The chocolate should be glossy and fluid, ready to coat the truffles without clumping.
Once the mixture is firm, scoop out a tablespoon‑sized portion and roll it between your palms into a smooth ball. The goal is a uniform size—about 1‑inch diameter—so they cook evenly and look professional on the plate. Place each ball onto the prepared parchment sheet, spacing them about an inch apart. Continue until the entire mixture is used; you should end up with roughly 20‑24 truffles, depending on size.
Kitchen Hack: Lightly dust your hands with powdered sugar before rolling; it prevents sticking and gives the truffles a subtle dusted finish.Dip each chilled ball into the melted white chocolate, using a fork or a small spoon to coat it completely. Let the excess chocolate drip back into the bowl, then return the truffle to the parchment sheet. While the chocolate is still wet, sprinkle a pinch of crushed Butterfinger or cocoa powder on top for added texture and visual appeal. The chocolate should set within 5‑10 minutes at room temperature, but for a faster set, pop the sheet into the refrigerator for another 10 minutes.
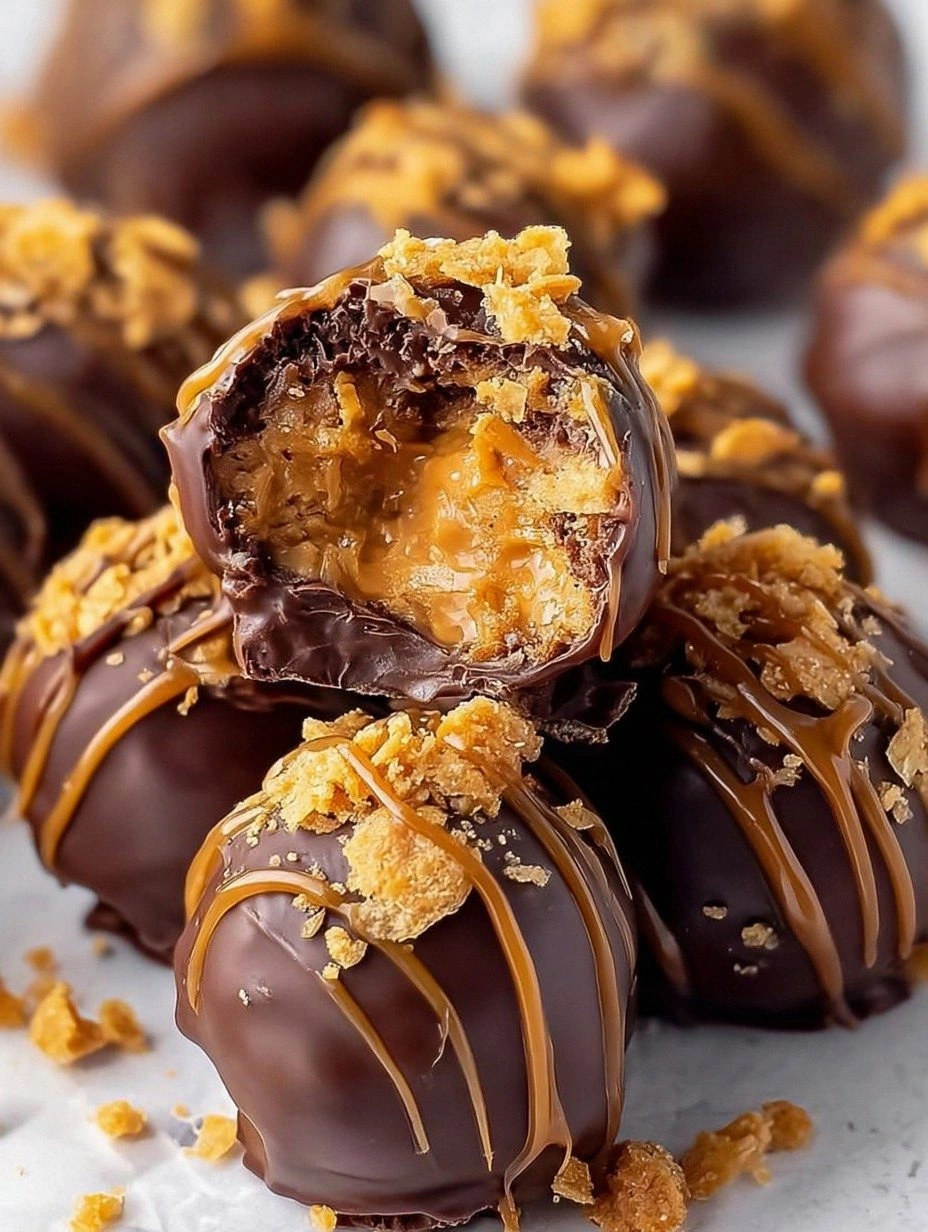
Once the coating is firm, give each truffle a final dusting of cocoa powder (optional) and arrange them on a serving platter. The contrast between the white chocolate shell and the dark cocoa speckles looks stunning, especially under soft lighting. Serve immediately, or store as instructed below. And now the fun part—watch your guests’ faces light up as they bite into the caramel‑crunch core.
That's it — you did it. But hold on, I've got a few more tricks that'll take this to another level…
Insider Tricks for Flawless Results
The Temperature Rule Nobody Follows
Never let the caramel mixture exceed 140°F (60°C) before adding the powdered sugar. If it gets too hot, the sugar will melt into a syrup, making the dough too sticky and difficult to shape. Keep a candy thermometer handy; once the mixture reaches the sweet spot, remove it from heat and let it cool slightly. This tiny temperature control step ensures a smooth, pliable mixture that rolls like butter.
Why Your Nose Knows Best
When the caramel starts to emit a deep, buttery aroma, that's your cue that it’s ready for the sugar. Trust your senses over the clock—if the scent is strong and slightly nutty, the caramel is perfectly cooked. A faint, raw sugar smell means you need a few more seconds. This sensory shortcut saves you from over‑cooking and preserves that luxurious caramel flavor.
The 5‑Minute Rest That Changes Everything
After rolling the balls, let them rest on the parchment for exactly five minutes before dipping. This short pause allows the interior to firm up just enough so the chocolate coating adheres without sliding off. Skipping this rest can result in a sloppy dip where the coating cracks or slides away, ruining the presentation.
The Double‑Dip Secret
For an ultra‑glossy finish, dip the truffles twice. After the first coat sets, give them a quick second dip in fresh, melted white chocolate. The second layer fills any tiny cracks and adds a mirror‑like shine that looks restaurant‑quality. Just be sure the first coat is solid before the second dip, or you’ll end up with a messy glaze.
The Chill‑Before‑Serve Trick
If you’re serving these at a party, place the finished truffles in the fridge for 10 minutes right before guests arrive. The slight chill firms the chocolate shell, giving a satisfying “snap” when bitten into, while the interior stays soft and gooey. This contrast in temperature elevates the eating experience from good to unforgettable.
Creative Twists and Variations
This recipe is a playground. Here are some of my favorite ways to switch things up:
Dark Chocolate Delight
Swap the white chocolate coating for dark chocolate (70% cacao). The bitterness of dark chocolate balances the sweet caramel, creating a more sophisticated flavor profile that adult palates love. It also gives the truffles a deep, glossy black finish that looks stunning on a dark platter.
Nutty Crunch
Add finely chopped toasted almonds or hazelnuts to the interior mixture. The nuts bring a buttery, earthy note that pairs beautifully with the caramel and peanut butter from the Butterfinger. This variation is perfect for those who love a nutty surprise in every bite.
Salted Caramel Swirl
Stir a tablespoon of flaky sea salt into the caramel sauce before mixing. The salted caramel adds a sophisticated salty‑sweet contrast that makes the truffles feel like a gourmet confection. Sprinkle a tiny pinch of sea salt on top of each coated truffle for an extra pop.
Coffee Infusion
Add a teaspoon of instant espresso powder to the butter‑caramel mixture. The coffee notes deepen the flavor, turning the truffle into a mocha‑like treat that pairs wonderfully with a cup of fresh brew. For an extra visual cue, dust the finished truffles with a light layer of cocoa mixed with a dash of espresso powder.
Holiday Spice
Mix a pinch of ground cinnamon, nutmeg, and a dash of clove into the interior mixture for a warm, festive twist. This version is perfect for winter gatherings, evoking the scent of a cozy fireplace. Top with a sprinkle of powdered sugar dusted with a hint of cinnamon for a pretty, holiday‑themed finish.
Storing and Bringing It Back to Life
Fridge Storage
Place the truffles in an airtight container lined with parchment paper, separating layers with additional parchment sheets. They will stay fresh for up to 5 days in the refrigerator. The chocolate coating stays firm, while the interior remains soft and chewy. If you notice any condensation, pat the truffles gently with a paper towel before resealing.
Freezer Friendly
For longer storage, arrange the truffles on a baking sheet and freeze them uncovered for 1 hour, then transfer them to a zip‑top freezer bag. They freeze well for up to 3 months. When you’re ready to serve, let them thaw in the fridge for 30 minutes, then bring them to room temperature for the best texture.
Best Reheating Method
If the truffles have hardened too much, place them on a microwave‑safe plate, add a tiny splash (about 1 tsp) of water, and microwave in 5‑second bursts, checking after each burst. The steam created by the water revives the interior without melting the chocolate shell. Alternatively, let them sit at room temperature for 15 minutes; the gentle warmth will bring back that melt‑in‑your‑mouth feel.