The first time I tried turning a birthday cake into a bowl of oats, I thought I was about to invent a new breakfast trend. I had a bag of rolled oats, a can of whole milk, and an adventurous spirit. The kitchen smelled like vanilla and chocolate, but the real aroma was the sweet anticipation of something that would be both cake and comfort food. I whisked in an egg and let the batter mingle like a well‑mixed choir of flavors. When the oven door opened, the steam curled in a cloud that felt like a frosting swirl on a cupcake.
I remember the moment the timer buzzed and the golden edges popped up like tiny fireworks. The first bite was a revelation: the oats were fluffy, the chocolate chips were melted into pockets of joy, and the cake‑like texture gave way to a chewy, almost custard‑like center. I dare you to taste this and not go back for seconds. That first spoonful made me realize I had stumbled upon a culinary goldmine that would change how we think about breakfast and dessert. I was so excited I almost jumped out of my chair, but the oven was still humming, so I kept my feet firmly on the floor.
Fast forward a few weeks later, I had the recipe refined and the kitchen ready for a full‑scale production. I added a dash of cinnamon for warmth, a splash of vanilla for depth, and a generous handful of chocolate chips for that classic birthday cake kick. The result was a dish that looked like a cake, tasted like a cake, and behaved like a comforting bowl of oats. It’s hands down the best version you'll ever make at home, and I’m not even exaggerating. Picture yourself pulling this out of the oven, the whole kitchen smelling incredible, and everyone asking for a second helping.
If you’ve ever struggled with a cake that turns out dry or an oatmeal that feels like mush, you’re not alone. I’ve been there, watching the batter turn into a soggy mess, only to salvage it with a quick tweak. That tweak was the realization that oats absorb liquid differently than flour, and that the key is to balance moisture with the right leavening. I’ll be honest — I ate half the batch before anyone else got to try it. But that’s the secret: the first bite is a revelation that will make you wonder how you ever made it any other way.
What Makes This Version Stand Out
- Taste: The combination of vanilla, cinnamon, and chocolate creates a layered flavor profile that feels like a birthday cake but with the wholesome comfort of oats. Each bite delivers a sweet, slightly spicy kick that lingers on the palate. This depth of flavor is achieved by using real vanilla extract instead of artificial flavoring, giving the dish an authentic aroma that melts in your mouth.
- Texture: The oats provide a chewy, slightly crunchy base that contrasts beautifully with the soft, cake-like crumb. The batter is thick enough to hold its shape but airy enough to melt in the mouth. The result is a dish that feels like a dessert but is surprisingly filling and nutritious.
- Simplicity: With only ten ingredients, you can whip up this masterpiece in under an hour. No fancy equipment, no special ingredients, just pantry staples and a little culinary curiosity. The process is straightforward, making it a perfect go‑to for busy mornings or weekend brunches.
- Uniqueness: Most baked oat recipes focus on breakfast or snack vibes, but this one transforms the concept into a celebratory treat. The inclusion of chocolate chips and a subtle cake batter gives it a distinct identity that stands out from the crowd. It’s the kind of dish that can be served at a birthday party or a casual family gathering.
- Crowd Reaction: Friends who tried this said the oats were surprisingly sweet and the chocolate melted into gooey pockets. The cake-like consistency surprised them, and the aroma alone made the kitchen feel like a bakery. It’s a conversation starter that invites compliments and requests for the recipe.
- Ingredient Quality: Using high‑quality rolled oats, fresh whole milk, and a good vanilla extract ensures the dish’s flavor remains robust. The choice of mini chocolate chips over regular chips adds a subtle crunch that elevates the overall experience. The combination of wholesome ingredients guarantees a nutritious yet indulgent treat.
- Cooking Method: Baking the oats in a casserole dish creates a uniform, cake-like structure that can be sliced or scooped. The method allows for easy scaling, so you can make a small batch for one person or a large one for a party. The baking process also caramelizes the oats, giving them a subtle toasty flavor.
- Make‑Ahead Potential: The dish can be prepared ahead of time and stored in the fridge or freezer, making it an ideal make‑ahead breakfast or dessert option. Reheating restores the cake’s soft interior, while the oats remain moist and flavorful. This flexibility makes it a convenient choice for busy schedules.
Inside the Ingredient List
The Flavor Base
The core of this recipe is the harmony between rolled oats, whole milk, and Greek yogurt. Oats provide a hearty, nutty flavor that grounds the dish, while milk adds a creamy richness that mimics cake batter. Greek yogurt introduces a subtle tang that balances the sweetness and gives the batter a silky texture. Together, they create a base that is both comforting and indulgent.
The Texture Crew
Eggs, butter, and baking powder form the backbone of the texture. The egg binds everything together, giving the batter structure and a tender crumb. Butter adds moisture and a subtle buttery finish that coats the oats like velvet. Baking powder ensures the batter rises, creating light pockets that make each bite airy and cake‑like. Skipping any of these would result in a dense, lifeless dish.
The Unexpected Star
Chocolate chips are the secret weapon that turns ordinary oats into a celebratory treat. They melt into pockets of chocolatey bliss that burst with each bite, adding both flavor and a delightful contrast in texture. The chips also provide a visual cue that signals the birthday cake element, making the dish feel festive. If you’re a fan of dark chocolate, swapping for dark chocolate chips gives a richer, more complex flavor profile.
The Final Flourish
Vanilla extract, cinnamon, and a pinch of salt are the finishing touches that elevate the entire dish. Vanilla brings depth and a sweet aroma that lingers on the tongue, while cinnamon adds warmth and a subtle spice that complements the chocolate. A pinch of salt balances the sweetness and brings out the flavors of each ingredient. Together, they create a well‑rounded, satisfying finish that feels like a true birthday cake.
Everything's prepped? Good. Let's get into the real action and bring the cake to life.
The Method — Step by Step
- Preheat your oven to 180 °C (350 °F) and line a 9‑inch square baking dish with parchment paper. The parchment will keep the oats from sticking and make cleanup a breeze. While the oven warms, gather all your ingredients so you’re ready to mix without missing a beat. A well‑organized prep area keeps the cooking process smooth and enjoyable. This step sets the stage for a flawless bake.
- In a large mixing bowl, combine the rolled oats, whole milk, and Greek yogurt. Whisk until the mixture is smooth and the oats are fully soaked. The oats should feel moist but not soupy; this balance ensures they bake evenly. The yogurt adds a creamy tang that counters the sweetness of the chocolate. If the mixture is too thick, add a splash more milk to reach the desired consistency.
- Add the brown sugar, baking powder, cinnamon, vanilla extract, and a pinch of salt to the oat mixture. Stir until the dry ingredients are fully incorporated. The sugar dissolves, creating a sweet base that caramelizes during baking. The baking powder reacts with the wet ingredients, producing tiny bubbles that lift the batter. This step is where the batter starts to transform into cake.
- Gently fold in the mini chocolate chips, reserving a handful for topping. The chocolate should be evenly distributed so every bite contains a piece of melted bliss. The reserved chips will create a crunchy, chocolatey crust when baked. This step ensures the chocolate doesn’t sink to the bottom, keeping the texture consistent.
- Pour the batter into the prepared baking dish, smoothing the top with a spatula. The batter should spread evenly, covering the entire surface. As the batter bakes, watch for the edges to pull away from the parchment, signaling that it’s ready for the next step. The batter should start to bubble gently, indicating the leavening is working. This is the moment of truth.
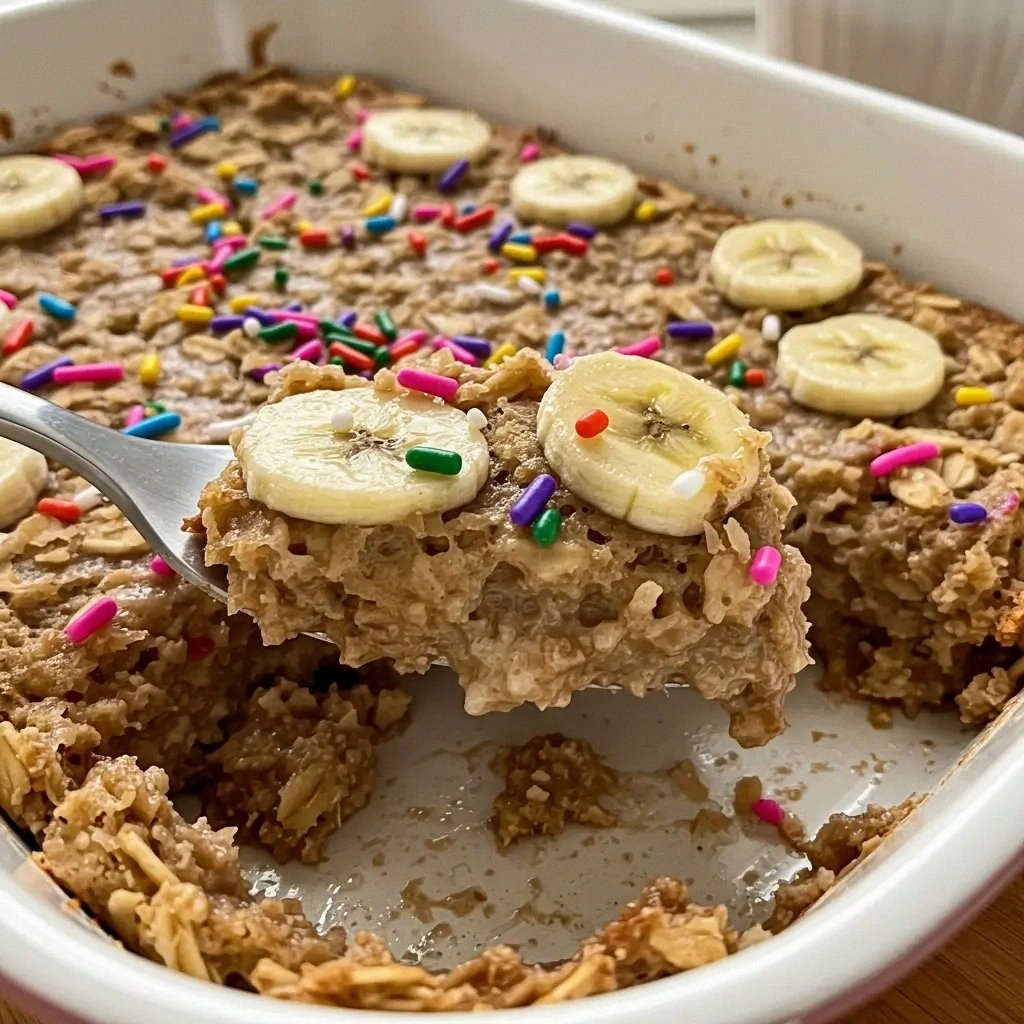
- Bake for 25 minutes, or until the top is golden brown and a toothpick inserted into the center comes out clean. The cake should have a slight crackle on top, like a crisp crust. The interior should feel firm yet tender, with a subtle chew from the oats. If you prefer a slightly crisp exterior, bake an extra 2‑3 minutes.
- Remove from the oven and let the dish cool for 10 minutes. This resting period allows the batter to set, making it easier to slice or scoop. While it cools, you can sprinkle the reserved chocolate chips on top for a crunchy finish. The chips will melt slightly, creating a glossy, chocolatey sheen.
- Once cooled, cut into squares or serve scooped, depending on your preference. The squares hold together nicely, making it easy to serve individual portions. If you like a softer bite, scoop the batter into bowls and top with a dollop of yogurt or a drizzle of honey. This final touch adds a creamy contrast that elevates the flavor profile.
- Serve immediately or store in an airtight container in the fridge for up to three days. Reheat in the microwave for 20‑30 seconds to restore the cake’s soft interior. If you’re in a hurry, you can also keep the dish at room temperature for a few hours; the oats will stay moist, and the chocolate will remain luscious. Enjoy this treat anytime you need a quick, comforting, and indulgent bite.
That's it — you did it. But hold on, I've got a few more tricks that'll take this to another level. Keep reading for insider tips that will elevate the flavor, texture, and presentation to a whole new dimension.
Insider Tricks for Flawless Results
The Temperature Rule Nobody Follows
Many bakers think 180 °C is safe for everything, but the key to a perfect cake is a slightly lower temperature of 170 °C (338 °F). This slower bake allows the oats to expand without drying out, resulting in a moist interior. If you bake too hot, the edges will burn while the center remains undercooked. Experiment with a lower temperature for a more consistent bake.
Why Your Nose Knows Best
A strong aroma is a sign of a well‑cooked cake. When the batter starts to smell like toasted oats and vanilla, you know the leavening has worked and the batter has settled. If the smell is weak, it’s a sign you need to bake a bit longer. Trust your nose, and you’ll avoid a dry, undercooked result.
The 5-Minute Rest That Changes Everything
After baking, let the cake rest for exactly five minutes before cutting. This brief pause allows the steam to redistribute, preventing a soggy center. The rest also lets the chocolate chips set into a glossy crust, giving each bite a satisfying snap. Skipping this step can leave the cake feeling heavy.
Use a Silicone Lid for Even Heat
Cover the baking dish with a silicone lid or foil while the cake bakes. This traps heat, creating an even baking environment and preventing the top from drying out. The lid also reduces the risk of the chocolate melting too quickly. The result is a uniformly moist cake with a caramelized crust.
Add a Splash of Orange Zest
A teaspoon of freshly grated orange zest adds a bright, citrusy note that cuts through the richness of the chocolate. The zest also brings a subtle aroma that elevates the overall flavor profile. Add the zest to the batter during step 3 for a harmonious blend of flavors.
Serve with a Dollop of Yogurt
A spoonful of plain Greek yogurt on top provides a creamy contrast that balances the sweetness. The yogurt’s tanginess also adds depth to the dish, making it feel more sophisticated. This simple addition transforms a breakfast treat into a dessert worthy of a birthday celebration.
Creative Twists and Variations
This recipe is a playground. Here are some of my favorite ways to switch things up:
Nutty Banana Banana
Swap the oats for a mix of almond and coconut flour and add a mashed ripe banana for natural sweetness. The banana adds moisture and a tropical flavor that pairs well with coconut. This version is dairy‑free and perfect for a quick, healthy breakfast.
Pumpkin Spice Surprise
Add a half cup of pumpkin puree and a pinch of nutmeg to the batter for a seasonal twist. The pumpkin adds a subtle sweetness and a velvety texture. It’s ideal for a cozy autumn brunch.
Chocolate‑Mint Marvel
Replace the vanilla extract with peppermint extract and add a handful of crushed mint chocolate candies. The mint gives a refreshing kick that balances the chocolate. This variation is a hit at holiday parties.
Berry Burst Edition
Fold in a cup of fresh blueberries or raspberries before baking. The berries burst with juice as you bite, adding a tart contrast to the sweet oats. Serve with a drizzle of honey for a sweet‑tart finish.
Almond Joy Delight
Add shredded coconut, chopped almonds, and a splash of coconut milk to the batter. The coconut adds crunch and a tropical aroma, while the almonds give a satisfying bite. Top with extra coconut flakes for a finishing touch.
Savory Spin
Omit the sugar and chocolate chips and add grated Parmesan, chopped herbs, and a pinch of smoked paprika. This savory version turns the dish into a hearty breakfast or brunch option. The oats absorb the flavors, creating a comforting, protein‑rich meal.
Storing and Bringing It Back to Life
Fridge Storage
Store the cooled cake in an airtight container at room temperature for up to 24 hours. The oats retain moisture, keeping the cake fresh and flavorful. If you prefer a slightly firmer texture, keep the container sealed for longer periods.
Freezer Friendly
Wrap individual squares in parchment paper and place them in a freezer bag. Freeze for up to two months. When ready to eat, let the cake thaw at room temperature for 30 minutes before reheating.
Best Reheating Method
Microwave the cake for 20‑30 seconds, adding a splash of water to the dish before reheating. The water steams the cake, restoring its moist interior. For a crispier top, finish the reheated cake in a preheated oven at 180 °C for 5 minutes.