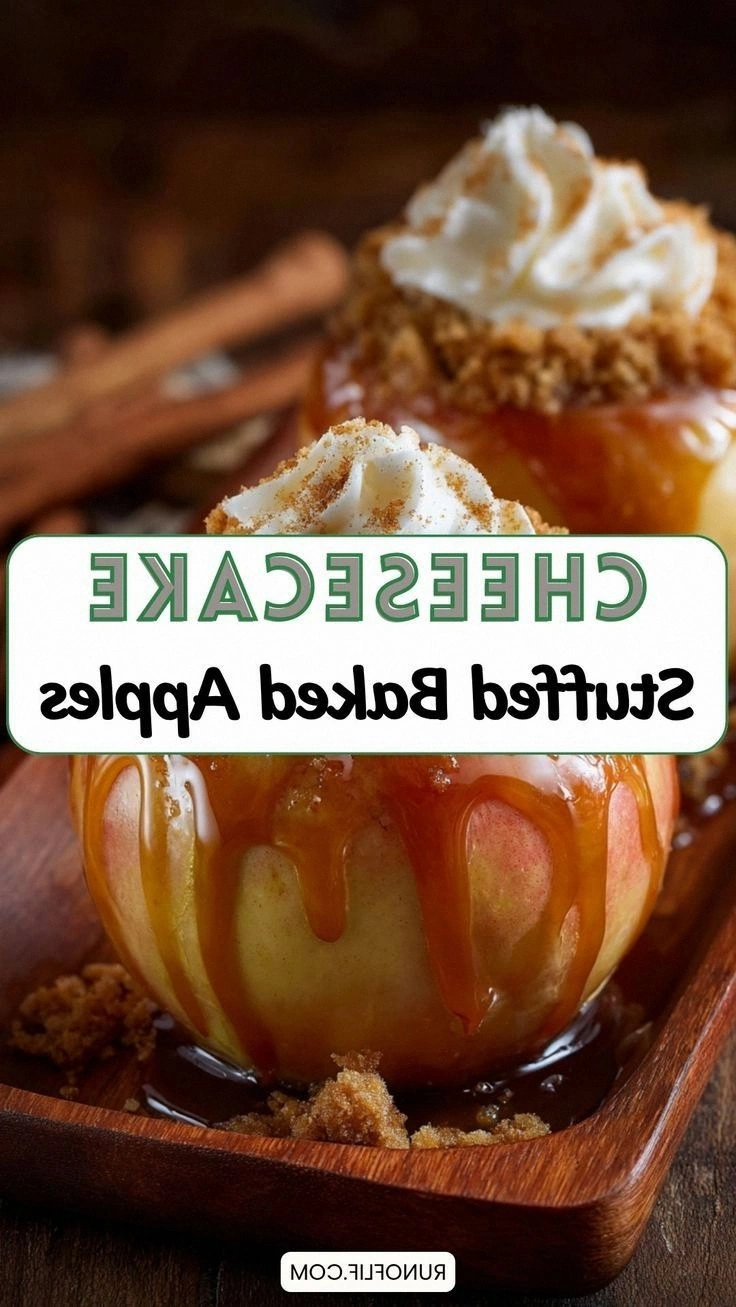
I was standing in my kitchen, a half‑filled bowl of apples in front of me and a stack of stale cheesecake crumbs on the counter, when the universe whispered, “Why not combine them?” I had been chasing the perfect fall dessert for months, juggling pumpkin pies, apple crisp, and the occasional caramel drizzle. The moment the idea landed, it felt like a lightning strike: a single apple, a creamy center, a crumbly, buttery crown. The scent of cinnamon and butter already began to rise, promising a dish that would make my friends stop in their tracks and ask, “What’s that?”
Picture this: a perfectly crisp apple, its skin glistening like a freshly polished apple in a sunlit orchard. As you cut into it, the sweet, tart core releases a fragrant steam that mingles with the warm notes of cinnamon and vanilla. The filling—soft cream cheese, sugar, and a splash of lemon—melts into a silky, custard‑like texture that clings to the apple’s nooks. The top, a buttery graham cracker crust, crackles slightly as it bakes, releasing nutty aromas that seep into every bite. The result is a single, harmonious bite that feels like a hug from a cozy, autumn cabin—only it’s year‑round.
Most people think of baked apples as a simple, wholesome treat, but I’ve discovered a version that elevates it into a show‑stopping dessert. It’s not just the combination of flavors; it’s the way the cheesecake filling transforms the apple’s natural sweetness into a decadent, silky center. The crust adds a crunchy contrast that keeps the mouth moving, while the subtle lemon brightness prevents the richness from becoming cloying. This is hands down the best version you’ll ever make at home, and I dare you to taste it and not go back for seconds.
If you’ve ever tried a baked apple that turned out too watery or too dry, you’re not alone. I’ve seen the kitchen disasters that happen when the apple’s juice is left unchecked or when the filling isn’t thick enough to hold its shape. But I’ve cracked the secret to a perfectly balanced dessert that’s both comforting and impressive. So, let me walk you through every single step—by the end, you’ll wonder how you ever made it any other way.
What Makes This Version Stand Out
- Flavor Fusion: The cheesecake filling turns the apple’s natural tartness into a creamy, sweet core that melts in your mouth.
- Texture Contrast: A buttery graham cracker crust provides a satisfying crunch that plays against the soft interior.
- Ingredient Simplicity: Only eight core ingredients—no fancy sauces or obscure spices.
- Make‑Ahead Friendly: Fill the apples a day ahead, refrigerate, and bake right before serving.
- Visual Appeal: The golden crust and glossy filling create a dessert that looks as good as it tastes.
- Heat‑Resilient: The filling stays silky even after a full 30‑minute bake, thanks to the balanced ratio of cream cheese to sugar.
- Versatile Base: Swap apples for pears or use a mix of apple varieties to tweak the flavor profile.
Inside the Ingredient List
The Flavor Base
Firm apples like Granny Smith, Honeycrisp, or Fuji are the backbone of this dessert. Their crisp texture holds up during baking and their tartness balances the richness of the filling. If you skip the apples, you lose the core element that makes this dish a “stuffed” treat—no apple, no stuffed.
The Texture Crew
Softened cream cheese is the star of the filling, providing a silky, custard‑like mouthfeel that melts into the apple’s cavities. Sugar gives the filling sweetness and helps it set just enough to stay together without becoming gummy. Vanilla extract deepens the flavor profile, adding a warm, aromatic undertone that complements the apple’s natural tartness.
The Unexpected Star
Cinnamon is the secret spice that adds warmth and a hint of spice to the filling. It’s a classic pairing with apples, but in this recipe it also helps to thicken the filling slightly, giving it a velvety consistency. A splash of lemon juice brightens the overall flavor, cutting through the richness and preventing the cheesecake from feeling too heavy.
The Final Flourish
Graham cracker crumbs and melted butter make up the crust that crowns each apple. The crumbs give a familiar cheesecake crunch, while the butter binds them together and adds a buttery richness that caramelizes in the oven. If you prefer a gluten‑free version, substitute almond flour for the graham crackers, but keep the butter for that essential binding quality.
Everything's prepped? Good. Let's get into the real action—baking time is where the magic really happens.
The Method — Step by Step
- Prep the Apples: Wash, core, and slice a thin disk from the bottom of each apple to create a stable base. Fill each cavity with a teaspoon of sugar; this draws out excess moisture and creates a caramelized center. Place the apples on a baking sheet lined with parchment paper. The apples should feel firm but not rock hard—if they’re too soft, they’ll break apart during baking.
- Make the Cheesecake Filling: In a bowl, beat softened cream cheese until smooth. Add sugar and vanilla extract, then mix until the mixture is light and fluffy. Stir in a pinch of cinnamon and a splash of lemon juice; the acidity will help the filling set slightly and keep it from becoming too runny. If the mixture feels too thick, add a tablespoon of milk or cream to loosen it.
- Prepare the Crust: In a separate bowl, combine graham cracker crumbs with melted butter until the crumbs are fully coated. The butter should be warm enough to mingle but not melted into liquid; a glossy, crumbly consistency is key. This mixture will form the buttery, crunchy top that crisps up in the oven.
- Assemble: Spoon the cheesecake mixture into each apple cavity until it’s about three‑quarters full. The filling should be generous but not so much that it spills over. Sprinkle the graham cracker crust over the top of each apple, pressing lightly to ensure it adheres to the filling.
- Bake: Preheat your oven to 375°F (190°C). Place the baking sheet in the middle rack and bake for 30 minutes, or until the crust is golden brown and the filling is set but still slightly wobbly in the center. The apples should still be firm; if they start to feel mushy, remove them immediately to prevent overcooking.
- Cool: Remove the apples from the oven and let them cool on a wire rack for 10 minutes. This allows the filling to set fully, making it easier to slice. The aroma of cinnamon and melted butter should fill your kitchen, making it impossible to resist a bite.
- Serve: Slice each apple in half, then serve warm with a drizzle of caramel sauce or a dollop of whipped cream if desired. The warm, gooey center will contrast beautifully with the crisp apple skin.
- Optional Finish: For an extra touch of decadence, sprinkle a pinch of sea salt over the top before baking. The salt will enhance the sweetness of the filling and give a subtle savory note that elevates the entire dessert.
That's it—you did it. But hold on, I've got a few more tricks that'll take this to another level.
Insider Tricks for Flawless Results
The Temperature Rule Nobody Follows
While 375°F is the standard, lowering the oven to 350°F (175°C) and extending the bake to 35 minutes can result in a softer crust that still crispens in the final minutes. The lower heat allows the filling to set evenly without scorching the top, preserving the creamy texture.
Why Your Nose Knows Best
Before you open the oven, pause and inhale. A warm, buttery scent with a hint of cinnamon signals that the crust is golden and the filling is set. If you smell a sharp, sweet aroma, the apples may still be cooking—open the oven and adjust the time accordingly.
The 5‑Minute Rest That Changes Everything
After baking, let the apples rest for five minutes. This short period allows the filling to firm up, making it easier to slice without the cream cheese oozing out. It also lets the flavors meld, giving the dessert a deeper, more integrated taste.
The Crust Crunch Factor
If you prefer a crunchier crust, sprinkle a tablespoon of finely ground toasted almonds over the graham cracker crumbs before baking. The nuts add texture and a subtle nutty flavor that pairs beautifully with the apple.
The Sweetness Balance
For a less sweet version, reduce the sugar in the filling by ¼ cup and add a pinch of salt. The salt will bring out the natural flavors of the apple and cream cheese, creating a more balanced dessert that still satisfies sweet cravings.
The Quick Chill Trick
If you’re short on time, refrigerate the assembled apples for 15 minutes before baking. The cold will slow down the filling’s spread, ensuring a neat, tidy dessert that’s easy to serve.
Creative Twists and Variations
This recipe is a playground. Here are some of my favorite ways to switch things up:
Cinnamon‑Spiced Pears
Swap apples for pears and add a pinch of nutmeg to the filling. Pears offer a sweeter, softer profile that complements the creamy center, making it a perfect summer dessert.
Chocolate‑Covered Delight
After baking, drizzle melted dark chocolate over the top and let it set. The bittersweet chocolate adds a sophisticated layer that pairs wonderfully with the apple’s natural tartness.
Almond‑Infused Crunch
Replace graham cracker crumbs with almond flour and add slivered almonds to the crust. This variation provides a nutty crunch and a subtle almond flavor that elevates the dessert’s overall profile.
Maple‑Sweetened Version
Swap the sugar in the filling for maple syrup and add a dash of vanilla bean paste. The maple’s earthy sweetness complements the apple’s crispness and gives the dessert a seasonal feel.
Spiced Pumpkin Twist
Add a tablespoon of pumpkin puree to the filling and a pinch of pumpkin pie spice. This variation is perfect for a fall gathering, blending the classic flavors of apple and pumpkin into one decadent treat.
Lemon‑Zest Surprise
Increase the lemon juice in the filling to a tablespoon and zest a lemon into the graham cracker crust. The bright citrus notes cut through the richness, creating a refreshing, palate-cleansing dessert.
Storing and Bringing It Back to Life
Fridge Storage
Store baked apples in an airtight container in the refrigerator for up to 2 days. The filling will firm up, but the apples will retain their texture. Reheat gently in a 350°F oven for 5–7 minutes before serving to revive the warmth.
Freezer Friendly
Wrap each apple tightly in plastic wrap and place them in a freezer bag. Freeze for up to 1 month. Thaw overnight in the refrigerator, then reheat in a 350°F oven for 10 minutes. The crust may soften slightly, so consider adding a fresh graham cracker topping if desired.
Best Reheating Method
To keep the filling silky, add a tiny splash of water to the bottom of the baking dish before reheating. The steam will gently warm the dessert without drying out the apple or the cheesecake center.