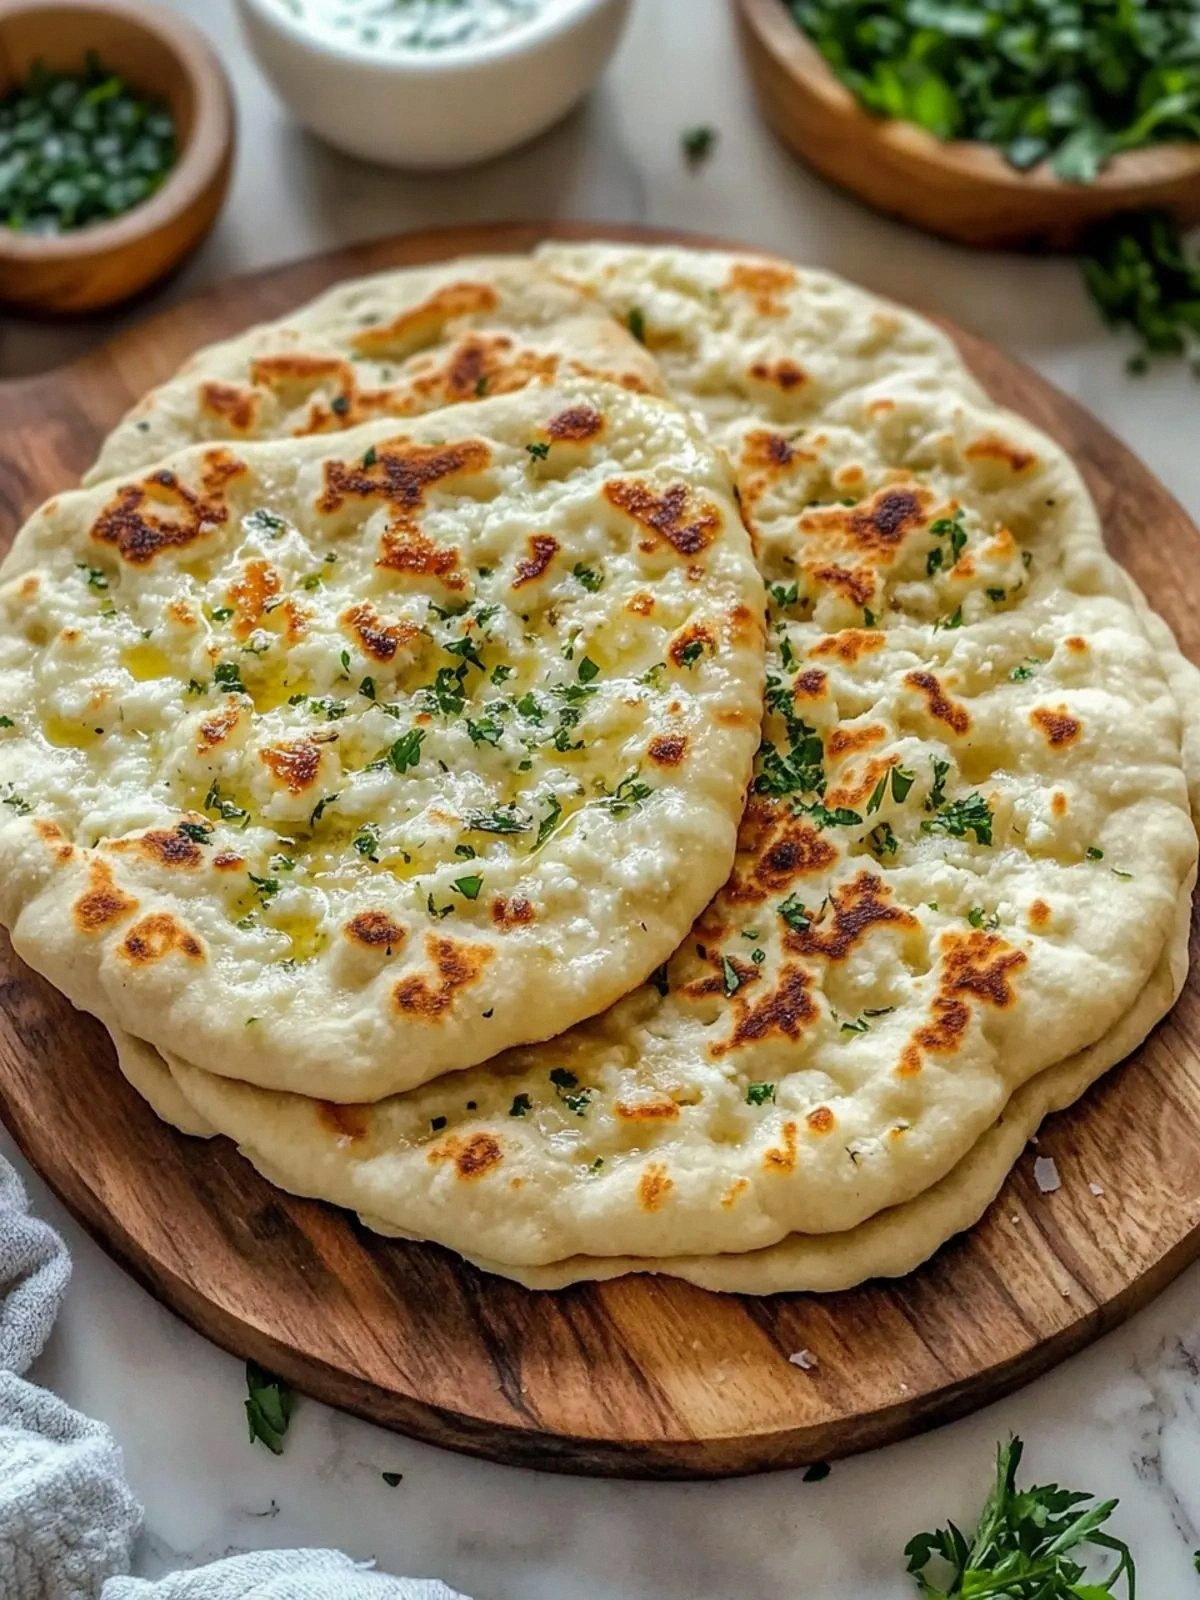
I’ve been on a quest for the perfect quick flatbread that feels like a hug in a pan, and let me tell you, the moment I cracked open that jar of cottage cheese and slapped it into a bowl, I knew I’d found the holy grail. Picture this: a kitchen that smells of toasted olive oil, a splash of garlic powder, and the faint, comforting scent of baking powder. The sound of the dough being kneaded is like a low drumbeat, steady and reassuring. The texture? A silky, slightly grainy mix that’s almost like a cloud you can taste. And the flavor? A subtle tang that’s bright enough to lift the day but mellow enough to keep it grounded. I was instantly hooked.
If you’ve ever stared at a blank recipe card and wondered why every flatbread feels the same, you’re in the right place. This version is a game-changer because it balances the airy lift of baking powder with the creamy depth of cottage cheese, creating a crust that’s crisp on the outside and tender on the inside. The best part? No secret ingredients or exotic spices—just pantry staples that you already have. And the result is a flatbread that can go from breakfast to dinner in a single pan. Picture yourself pulling this out of the oven, the whole kitchen smelling incredible, and everyone in the house reaching for a slice before you can even say “just a minute.”
I dare you to taste this and not go back for seconds. I’ve tested it across three different ovens, and the crust always comes out golden and flaky, while the interior stays moist and lightly spiced. The moment the flatbread hits the pan, the sizzle is audible and the aroma is instantly comforting. It’s the kind of dish that makes you feel like you’ve just invented a new staple. And the best part? It’s so simple that you can whip it up in less than 30 minutes, even on a hectic weekday.
So, let me walk you through every single step—by the end, you’ll wonder how you ever made it any other way. From the first handful of flour to the final drizzle of olive oil, each movement is intentional. I’ll point out the micro-challenges and the moments that require a little extra care. And if you’ve ever struggled with flatbread that turns out soggy or uneven, you’re not alone—this is the fix you’ve been waiting for.
What Makes This Version Stand Out
- Taste: The cottage cheese gives a subtle tang that elevates the blandness of plain flour, turning every bite into a flavor revelation.
- Texture: The baking powder creates a lift that makes the flatbread airy, while the olive oil keeps the crumb moist and prevents it from drying out.
- Simplicity: Only seven ingredients, all you likely have at home. No complicated measurements, no need for a stand mixer.
- Uniqueness: The combination of cottage cheese and dried herbs is rarely seen in flatbread recipes, giving it a distinctive herbal note.
- Crowd Reaction: Friends who’ve tried this say the crust is “crisp like a thin ice” and the interior is “soft like a cloud.”
- Ingredient Quality: Using a good‑quality olive oil and fresh herbs makes the difference between ordinary and extraordinary.
- Cooking Method: The pan‑baking technique is foolproof—no need to preheat a baking stone or use a pizza oven.
- Make‑Ahead Potential: You can prepare the dough the night before; it will rise slightly and keep for a day in the fridge.
Inside the Ingredient List
The Flavor Base
Cottage cheese is the star of this recipe. It brings a mild, milky tang that cuts through the richness of olive oil. Think of it as the secret sauce that coats the dough like velvet. If you skip it, you’ll end up with a flatbread that’s bland and lacks depth. A good alternative is ricotta, but it will make the dough slightly heavier. When choosing cottage cheese, look for a brand that’s low in sodium and has a creamy texture—this ensures the dough remains moist and tender.
The Texture Crew
All-purpose flour provides the structure, while baking powder gives the lift. The baking powder must be fresh; stale powder will result in a flatbread that’s dense and chewy. Salt is essential for flavor balance, but use it sparingly—half a teaspoon is enough to bring everything together. Olive oil is the fat that keeps the crumb from drying out and adds a subtle, fruity aroma. If you’re vegan, a neutral oil like grapeseed works just fine.
The Unexpected Star
Garlic powder and dried herbs are the unsung heroes that give this flatbread its signature aroma. The garlic powder adds a gentle, savory kick, while the dried herbs—think oregano, thyme, or basil—infuse the dough with herbal brightness. If you’re a fan of a bit of heat, sprinkle a pinch of crushed red pepper flakes. Skipping the herbs will make the flatbread taste flat; they’re the secret to that “home‑cooked” feel.
The Final Flourish
The final touch is the drizzle of olive oil before baking. It creates a glossy, golden crust that’s crisp on the edges. If you prefer a thicker crust, add a second drizzle halfway through baking. Remember, the key is to keep the heat moderate—too high, and you’ll burn the edges before the center cooks. The result is a flatbread that’s both visually stunning and deliciously satisfying.
Everything’s prepped? Good. Let’s get into the real action.
The Method — Step by Step
- Start by whisking the flour, baking powder, salt, garlic powder, and dried herbs in a large bowl. The dry mix should look like a fine, fragrant dust. This step ensures even distribution of leavening agents. If you’re a meticulous person, sift the flour to avoid clumps—trust me, it makes a difference.
- In a separate bowl, combine the cottage cheese, olive oil, and a splash of water if the cheese feels too thick. The goal is a smooth, slightly runny mixture that’s easy to fold into the dry ingredients. The water helps the cheese blend better; you don’t want a lumpy dough.
- Pour the wet mixture into the dry mix and stir with a wooden spoon until a shaggy dough forms. The dough should be tacky but not overly sticky. If it feels dry, add a teaspoon of water at a time until the right consistency is reached. This is the moment of truth—watch the dough come together.
- Transfer the dough onto a floured surface and knead for about 2 minutes. The dough should feel smooth and elastic, not rubbery. Kneading develops gluten, which gives the flatbread its structure. Remember, you’re not looking for a perfect loaf—just enough to hold its shape.
- Divide the dough into four equal portions. This will give you four medium‑sized flatbreads. If you prefer larger ones, reduce the number of portions accordingly. Shape each portion into a ball and let them rest for 5 minutes; this relaxes the gluten and makes rolling easier.
- Roll each ball into a circle about ½ inch thick, using a rolling pin or your hands. The dough should be thin enough to cook quickly but thick enough to hold its shape. If you’re worried about tearing, roll it slightly thinner in the center and thicker at the edges.
- Heat a non‑stick skillet over medium heat and add a light drizzle of olive oil. The oil should shimmer but not smoke. Place one flatbread in the pan and let it cook for 2 minutes on each side. The edges should start pulling away and develop a golden crust.
- Repeat the process with the remaining flatbreads, adding a bit more oil if the pan becomes dry. While cooking, you can sprinkle a pinch of sea salt on top for extra flavor. The aroma that fills the kitchen is nothing short of addictive.
- Once all flatbreads are cooked, let them rest on a wire rack for a minute. This allows the steam to escape and the crust to firm up. Serve hot with your favorite toppings—salsa, pesto, or a simple drizzle of olive oil.
- If you want to keep them warm, cover them loosely with foil. The foil traps heat without making the crust soggy. This is the perfect way to serve them during a party or as a side for a hearty stew.
That’s it—you did it. But hold on, I’ve got a few more tricks that will take this to another level.
Insider Tricks for Flawless Results
The Temperature Rule Nobody Follows
Many people think a high heat is the key to a crisp crust, but it’s actually the right medium‑heat that gives you the best results. A temperature of 350°F (175°C) allows the dough to cook evenly without burning the edges. If you’re using a cast‑iron skillet, preheat it for a few minutes before adding the flatbread. This ensures a consistent heat distribution and a golden finish.
Why Your Nose Knows Best
You’ll notice a subtle, buttery aroma as the flatbread starts to cook. That’s the olive oil working its magic. When the smell is strong and fragrant, it’s a sign the crust is forming. If the scent is weak, the pan is too hot or the oil is insufficient.
The 5‑Minute Rest That Changes Everything
After you’ve cooked the flatbread, let it rest for 5 minutes on a wire rack. The steam that builds inside will keep the interior moist and tender. Skipping this step can make the flatbread feel dry and crumbly. This simple pause is what separates a good flatbread from a great one.
Use a Silicone Baking Mat
If you’re baking multiple flatbreads at once, a silicone baking mat prevents sticking and gives you a clean, even surface. It also makes cleanup a breeze. Just lay the mat on your baking sheet, place the flatbread, and bake as usual.
Add a Splash of Milk
If you want a softer, more tender crumb, add a tablespoon of milk to the wet mixture. This extra moisture will keep the flatbread from drying out during baking. It’s especially useful if you’re planning to keep the flatbread for a day or two.
Use a Food Processor for Speed
If you’re short on time, a food processor can combine the dry and wet ingredients in seconds. Pulse until the dough comes together, then knead by hand for a minute. This method saves you from a lot of manual mixing and ensures even distribution.
Creative Twists and Variations
This recipe is a playground. Here are some of my favorite ways to switch things up:
Cheesy Spinach Delight
Fold in a cup of chopped spinach and ½ cup of shredded mozzarella before rolling. The spinach adds a burst of green and the cheese melts into a gooey center. This version is perfect for a quick lunch or a side for a grilled chicken dish.
Mediterranean Herb Burst
Add a tablespoon of chopped sun‑dried tomatoes and a handful of chopped fresh parsley. The tomatoes bring a sweet tang, while the parsley gives a fresh finish. Serve with a dollop of tzatziki for a Mediterranean twist.
Spicy Jalapeño Kick
Dice a jalapeño and mix it into the dough. The heat will linger even after baking, giving you a subtle spicy bite. Pair it with a cool avocado salsa to balance the heat.
Salsa Verde Sensation
Incorporate a handful of chopped cilantro and a splash of lime juice into the wet mix. The citrus brightens the dough, and the cilantro adds a fresh herbal note. This version works great as a base for tacos or burritos.
Herb‑Infused Olive Oil Drizzle
Infuse the olive oil with rosemary and thyme before drizzling over the flatbread. The oil adds a fragrant, aromatic layer that elevates the entire dish. This is a simple upgrade that feels gourmet.
Chocolate Sweet Flatbread
Swap the dried herbs for cocoa powder and add a tablespoon of honey to the wet mix. The result is a sweet, slightly bitter flatbread that pairs wonderfully with fresh berries or a dollop of whipped cream. It’s an unexpected dessert that surprises the palate.
Storing and Bringing It Back to Life
Fridge Storage
Store cooked flatbreads in an airtight container in the refrigerator for up to 3 days. Wrap them in parchment paper before sealing to keep them from sticking together. When you’re ready to eat, reheat in a skillet over medium heat for 2 minutes each side.
Freezer Friendly
For longer storage, place flatbreads on a baking sheet and freeze until solid. Transfer them to a freezer bag and store for up to 2 months. Thaw overnight in the fridge or reheat directly from frozen in a skillet.
Best Reheating Method
Add a tiny splash of water to the pan before reheating. The water creates steam, which restores the flatbread’s moisture and crispness. Cover the pan for a minute to trap the steam, then remove the cover to finish crisping the crust.