I was standing in my kitchen, staring at a half‑cooked pie crust that had turned a sad, soggy brown, when my friend dared me to make the ultimate Easter Swirl Cream Pie. The challenge sounded absurd, but the promise of a buttery, caramel‑chocolate swirl kept me hooked. I grabbed my apron, because nothing says culinary adventure like a kitchen disaster that turns into a triumph. The aroma of vanilla and chocolate already started dancing in the air, a sweet prelude to the chaos that was about to unfold. If you’re ready to turn a kitchen mishap into a show‑stopping dessert, keep reading. That moment felt like a secret handshake between me and the universe, a nod that great things happen when you’re willing to experiment.
Picture this: a flaky pie shell that cracks like a sunrise, a silky custard that feels like liquid silk, and a chocolate swirl that glistens like a secret. The moment you slice into it, the steam rises, carrying a fragrance that makes your eyes water in delight. My first bite was a revelation—rich, creamy, and with a hint of buttery crunch that whispered, “you did it.” The swirl itself is a ribbon of dark chocolate that melts into the custard, creating a visual and flavor contrast that feels like a sunrise meeting a midnight storm. That’s the kind of experience I want to share with you today. It’s the kind of dish that turns an ordinary Sunday into a festival of flavors.
What makes this version stand out is not just the swirl, but the meticulous balance between sweetness and depth. I’ve trimmed the sugar to let the vanilla shine, and the chocolate is high‑quality so it doesn’t overpower the custard. The crust is pre‑baked to a golden perfection, giving a subtle crunch that anchors the silky filling. Every bite feels like a mini celebration, a bite of spring that you can hold in a slice. If you’ve ever tasted a pie that was too sweet or too dry, this one will be a revelation. The result is a dessert that feels like a hug from the inside out.
The secret twist? A splash of espresso powder that wakes up the chocolate without adding bitterness, and a pinch of sea salt that turns the sweetness into a complex dance. I dare you to taste this and not go back for seconds, because the layers of flavor will keep you coming back for more. I’ll be honest—I ate half the batch before anyone else got to try it, and I’m still craving a second slice. Picture yourself pulling this out of the oven, the whole kitchen smelling incredible, and seeing your friends’ eyes widen. Let me walk you through every single step—by the end, you’ll wonder how you ever made it any other way. The anticipation is half the fun, and trust me, the payoff is worth every moment.
If you’ve ever struggled with custard that curdles or a crust that turns soggy, you’re not alone. The trick is to keep the heat low and the ingredients at room temperature before you start. When the chocolate is added, let it cool slightly so it doesn’t cook the custard. I’ve learned that a good whisk can make the difference between a silky smooth filling and a lumpy nightmare. This recipe is a playground for culinary confidence, and every step is designed to feel intuitive. The end result? A pie that looks like a masterpiece and tastes like a dream. Get ready to become the hero of your own kitchen story.
What Makes This Version Stand Out
- Flavor Depth: The custard is enriched with a touch of espresso that awakens the chocolate, creating a layered taste that feels like a sunrise and a midnight storm. The result is a dessert that stays on your palate long after the last bite.
- Texture Balance: The crust is baked to a crisp edge while the filling remains luxuriously creamy, giving a satisfying contrast with every forkful. The chocolate swirl adds a subtle crunch that breaks the silky smoothness just enough to keep you intrigued.
- Simplicity in Complexity: Though the final product looks intricate, the process is broken down into clear, manageable steps. You’ll find that each ingredient plays a pivotal role without overwhelming your kitchen.
- Ingredient Quality: Using high‑grade dark chocolate and fresh‑sourced eggs elevates the flavor profile and ensures a silky texture. The difference between store‑bought and premium ingredients is like the difference between a good story and a bestseller.
- Make‑Ahead Flexibility: The pie can be assembled a day in advance, allowing flavors to mingle and intensify. This makes it perfect for a busy schedule or a last‑minute dessert.
- Visual Appeal: The swirling chocolate pattern is not just decorative—it’s a testament to the technique and patience invested in the dish. The visual wow factor is guaranteed to impress.
- Audience Impact: Friends and family will rave about the balance of sweet and savory, and the aroma will linger long after the plate is cleared. It’s the kind of dessert that turns a gathering into a memorable event.
Inside the Ingredient List
The Flavor Base
The foundation of this pie is a classic custard that marries whole milk, heavy cream, and a generous splash of vanilla extract. The combination creates a smooth, luscious base that carries the chocolate swirl without being overpowered. Each ingredient is measured precisely to maintain the perfect consistency; too much milk can make it runny, while too little will cause it to thicken prematurely. The espresso powder, though subtle, awakens the chocolate and adds a depth that feels like a well‑timed espresso shot in your dessert. When you whisk these together, you’re essentially building a flavor bridge that connects the crust, filling, and topping.
The Texture Crew
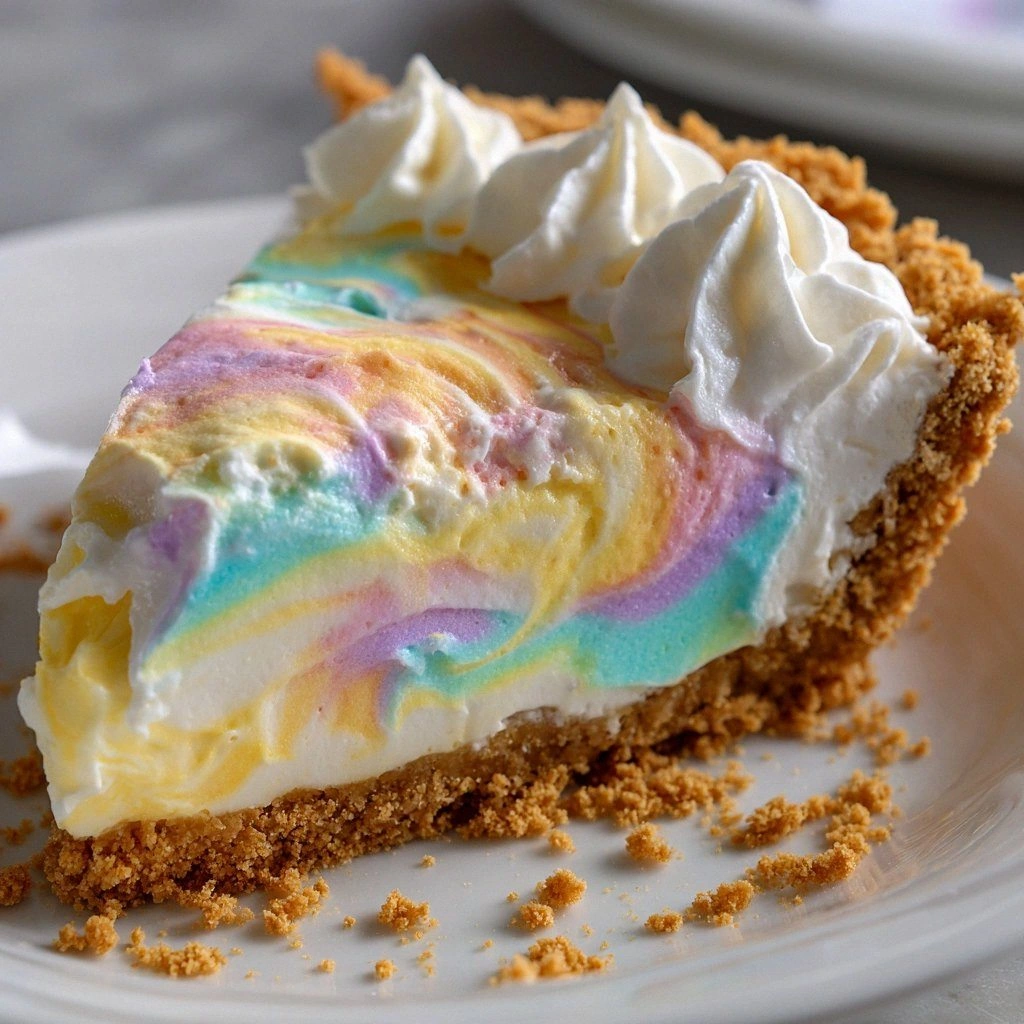
The crust is the first thing you taste; it needs to be flaky, buttery, and slightly caramelized. Bake it to a golden brown so it can hold the custard without becoming soggy. The chocolate swirl is made by melting high‑quality dark chocolate chips and gently swirling them into the custard before it sets. This technique creates a marbled effect that is as pleasing to the eye as it is to the palate. Finally, the whipped cream topping adds a light, airy contrast that lifts the entire dish, making each bite feel like a cloud.
The Unexpected Star
Espresso powder is the secret star that elevates this pie from ordinary to unforgettable. A single teaspoon is enough to introduce a subtle bitterness that balances the sweetness without dominating. It also enhances the chocolate’s flavor profile, making the swirl feel richer and more complex. This small addition is a testament to how a single ingredient can transform a recipe. Think of it as the hidden ingredient that turns a good pie into a masterpiece.
The Final Flourish
The whipped cream topping is more than just a garnish; it’s the final touch that completes the flavor profile. Heavy whipping cream, powdered sugar, and a splash of vanilla create a silky, sweet finish that balances the chocolate’s intensity. Whisk until soft peaks form, then fold gently into the custard to create a light, airy texture. This step ensures the pie has a harmonious balance of richness and lightness. The topping also adds a subtle visual contrast, making the pie look as delightful as it tastes.
Everything’s prepped? Good. Let’s get into the real action. The process is straightforward, but every detail matters. From the first whisk to the final swirl, each step is an opportunity to elevate the dish. You’ll feel like a culinary wizard as you guide the ingredients through their transformation. And trust me, the payoff is worth the effort.
The Method — Step by Step
- Preheat your oven to 350°F (175°C). Roll out the pie crust and place it in a 9-inch pie dish, pressing it into the corners. Trim the edges and chill the crust in the fridge for 10 minutes to prevent shrinkage. This step ensures a crisp base that won’t become soggy when the custard is added. While the crust chills, you can start preparing the custard mixture.
- In a saucepan, combine the whole milk, heavy cream, and a pinch of salt. Warm the mixture over low heat until it’s just about to simmer; do not let it boil, as that can curdle the custard. Stir occasionally to prevent a skin from forming on the surface. The gentle heat allows the flavors to meld without compromising the custard’s silky texture. Keep an eye on the temperature—it’s a fine line between too hot and too cool.
- In a separate bowl, whisk the egg yolks, sugar, and cornstarch until the mixture is pale and slightly thickened. This step is crucial because it ensures the custard will thicken evenly once combined with the warm milk. Add the vanilla extract and espresso powder, whisking until fully integrated. The mixture should feel smooth and free of lumps. This is the moment when the flavor foundation is set.
- Slowly pour the warm milk mixture into the yolk mixture, whisking constantly to prevent the eggs from scrambling. Transfer the combined mixture back to the saucepan and cook over low heat, stirring constantly, until it thickens and coats the back of a spoon. This should take about 8-10 minutes; patience is key. Remove the custard from heat immediately once it reaches the right consistency to avoid overcooking. The custard should be thick enough to hold its shape but still pourable for the swirl.
- Let the custard cool slightly before pouring it into the chilled crust. The custard should still be warm enough to melt the chocolate chips you’ll add next. Pour the custard into the pie shell, filling it about two-thirds full. This gives you enough space for the chocolate swirl. The custard should be poured gently to avoid disturbing the crust.
- Melt the dark chocolate chips in a heat‑proof bowl over a pot of simmering water, stirring until smooth. Once melted, let the chocolate cool to a warm but not hot temperature. Slowly drizzle the chocolate over the custard, creating a swirling pattern with a toothpick or skewer. The swirl should look like a ribbon of night against a creamy sky. This step is where the magic happens—watch the chocolate dance in the custard.
- Return the pie to the oven and bake for 25 minutes, or until the edges are set and the center has a slight wobble. Avoid overbaking, as this can cause the custard to become dry. The top should develop a light golden hue. Once baked, remove the pie and let it cool completely on a wire rack. This allows the custard to set and the chocolate swirl to firm up.
- While the pie cools, whip the heavy cream with powdered sugar and vanilla until soft peaks form. Fold the whipped cream into the cooled custard gently, ensuring it stays airy. This step lightens the filling and adds a velvety finish. Be careful not to overmix, or you’ll lose the airy quality. The result is a custard that feels like a cloud.
- Once the custard is fully mixed with the whipped cream, pour it back into the pie shell, smoothing the top with a spatula. Chill the pie in the refrigerator for at least 4 hours, preferably overnight, to allow the flavors to meld and the custard to firm up. The longer it chills, the more pronounced the swirl will be. When you’re ready to serve, top with a light dusting of cocoa powder or a few chocolate shavings for an extra touch of elegance. The pie is now ready to impress. That final touch is what turns a great dessert into a memorable one.
- Serve the pie chilled, slicing with a clean knife to preserve the swirl. Each slice should reveal the chocolate ribbon cutting through creamy custard. Pair it with a scoop of vanilla ice cream or a drizzle of caramel sauce for an added layer of decadence. If you’re feeling adventurous, add a sprinkle of sea salt on top for a salty‑sweet contrast. Enjoy the moment of pure bliss as the flavors unfold on your palate. You’ve earned this indulgent treat.
Insider Tricks for Flawless Results
The Temperature Rule Nobody Follows
Many bakers think the custard can be cooked at any temperature, but low heat is essential for a silky texture. Cooking too quickly causes the eggs to scramble, while too slow a heat can result in a watery custard. The ideal temperature is around 180°F (82°C), which you can check with a candy thermometer. This ensures the custard thickens evenly without forming a skin on the surface. I’ve learned that a steady, low heat is the secret to a professional finish.
Why Your Nose Knows Best
The aroma of the custard as it thickens is a reliable indicator of doneness. When you hear a faint nutty smell, the custard is close to ready. If it starts smelling overly sweet or burnt, it’s overcooked. Trusting your senses can save you from a dry or lumpy pie. A good rule of thumb is to stop cooking once the custard coats the back of a spoon and the aroma is warm and comforting.
The 5-Minute Rest That Changes Everything
Letting the custard rest for five minutes after removing it from heat allows the starches to settle, ensuring a smooth consistency. Skipping this step often leads to a slightly grainy texture. This brief pause also helps the custard cool enough to handle without burning your fingers. It’s a small but critical step that makes a big difference. I’ve found that a quick rest always pays off.
Keep the Swirl Alive
If the chocolate swirl starts to set too quickly, gently reheat the pie for a minute or two to soften it. This can be done in a low oven or a warm water bath. The goal is to keep the swirl fluid until you’re ready to serve. A well‑maintained swirl looks like liquid silk against the custard. Don’t let the chocolate harden prematurely; the visual appeal matters as much as the taste.
Whipping the Cream Just Right
Overwhipped cream becomes buttery and loses its airy quality, while underwhipped cream won’t lift the custard. Aim for soft peaks—just firm enough to hold shape but still light. Adding a pinch of salt to the cream can enhance its flavor profile, giving a subtle contrast to the sweetness. I’ve experimented with different cream types, and heavy whipping cream consistently gives the best lift. Remember, the cream is the final touch that ties the entire pie together.
Storing for Longevity
If you need to store the pie, keep it in an airtight container in the fridge for up to 3 days. The custard will firm up, but the swirl remains intact. When you’re ready to serve, let the pie sit at room temperature for 15 minutes to soften slightly. This small step ensures each bite is as creamy as the first. Proper storage preserves the flavor profile and texture.
Creative Twists and Variations
Berry‑Burst Edition
Swap the dark chocolate swirl for a vibrant berry compote made from fresh raspberries and blueberries. The tartness of the berries balances the sweetness of the custard, creating a refreshing twist. This version is perfect for summer gatherings or a light dessert. The bright colors also add a festive touch to the pie. Your guests will love the burst of natural fruit flavors.
Nutty Delight
Add toasted almonds or hazelnuts to the custard for a crunchy texture that contrasts with the silky filling. The nutty aroma enhances the overall depth of the pie, making it feel more indulgent. Sprinkle the nuts on top before chilling for a decorative touch. This variation works well for holiday celebrations when you want something extra special. The nuts also add a healthy dose of protein and healthy fats.
Caramel‑Swirl Surprise
Replace the chocolate swirl with a luscious caramel sauce made from brown sugar, butter, and cream. The caramel adds a buttery sweetness that pairs beautifully with the vanilla custard. Drizzle a thin line of caramel across the top before chilling to create a glossy finish. This version is a crowd‑pleaser for those who love sweet, buttery desserts. The caramel also brings a subtle toffee note that elevates the dish.
Minty Fresh Twist
Infuse the custard with fresh mint leaves, then strain them out before baking. The mint adds a cool, refreshing undertone that balances the richness of the custard. Garnish with a few fresh mint sprigs for a pop of color and aroma. This version is ideal for spring or summer celebrations. The mint also gives the pie a light, airy feel.
Spiced Pumpkin Variation
Incorporate pumpkin puree and warm spices like cinnamon, nutmeg, and cloves into the custard for a seasonal twist. The pumpkin adds a subtle sweetness and a creamy texture that complements the custard. The spices create a cozy, comforting flavor profile that’s perfect for fall gatherings. Top with a dollop of whipped cream and a dusting of cinnamon for an extra touch. This variation turns the pie into a holiday staple.
Chocolate‑Truffle Infusion
Add a small amount of chocolate truffle to the custard for an ultra‑rich, velvety finish. The truffle’s intense chocolate flavor intensifies the swirl without overpowering the custard. Finish with a dusting of cocoa powder or chocolate shavings for a dramatic look. This version is for those who want an indulgent, decadent dessert. The truffle also adds a luxurious aroma that’s hard to resist.
Storing and Bringing It Back to Life
Fridge Storage
Keep the pie refrigerated in an airtight container for up to 3 days. The custard will firm up slightly, but the swirl remains intact. Let it sit at room temperature for 10–15 minutes before serving to soften the filling. This short rest brings the pie back to its original creamy consistency. The flavors meld further during this time, making each bite even more delightful.
Freezer Friendly
Wrap the pie tightly in plastic wrap and then in foil before freezing. It can stay in the freezer for up to 2 months. When you’re ready to enjoy it, thaw in the refrigerator overnight. The custard may become slightly firmer, but it will regain its silky texture when warmed slightly. This method allows you to enjoy the pie at your convenience.
Best Reheating Method
To reheat, place the pie in a low‑temperature oven at 300°F (150°C) for 10 minutes. If the custard feels too thick, add a splash of milk to restore its creamy texture. Alternatively, microwave in short bursts of 20 seconds, stirring between each burst. The key is to warm it gently to avoid overcooking. This technique preserves the swirl and keeps the pie deliciously creamy.