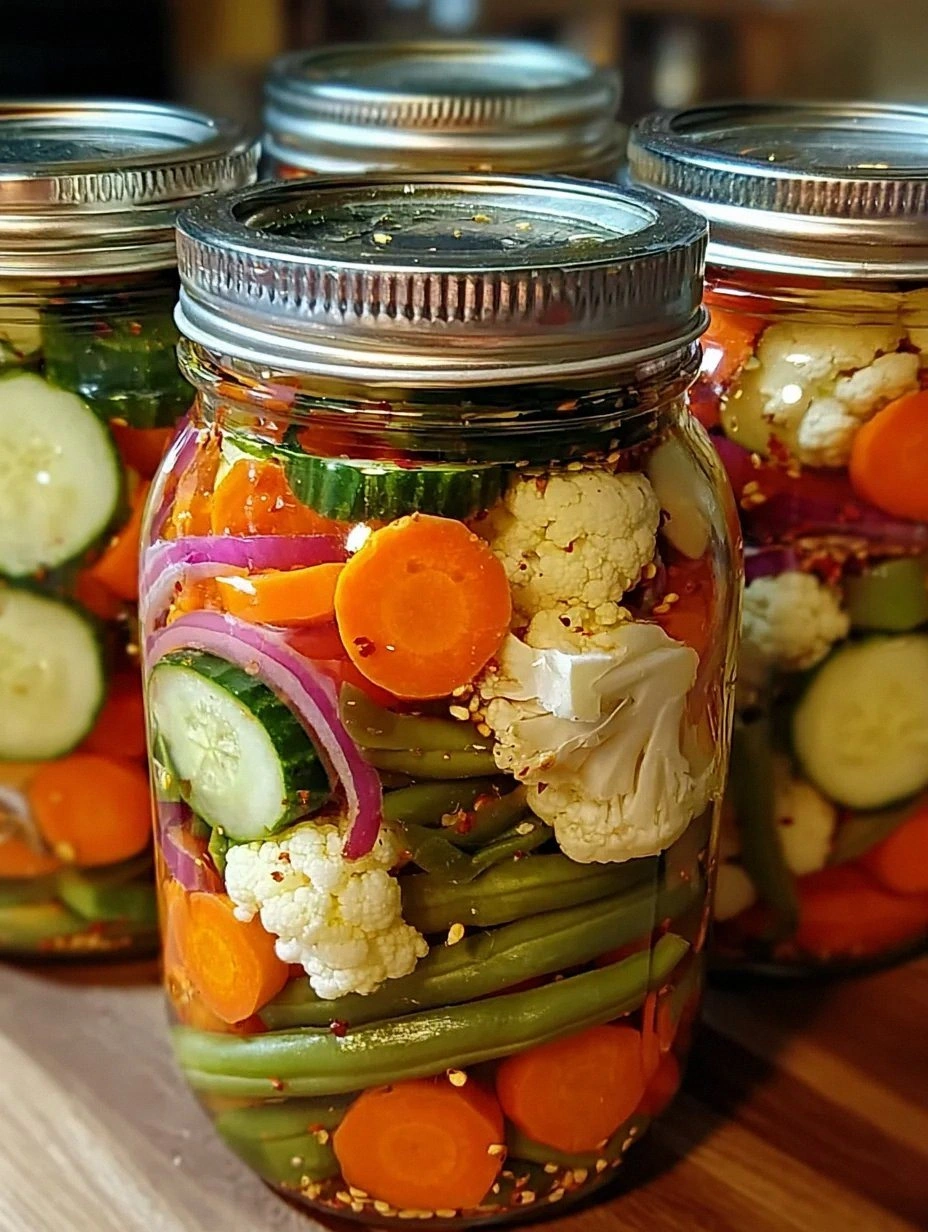
I was in the middle of a frantic week, juggling spreadsheets, Zoom calls, and a toddler who thought the kitchen counter was a personal amusement park. I opened the fridge, stared at a sad handful of limp carrots and a wilted cucumber, and thought, “What if I could turn this grocery‑store graveyard into something that makes my mouth do a happy dance?” That moment sparked a kitchen rebellion that ended with a jar of bright, crunchy, tang‑kissed vegetables that could convince even the most stubborn palate. I dare you to taste this and not go back for seconds.
Picture the scene: the sharp snap of fresh carrots as you bite, the mellow, almost sweet pop of cauliflower, and that unmistakable zing of vinegar that makes your nostrils perk up like a dog hearing the treat jar. The air fills with a perfume that’s part garden, part vinegar shop, and a whisper of garlic that makes you feel like you’ve just opened a secret pantry door. You hear the gentle clink of the mason jar sealing, the soft thud of the lid, and the faint hiss of the brine as it settles around each vegetable like a tiny, flavorful hug. Your fingers feel the cool glass, the weight of the jar, and the anticipation building in your gut.
Most pickling recipes either drown the veggies in a syrupy swamp or demand a week‑long fermentation that feels like a science experiment gone rogue. This version, however, is the antidote: quick, refrigerator‑friendly, and so balanced that the vegetables retain their natural crunch while soaking up a brine that sings with sweet, salty, and spicy notes. I’ll be honest — I ate half the batch before anyone else got to try it, and that’s because the flavor is hands down the best version you’ll ever make at home. Most recipes get this completely wrong. Here’s what actually works.
The secret weapon? A tiny splash of water in the brine that keeps the acidity from overwhelming the veggies, plus a pinch of sugar that smooths the edge like velvet. This isn’t just a side dish; it’s a conversation starter, a snack, a garnish, and a pantry staple all rolled into one. Okay, ready for the game‑changer? Let me walk you through every single step — by the end, you’ll wonder how you ever made it any other way.
What Makes This Version Stand Out
- Flavor Harmony: The brine balances sweet, salty, and spicy notes so perfectly that each bite feels like a mini celebration on your tongue.
- Crunch Retention: By using a quick‑refrigerator method, the vegetables stay crisp, delivering that satisfying snap that cooked‑down pickles lose.
- Simplicity: No fancy equipment, no fermentation gymnastics — just a jar, a saucepan, and a handful of pantry staples.
- Versatility: Works as a snack, a taco topping, a sandwich filler, or a vibrant side for any meal.
- Crowd Reaction: Guests often ask for the recipe within minutes; it’s the kind of dish that earns applause without the drama.
- Ingredient Quality: Fresh, colorful veggies shine through, and the simple spices let each vegetable’s natural flavor sing.
- Make‑Ahead Potential: The jar keeps for up to two weeks, getting better each day — a true set‑it‑and‑forget‑it hero.
- Low‑Effort, High‑Reward: In under an hour you have a pantry‑ready condiment that feels like a culinary triumph.
Inside the Ingredient List
The Flavor Base
White Vinegar: The star of the brine, its sharp acidity cuts through the natural sweetness of the veggies, creating that classic pickle tang. If you swap it for apple cider vinegar, you’ll get a fruitier note that can be delightful but changes the flavor profile. Choose a distilled, unflavored version for the cleanest taste.
Sugar: Just a tablespoon, and you’ll notice how it rounds the edge of the vinegar, making the brine less aggressive. Skipping the sugar leaves a harsh bite that can dominate the delicate vegetables. You can replace it with honey for a subtle floral undertone.
Salt: Salt isn’t just seasoning; it draws moisture out of the veggies, helping them stay crisp while also enhancing the overall flavor. Kosher or pickling salt works best because it dissolves quickly and has no additives. Too much salt will make the brine overly salty, so measure carefully.
The Texture Crew
Carrots: Cut into bite‑size shapes, these add a natural sweetness and a bright orange pop that makes the jar look like a sunset. If you leave them whole, they’ll take longer to absorb the brine and stay too firm. Choose carrots that are firm and free of cracks for the best crunch.
Cauliflower: Fresh florets that break easily into small, snackable pieces provide a buttery texture that contrasts nicely with the snap of the carrots. A frozen head will release water and become soggy, so always buy fresh.
Cucumbers: Sliced or speared, they bring a refreshing crunch that feels like a cool breeze on a hot day. For the crunchiest result, use English cucumbers or Persian varieties with thin skins and few seeds.
Green Beans: Trimmed and possibly halved, they add a nice snap that’s almost like a miniature asparagus spear. If you overcook them before pickling, you’ll lose that satisfying bite.
Red Bell Pepper: Chunks or strips add a sweet, slightly fruity note and a vivid red hue that makes the jar look festive. Roasted peppers would add smokiness, but we’re keeping it fresh for this version.
The Unexpected Star
Garlic: Whole cloves infuse a robust, aromatic depth that transforms the brine from simple to sophisticated. If you’re not a fan of raw garlic heat, lightly crush the cloves first to mellow the bite.
Mustard Seeds: These tiny powerhouses add a subtle, earthy spice that awakens the palate. Yellow seeds are milder; brown seeds bring a hotter kick. Toast them briefly for an extra layer of flavor.
Black Peppercorns: They lend a peppery warmth that balances the acidity. Cracking them slightly before adding releases their essential oils.
Red Pepper Flakes (Optional): For those who enjoy a little heat, a pinch of flakes adds a whisper of fire that lingers on the tongue. Omit if you prefer a milder profile.
The Final Flourish
Water: Diluting the vinegar prevents the brine from being too harsh, allowing the vegetables to stay crisp while still absorbing that tangy goodness. Use filtered water for the cleanest flavor.
Red Pepper Flakes (Optional): A tiny sprinkle can turn a mild snack into a bold statement. Adjust to taste; a little goes a long way.
Everything's prepped? Good. Let’s get into the real action…
The Method — Step by Step
Gather all your vegetables and give them a good rinse under cold water. Pat them dry with a clean kitchen towel; excess moisture can dilute the brine and make the jar soggy. Cut the carrots into sticks, break the cauliflower into bite‑size florets, slice the cucumber into half‑moons, trim the green beans, and dice the red bell pepper into colorful chunks. Toss everything into a large bowl, and give the mix a quick toss to ensure an even distribution.
Kitchen Hack: Sprinkle a pinch of salt on the raw veggies and let them sit for 5 minutes; this draws out excess water and helps the brine cling better.In a medium saucepan, combine 1 cup white vinegar, 1 cup water, 1 tablespoon sugar, and 1 teaspoon salt. Bring the mixture to a gentle boil, stirring until the sugar and salt dissolve completely. Once bubbling, add the mustard seeds, black peppercorns, and optional red pepper flakes. Let the spices steep for about 2 minutes; you’ll notice a fragrant cloud rising from the pot — that’s the aroma of flavor building.
While the brine simmers, prepare your jars. Use a quart‑size mason jar or any airtight glass container with a wide mouth. Layer the garlic cloves at the bottom of each jar; they’ll act as a flavor anchor, ensuring every bite gets a whisper of garlic.
Now, start packing the vegetables tightly but gently into the jar. The goal is to fill the jar as much as possible without crushing the pieces; think of it as a cozy, packed suitcase. Alternate colors for visual appeal — a bright orange carrot next to a white cauliflower floret, a green cucumber beside a red pepper chunk. This not only looks gorgeous but also ensures each bite offers a balanced mix.
When the brine reaches a rolling boil, remove it from heat and let it cool for about 2 minutes. Then, carefully pour the hot brine over the packed vegetables, making sure the liquid completely covers everything. You should hear a gentle sizzle as the hot liquid meets the cool veggies — that’s the moment of magic when the flavors start to meld.
Seal the jar tightly with its lid and give it a good shake. This distributes the spices and helps any air bubbles escape. Place the jar in the refrigerator immediately; the cold environment stops any unwanted fermentation and keeps the crunch intact.
Watch Out: If any vegetable pieces float above the brine, press them down with a clean spoon; exposed veggies can turn mushy.Let the jar sit in the fridge for at least 2 hours before tasting, though the flavor truly peaks after 24 hours. The brine continues to penetrate, turning each vegetable a beautiful, slightly translucent shade. During this waiting period, you might notice a faint fizz — that’s just the natural carbonation from the vinegar reacting with the vegetables, a harmless and tasty side effect.
After the first day, give the jar a quick shake each morning for the next three days. This redistributes the spices and ensures an even flavor throughout. By day three, the vegetables will have a balanced sweet‑sour‑spicy profile that’s ready to eat straight from the jar or as a topping for tacos, salads, or sandwiches.
Kitchen Hack: Store the jar upright on a shelf rather than lying flat; this reduces the risk of leakage and keeps the brine evenly distributed.When you’re ready to serve, scoop out a handful with clean tongs. The vegetables should be crisp, bright, and coated in a glossy, slightly thickened brine. Taste and adjust: a pinch more salt or a dash of extra red pepper flakes can be added directly to the jar if you crave more punch.
That’s it — you did it. But hold on, I’ve got a few more tricks that’ll take this to another level, because why settle for good when you can have legendary?
Insider Tricks for Flawless Results
The Temperature Rule Nobody Follows
Never pour boiling brine directly over cold vegetables; the shock can cause the veggies to wilt slightly. Instead, let the brine cool to around 140°F (60°C) before pouring. This gentle temperature preserves the crunch while still allowing the flavors to penetrate quickly. I once tried the hot‑pour method and ended up with soggy carrots — lesson learned.
Why Your Nose Knows Best
Your sense of smell is a reliable indicator of when the brine is ready. When the vinegar‑sugar‑salt mixture starts to emit a fragrant, slightly sweet aroma, it’s time to go. If you smell a sharp, almost chemical bite, you’ve over‑cooked the brine and risk a harsh flavor. Trust your nose; it’s the ultimate kitchen gauge.
The 5‑Minute Rest That Changes Everything
After sealing the jar, let it sit on the counter for exactly five minutes before refrigerating. This short rest allows the hot brine to settle and the spices to begin infusing without the shock of immediate cold. A friend tried skipping this step once — the jar leaked, and the brine pooled at the bottom, leaving some veggies under‑seasoned.
The Crunch Keeper
Add a tiny pinch of calcium chloride (also sold as Pickle Crisp) to the brine if you’re planning to keep the pickles for more than a week. This mineral helps maintain that satisfying snap, especially for cucumbers. It’s a secret pro‑chef trick that keeps your pickles crisp longer.
Flavor Layering with Herbs
Throw in a sprig of fresh dill or a few bay leaves for an herbaceous undertone that doesn’t dominate but adds depth. I love the subtle earthiness that dill brings; it’s like a whisper in a bustling conversation.
Creative Twists and Variations
This recipe is a playground. Here are some of my favorite ways to switch things up:
Spicy Sriracha Splash
Add a tablespoon of sriracha sauce to the brine for a bold, Asian‑inspired heat. The sweet‑garlic base of sriracha pairs beautifully with the crisp veggies, making it perfect for topping ramen or bao buns.
Herb‑Infused Delight
Swap the mustard seeds for a tablespoon of mixed dried herbs (thyme, oregano, and rosemary). This herbaceous version works wonderfully as a side for grilled meats or a topping for roasted potatoes.
Sweet‑Heat Asian Fusion
Include thinly sliced red onion, a splash of rice vinegar, and a drizzle of honey in the brine. The result is a sweet‑and‑spicy medley that shines on sushi bowls or as a garnish for grilled tofu.
Mediterranean Olive Boost
Add a handful of pitted Kalamata olives and a teaspoon of oregano. The brine takes on a salty, briny character that pairs perfectly with feta cheese and pita.
Autumn Harvest Mix
Swap the cucumber for thinly sliced apples and add a pinch of cinnamon to the brine. This sweet‑savory combo is a surprise hit on cheese boards during the cooler months.
Storing and Bringing It Back to Life
Fridge Storage
Keep the jar sealed in the refrigerator for up to two weeks. The vegetables will continue to develop flavor, becoming more vibrant each day. For the best texture, consume within the first week.
Freezer Friendly
If you need to store longer, transfer the pickles (without the brine) into a freezer‑safe container and freeze for up to three months. Thaw in the fridge and refresh the brine by adding a fresh splash of vinegar and water before serving.
Best Reheating Method
When you want to serve the pickles warm (great on grilled sandwiches), add a tiny splash of water to the jar and microwave for 30 seconds. The added moisture steams the veggies back to a perfect, slightly softened texture without losing the tang.