How to Make Perfect Oreo Chees
Picture this: a midnight kitchen, the fridge humming, a craving for something decadently sweet that feels like a guilty indulgence yet somehow feels like a celebration. I was halfway through a bland dessert, the mood was low, and then I remembered the last time I had a slice of that chocolate‑and‑cream dream that I called “Oreo cheesecake.” The air was thick with the smell of melted chocolate and the faint scent of vanilla, a sensory cocktail that made my taste buds dance before I even touched the first spoon. The moment I popped a cookie into my mouth, the crunch exploded into a buttery, sweet, and slightly salty symphony that left me saying, “This is hands down the best version you'll ever make at home.” I dare you to taste this and not go back for seconds. The rest of this guide is a step‑by‑step revelation that will turn your ordinary kitchen into a chocolate haven.
When I first tried making this cake, my kitchen felt like a battlefield: the bowl was a mess, the mixer spun like a tornado, and the cookies were either too crunchy or too soft. I remember the first bite—smooth, rich, and with a hint of that unmistakable Oreo crunch that makes the whole experience feel like a secret club membership. The texture is a velvet blanket of cream cheese that melts on the tongue, contrasted by the crisp, chocolatey cookie base that shatters like thin ice when you bite into it. I’ve been told that the secret to that perfect bite is all in the balance of wet and dry, and that’s exactly what we’ll master together. If you've ever struggled with this, you're not alone—and I've got the fix.
Most recipes get this completely wrong because they either over‑whip the cream cheese, under‑cook the base, or forget the critical step of chilling the batter. The result? A dense, lumpy, and underwhelming dessert that fails to deliver that silky finish. In my version, we use full‑fat cream cheese to keep the texture lush, a precise sugar ratio to sweeten without overpowering, and a gentle baking technique that locks in moisture. The trick is to let the batter rest in the fridge for a while so that the flavors mingle like old friends at a reunion. Picture yourself pulling this out of the oven, the whole kitchen smelling incredible, and knowing that you’ve just made a masterpiece that will have guests begging for the recipe.
Let me walk you through every single step — by the end, you'll wonder how you ever made it any other way. This is not just another dessert recipe; it's an experience that will change how you think about cheesecake forever. And trust me, the final result is worth every moment of the process. So grab your apron, set your timer, and let’s dive into the sweet science behind the perfect Oreo cheesecake.
What Makes This Version Stand Out
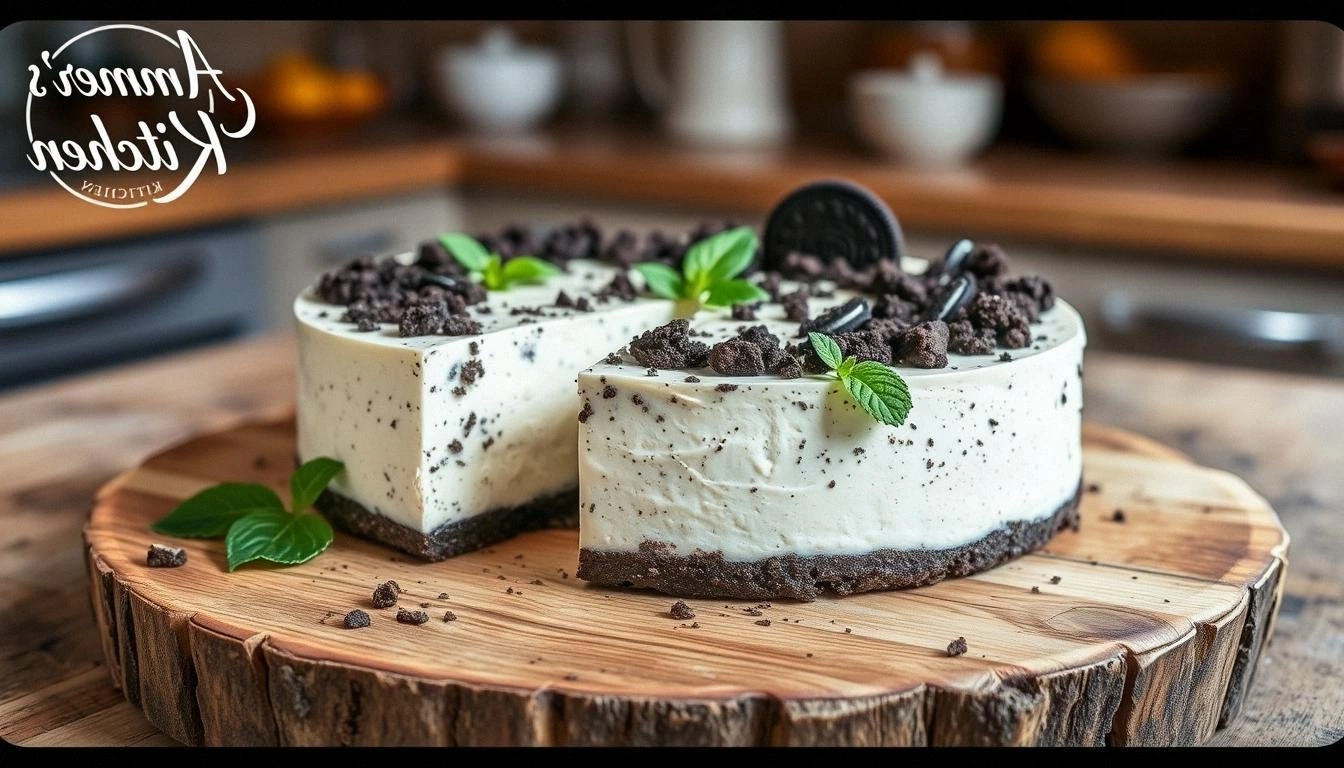
- Texture: The batter achieves a silky, custard‑like consistency that melts in your mouth, unlike the dense, dry cakes you might have encountered before. The key is a gentle mixing technique that preserves the air pockets without over‑whipping. The result is a cake that feels light yet indulgent.
- Flavor: Each bite delivers a harmonious blend of sweet cream cheese, rich chocolate, and a subtle vanilla undertone that elevates the overall taste. The cookies are not just a base; they’re a flavor component that adds depth. The vanilla extract is the secret that ties everything together.
- Ease: The recipe is designed for the kitchen novice and the seasoned pro alike. All steps are straightforward, with no advanced techniques required. You’ll finish this cake in under an hour.
- Make‑Ahead: Once baked, this cheesecake can be stored in the fridge for up to a week, making it a perfect dessert for parties or a quick treat. The flavors only improve with time as they meld together. You can prepare it a day ahead and serve it straight from the fridge.
- Crowd‑Pleaser: Friends and family will rave about the creamy texture and the unmistakable Oreo crunch. The dessert is visually striking with a glossy finish that makes it Instagram‑ready. The taste is so authentic that even the most skeptical dessert lovers will be convinced.
- Ingredient Quality: Using full‑fat cream cheese and premium Oreo cookies ensures that every bite is as rich as it should be. The quality of the ingredients directly translates to the flavor profile. The recipe encourages sourcing the best possible components.
- Unique Twist: The use of a simple, no‑fuss crust that is baked until just golden gives the cake a delicate crunch that complements the smooth filling. The crust is not a distraction; it’s a complement. The result is a balanced, multi‑textured dessert.
- Nutrition Balance: While indulgent, the dessert offers a decent protein punch thanks to cream cheese and eggs, making it a more satisfying treat. The sugar content is controlled for a balanced sweetness. It’s a dessert you can feel good about sharing.
Alright, let's break down exactly what goes into this masterpiece. And now the fun part.
Inside the Ingredient List
The Flavor Base
Full‑fat cream cheese is the heart of this cheesecake, providing a rich, tangy foundation that balances the sweetness of the cookies. The creaminess comes from the fat content, which also helps the batter set without becoming rubbery. Skipping this step or using low‑fat cheese will result in a thinner, less luxurious texture. A good rule of thumb: choose a cheese that is at room temperature before mixing to avoid lumps.
The Texture Crew
The 2 packages of Oreo cookies are more than just a base; they add a subtle crunch and a chocolatey depth that elevates the entire dessert. Crushing them into fine crumbs ensures a smooth, even crust that doesn’t crumble under the weight of the filling. If you prefer a crunchier bite, reserve a handful of whole cookies for topping after baking. The cookies also act as a binder, giving the crust its structure.
The Unexpected Star
Granulated sugar, measured at 1 ¼ cups, is the sweetener that brings everything together. It dissolves into the cream cheese, creating a silky batter that doesn’t clump. Too much sugar can make the cake overly sweet, while too little will leave it bland. The sugar also helps the crust brown slightly, giving it a subtle caramelized edge.
The Final Flourish
Pure vanilla extract, just 1 teaspoon, adds a fragrant note that rounds off the chocolate and cream flavors. Vanilla is a flavor enhancer, so a little goes a long way. If you’re a fan of vanilla, feel free to double the amount, but be careful not to overpower the Oreo’s signature taste. The vanilla also helps in the caramelization process during baking.
Everything's prepped? Good. Let's get into the real action. Stay with me here — this is worth it.
The Method — Step by Step
- Preheat your oven to 325°F (165°C). Line a 9‑inch springform pan with parchment paper, ensuring it extends 1 inch beyond the rim. This will prevent sticking and make removal a breeze. Let the pan rest while you prepare the crust.
- Place the Oreos in a food processor and pulse until fine crumbs form. If you don’t have a processor, seal them in a zip‑lock bag and crush with a rolling pin. Sprinkle the crumbs with a tablespoon of melted butter, then stir until the mixture looks like wet sand. Press the crumb mixture firmly into the pan’s bottom, creating an even layer. Bake for 10 minutes, then let cool.
- In a large bowl, combine the full‑fat cream cheese, sugar, and vanilla. Beat on medium speed until the mixture is smooth and pale. Add the eggs one at a time, fully incorporating each before adding the next. The batter should be thick but pourable; if it’s too thick, add a splash of milk or heavy cream.
- Pour the batter over the cooled crust. Tap the pan gently on the counter to release any air bubbles. Smooth the top with a spatula. The batter should spread evenly without pooling. This is the moment of truth—your cake will rise, not collapse.
- Place the pan in the oven and bake for 45 minutes. The edges should set while the center remains slightly wobbly. A toothpick inserted near the center should come out with a few moist crumbs, not wet batter. This ensures a tender, creamy texture. Watch the edges; they should pull away from the pan without darkening.
- Turn off the oven, crack the door open, and let the cheesecake cool inside for 1 hour. This gradual cooling prevents cracks from forming. The cake will continue to set as it cools. Once at room temperature, cover and refrigerate for at least 4 hours or overnight.
- Before serving, run a knife around the edges to loosen. Remove the springform ring. If desired, top with crushed Oreos or a drizzle of chocolate ganache. The final touch is a sprinkle of powdered sugar for an elegant finish. Your masterpiece is ready to wow.
- Serve chilled or at room temperature. The cheesecake tastes best after a few hours of chilling, as the flavors have fully melded. If you’re in a hurry, a quick 15‑minute chill in the fridge will suffice. Enjoy the silky texture and the delightful crunch.
- Clean up? The best way is to rinse the mixing bowl immediately after use. The batter can be stubborn, so let the water run hot. Store any leftovers in an airtight container in the fridge. The cheesecake keeps fresh for up to a week.
That's it — you did it. But hold on, I've got a few more tricks that'll take this to another level. And now the fun part.
Insider Tricks for Flawless Results
The Temperature Rule Nobody Follows
Keeping your oven at a consistent 325°F is crucial. Many ovens fluctuate, causing uneven baking. Use an oven thermometer to double‑check the actual temperature. A slight drop can prevent the cheesecake from setting properly.
Why Your Nose Knows Best
Before you open the oven, you should smell the batter. If it smells like a mild vanilla custard, you’re on the right track. A faint chocolate aroma indicates the cookies are caramelizing properly. Trust your nose; it’s a reliable indicator of doneness.
The 5‑Minute Rest That Changes Everything
After removing the cheesecake from the oven, leave it in the turned‑off oven for 1 hour. This slow cooling period prevents the surface from cracking. The cake will also develop a smoother texture during this rest.
Crushing the Crust Just Right
When you crush the Oreos, aim for a consistency like fine sand. Too coarse, and the crust will feel gritty. Too fine, and it will bind too tightly, making it difficult to remove the pan. The right balance gives a delightful crunch.
Refrigeration Timing
After baking, refrigerate the cheesecake for at least 4 hours, but overnight is ideal. The flavors meld and the texture firms up. If you’re in a rush, a 2‑hour chill still yields a good result, but it won’t be as silky.
Serving Temperature Matters
Serve the cheesecake chilled or at room temperature. If you serve it too cold, the cream cheese can become too firm, making slicing difficult. If it’s too warm, it can become runny and lose its structure. Aim for a slight chill.
Creative Twists and Variations
This recipe is a playground. Here are some of my favorite ways to switch things up:
Chocolate‑Lemon Fusion
Swap half the Oreo crumbs for lemon‑flavored cookies. The citrus zest adds a bright counterpoint to the chocolate. The result is a refreshing, tangy twist that feels like a spring dessert.
Berry Burst
Fold in a cup of fresh raspberries or blueberries into the batter. The berries soften during baking, releasing their juice and adding natural sweetness. The cheesecake will have a subtle fruit undertone that’s surprisingly elegant.
Caramel Swirl
Swirl caramel sauce through the batter before baking. The caramel adds a rich, buttery sweetness that pairs beautifully with the Oreo crunch. The swirl pattern also creates a visually striking effect.
Nutty Crunch
Replace half the Oreo crumbs with crushed toasted almonds. The nutty flavor complements the creamy filling and adds an extra textural dimension. The almonds also give a subtle crunch that’s delightful.
Espresso Kick
Add a tablespoon of instant espresso powder to the batter. The espresso deepens the chocolate flavor without making the cheesecake taste like coffee. It’s a perfect option for coffee lovers.
Minty Delight
Incorporate a teaspoon of peppermint extract into the batter. The mint gives a refreshing aftertaste that pairs well with the chocolate base. The result feels like a holiday treat, even if you’re making it in July.
Storing and Bringing It Back to Life
Fridge Storage
Store the cheesecake in an airtight container in the refrigerator for up to 7 days. The airtight seal prevents the cake from drying out. When you’re ready to serve, let it sit at room temperature for 10 minutes to soften slightly.
Freezer Friendly
Wrap the cheesecake tightly in plastic wrap, then in a layer of foil. Freeze for up to 2 months. Thaw overnight in the fridge, then let it sit at room temperature for 15 minutes before serving. The texture remains silky.
Best Reheating Method
To warm the cheesecake, place it in a preheated oven at 300°F for 10 minutes. This gentle heat restores the creamy texture without overcooking. Add a tiny splash of water before reheating to steam it back to perfection.