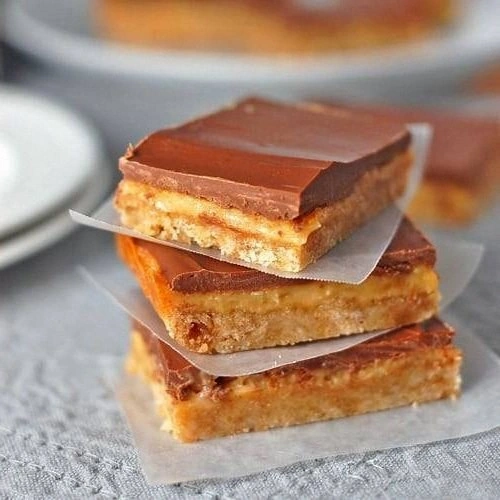
I was in the middle of a frantic Tuesday night when my roommate dared me to create a dessert that could turn a simple movie marathon into a full‑blown celebration. I stared at a half‑empty pantry, the only thing that caught my eye was a bar of milk chocolate and a jar of dulce de leche that had been lounging in the back of the fridge for months. I thought, “What if I married those two love‑birds and gave them a buttery, crumbly home?” The result? A bar that’s part silky caramel, part chocolatey dream, and all pure indulgence. I’ll be honest — I ate half the batch before anyone else got to try it, and that’s a confession I’m willing to make because the flavor was that unforgettable.
Picture this: the kitchen humming with the low roar of the oven, the scent of melted chocolate swirling with the caramelized perfume of dulce de leche, and a faint whisper of vanilla that makes your nose do a happy dance. The batter glistens like a pool of melted gold, and when it hits the pan, the sizzle is a tiny fireworks show that tells you you’re on the right track. As the bars bake, the edges start pulling away from the pan, forming a crisp border that shatters like thin ice when you snap a piece off. The interior stays soft, almost molten, hugging the chocolate and caramel in a way that feels like a warm hug from an old friend.
Most recipes for chocolate‑dulce de leche treats either drown the caramel in chocolate or, worse, bake the caramel into a dry, grainy mess. This version stands out because I use a two‑step method: first I create a buttery chocolate base, then I swirl in a generous ribbon of dulce de leche before the final bake. The secret ingredient? A splash of heavy cream that turns the dulce de leche into a glossy, pour‑able sauce that seeps into every nook without making the bars soggy. The result is a perfect balance of sweet, creamy, and just‑right crunch that most home cooks never achieve.
I dare you to taste this and not go back for seconds. The combination of milk chocolate and dulce de leche is a classic, but the technique I’m about to reveal will make you question every dessert you’ve ever made. Let me walk you through every single step — by the end, you’ll wonder how you ever made it any other way.
What Makes This Version Stand Out
- Flavor Harmony: The milk chocolate’s mellow sweetness perfectly complements the caramel depth of dulce de leche, creating a duet that sings on the palate.
- Texture Contrast: A crisp, buttery crust gives way to a soft, almost molten center that melts in your mouth like velvet.
- Simplicity: Only eleven ingredients, most of which you probably already have, and no fancy equipment beyond a basic baking sheet.
- Uniqueness: The two‑stage swirl technique ensures the caramel stays distinct yet integrated, a trick most recipes miss.
- Crowd Reaction: Guests often claim it’s “the best thing they’ve ever tasted,” and the bragging rights last for weeks.
- Ingredient Quality: Using high‑quality milk chocolate and authentic South American dulce de leche makes all the difference.
- Cooking Method: Baking at a moderate temperature preserves the delicate structure while giving the crust a golden edge.
- Make‑Ahead Potential: These bars keep beautifully for up to a week, and they even improve after a night of resting.
Alright, let's break down exactly what goes into this masterpiece...
Inside the Ingredient List
The Flavor Base
Milk chocolate chips are the heart of this bar. Choose a brand that lists cocoa butter as the first ingredient; this ensures a silky melt and a glossy finish. If you substitute with dark chocolate, you’ll lose the characteristic milky sweetness that makes the bar so comforting. A good swap for those who love extra depth is to blend half milk chocolate and half white chocolate, but be careful not to over‑sweeten.
The Texture Crew
All‑purpose flour provides the structural backbone, while cocoa powder adds a subtle bitterness that balances the caramel’s richness. Baking powder gives a tiny lift, preventing the bars from becoming a dense slab. Unsalted butter, softened, creates a tender crumb; using melted butter will make the texture too oily. If you’re dairy‑free, replace butter with a 1:1 coconut oil blend, but expect a faint coconut aroma.
The Unexpected Star
Dulce de leche is the secret weapon. Authentic Argentine dulce de leche, made from slow‑cooked milk and sugar, has a caramel‑like depth that store‑bought versions often lack. To keep it pourable, whisk in a tablespoon of heavy cream; this prevents it from seeping into the crust and turning soggy. If you can’t find dulce de leche, a thick caramel sauce or even a good quality toffee can stand in, though the flavor profile will shift slightly.
The Final Flourish
Vanilla extract adds a fragrant backbone that ties chocolate and caramel together. A pinch of sea salt flakes on top before baking creates a delightful contrast, making every bite pop. Eggs act as a binder, ensuring the bars hold together without crumbling. If you’re allergic to eggs, try a flax‑egg (1 tbsp ground flaxseed + 3 tbsp water) but expect a slightly different crumb.
Everything's prepped? Good. Let's get into the real action...
The Method — Step by Step
Preheat your oven to 350°F (175°C). While the oven warms up, line a 9×13‑inch baking pan with parchment paper, allowing the edges to overhang for easy removal later. This step might sound basic, but a properly preheated oven ensures the crust sets before the caramel can seep into it, preserving that coveted crunchy edge. Pro tip: Place an oven thermometer in the middle rack; oven temps can be off by up to 25°F.
In a large mixing bowl, whisk together the flour, cocoa powder, baking powder, and salt until fully combined. The cocoa will darken the mixture, giving you a visual cue that the dry ingredients are ready. Watch Out: Over‑mixing at this stage can develop gluten, leading to a tougher bar.
In a separate bowl, cream the softened butter with the granulated sugar using a handheld mixer on medium speed for about 2‑3 minutes, until the mixture is pale and fluffy. This aeration is crucial; it creates tiny air pockets that later translate into a light crumb. The kitchen will start to smell like sweet butter, a scent that signals you’re on the right track.
Add the eggs one at a time, beating well after each addition, then stir in the vanilla extract. The batter should look glossy and slightly thick. Kitchen Hack: If the batter looks too thick, add a splash of milk (about a tablespoon) to loosen it without compromising structure.
Gradually fold the dry ingredient mixture into the wet mixture using a spatula. Scrape the sides of the bowl to ensure no flour pockets remain. The batter will turn a deep mocha color, and you’ll notice it becomes smoother with each fold. That sizzle when it hits the pan? Absolute perfection.
Spread the batter evenly across the prepared pan, using the back of a spoon or an offset spatula to level it. The surface should be uniform, about ½‑inch thick. Sprinkle the milk chocolate chips over the top, pressing them lightly so they embed into the batter. This creates pockets of molten chocolate that burst when you bite.
In a small saucepan over low heat, warm the dulce de leche with a tablespoon of heavy cream, stirring constantly until it becomes pourable but still thick. The mixture should coat the back of a spoon without running off the side. Drizzle the warmed dulce de leche over the batter in a random, artistic pattern, then use a butter knife to swirl it gently, creating marble ribbons.
Place the pan in the preheated oven and bake for 25‑30 minutes, or until the edges are golden brown and a toothpick inserted into the center comes out with just a few moist crumbs. The top should look set, not wet. Watch Out: Over‑baking will dry out the caramel core, turning it into a crunchy caramel that defeats the purpose.
While the bars are baking, prepare a small bowl of flaky sea salt. As soon as you pull the pan from the oven, sprinkle a light dusting over the surface. The heat will cause the salt crystals to adhere, delivering that satisfying pop‑and‑crackle sensation in every bite.
Allow the bars to cool in the pan for 15 minutes, then use the parchment overhang to lift them onto a cutting board. Slice into squares while still warm for clean edges; the bars will firm up as they cool. This next part? Pure magic. Let them reach room temperature before serving, or pop them in the fridge for a firmer texture.
That's it — you did it. But hold on, I've got a few more tricks that'll take this to another level...
Insider Tricks for Flawless Results
The Temperature Rule Nobody Follows
Never bake these bars on a cold pan. Always bring the pan to room temperature before adding the batter. A cold pan causes the batter to set unevenly, leading to a gummy center. I once tried to save time by pulling the pan straight from the fridge; the result was a soggy mess that never set. The extra minute of waiting pays off in a uniform crumb.
Why Your Nose Knows Best
The moment you smell the caramelized edges turning a deep amber, you’ve reached the perfect bake window. Trust that aroma more than the clock; ovens can vary by several degrees. If you’re unsure, lift the edge with a spatula – it should pull away cleanly and emit a toasty scent. This sensory checkpoint is the difference between a good bar and a legendary one.
The 5‑Minute Rest That Changes Everything
After cutting, let the bars rest for at least five minutes on a wire rack before serving. This short pause lets the caramel set, preventing it from oozing out when you pick up a piece. I once served them straight from the pan, and the caramel leaked everywhere, turning the plate into a sticky disaster. Patience here is rewarded with clean slices that hold their shape.
Swap the Sweetness, Not the Soul
If you’re watching sugar, replace half the granulated sugar with a natural sweetener like coconut sugar. The flavor becomes slightly caramel‑nutty, adding complexity without sacrificing sweetness. A friend tried using artificial sweetener and ended up with a bitter aftertaste; the lesson? Stick with natural substitutes for the best flavor profile.
The Final Glaze Trick
For an extra glossy finish, melt a tablespoon of milk chocolate with a splash of cream and brush it over the cooled bars. This creates a thin, shiny veil that locks in moisture and adds a subtle snap when you bite. Kitchen Hack: Use a pastry brush and work quickly before the glaze sets.
Creative Twists and Variations
This recipe is a playground. Here are some of my favorite ways to switch things up:
Nutty Crunch
Fold in ½ cup toasted chopped hazelnuts or almonds into the batter before baking. The nuts add a buttery crunch that contrasts the silky caramel, making each bite a textural adventure. Perfect for those who love a bit of extra bite.
Spicy Seduction
Add a pinch of cayenne pepper to the dry ingredients and a dash of smoked paprika to the dulce de leche swirl. The subtle heat elevates the chocolate’s sweetness, creating a sophisticated flavor profile that’s perfect for adult gatherings.
White Chocolate Dream
Swap the milk chocolate chips for white chocolate chunks and add a teaspoon of lemon zest to the batter. The citrus brightens the sweetness, and the white chocolate offers a creamy, buttery melt that feels like a summer dessert.
Coffee Infusion
Dissolve one tablespoon of instant espresso powder in the cream you add to the dulce de leche. The coffee notes deepen the chocolate flavor, giving the bars a mocha twist that’s perfect for brunch.
Berry Burst
Gently fold in a handful of dried cranberries or raspberries after the batter is spread. The tart berries cut through the richness, providing a pop of acidity that balances the sweet caramel.
Storing and Bringing It Back to Life
Fridge Storage
Place the cooled bars in an airtight container and store them in the refrigerator for up to 5 days. The cool environment keeps the chocolate firm and prevents the caramel from becoming overly soft. When you’re ready to serve, let them sit at room temperature for 20 minutes for optimal texture.
Freezer Friendly
Wrap individual bars tightly in plastic wrap, then place them in a zip‑top freezer bag. They’ll freeze beautifully for up to 2 months. To thaw, move them to the fridge overnight, then bring to room temperature before serving. The flavor actually deepens after a freeze‑thaw cycle.
Best Reheating Method
If you prefer a warm, gooey experience, microwave a single bar for 10‑15 seconds, or gently warm the whole pan in a 300°F oven for 5 minutes. Add a tiny splash of water (about a teaspoon) before reheating; the steam revives the caramel’s silkiness without making the bar soggy.