I still remember the first time I tried to make pumpkin Oreo balls. It was a disaster of epic proportions — pumpkin puree everywhere, Oreo crumbs stuck to my ceiling fan, and a final product that looked like sad, lumpy golf balls. But here's the thing: I could taste the potential. That creamy pumpkin-spice filling wrapped in that perfect chocolate shell was whispering promises of autumn glory, if only I could get the ratios right. Fast forward through three weeks, two batches of burnt chocolate, and one very patient dog who learned to stay out of the kitchen, and I finally cracked the code. What you're about to make isn't just another pumpkin recipe — it's the pumpkin recipe that'll have your friends texting you at midnight, begging for the secret.
Picture this: It's October, the air is crisp, and your kitchen smells like someone bottled up fall and released it into your home. The smell of crushed Oreos mingles with warm pumpkin pie spice, creating this intoxicating aroma that makes you close your eyes and sigh contentedly. You're rolling these perfect little spheres between your palms, and each one comes out looking like it belongs in a boutique bakery window. The chocolate coating sets into this gorgeous, glossy shell that cracks just slightly when you bite into it, revealing that impossibly smooth, orange-tinted filling that tastes like someone blended pumpkin pie with cookies and cream. I dare you to taste this and not go back for seconds — actually, I double-dog-dare you, because I ate half the batch before anyone else got to try it, and I have zero regrets about it.
Most recipes out there get this completely wrong, and I'll tell you exactly why. They either add too much pumpkin (resulting in a soggy mess that won't hold its shape), or they skip the crucial step of properly tempering the chocolate (leaving you with a dull, streaky coating that looks like it went through a war zone). Some even try to get fancy with white chocolate chips that seize up faster than you can say "pumpkin spice latte." But here's what actually works: the perfect ratio of cream cheese to pumpkin, the right kind of Oreos (Double Stuf, always), and a chocolate coating technique that'll make you look like a professional chocolatier even if you've never tempered chocolate in your life. Stay with me here — this is worth it.
The game-changer? It's all in how you treat the filling. Most recipes tell you to just mix everything together and hope for the best, but we're going to whip the cream cheese until it's lighter than air, then fold in the pumpkin with the reverence of a sacred ritual. This creates a filling so smooth, so perfectly balanced between tangy and sweet, that you'll be tempted to eat it with a spoon. And here's my confession — I have. Multiple times. Picture yourself pulling these out of the fridge, the chocolate just barely set, the whole kitchen smelling incredible while your family hovers nearby like vultures. Let me walk you through every single step — by the end, you'll wonder how you ever made it any other way.
What Makes This Version Stand Out
Pumpkin-Perfect: This isn't some bland, vaguely orange-flavored candy. We use real pumpkin puree (not pie filling) and blend it with warm spices in the exact proportions that make pumpkin pie legendary. The result hits your taste buds like autumn fireworks — cinnamon, nutmeg, ginger, and cloves dancing together in perfect harmony.
Texture Paradise: The contrast here is everything — a snappy chocolate shell that gives way to a cloud-like filling that's somehow both rich and airy. It's like biting through a thin layer of ice into a warm swimming pool, if that makes any sense at all. The cream cheese lightens the pumpkin, while the Oreo crumbs add these tiny pockets of chocolate crunch throughout.
No-Fail Method: I've tested this recipe seventeen times across three different kitchens with varying humidity levels, and it works every single time. The secret lies in our foolproof chocolate coating technique that doesn't require any fancy equipment or culinary school training. If you can operate a fork, you can make these look professional.
Crowd Magic: Bring these to a potluck and watch what happens. Within minutes, you'll have a crowd of people hovering around your dessert plate, asking for the recipe in between bites. I've seen grown adults hide these in napkins to take home. I've seen teenagers voluntarily do dishes just to earn an extra one. This is the dessert equivalent of a rock concert.
Ingredient Integrity: We're using premium ingredients here — real butter in the cream cheese mixture, pure vanilla extract, and good-quality chocolate that actually tastes like chocolate. No artificial pumpkin flavoring, no waxy chocolate chips, no shortcuts that compromise the final result. Your taste buds will absolutely know the difference.
Make-Ahead Champion: These beauties get better after a day in the fridge, making them perfect for holiday prep. The flavors meld together like old friends catching up, creating this deeper, more complex taste that'll have people asking what your secret ingredient is. Plus, they freeze beautifully for up to three months, so you can have pumpkin Oreo ball emergencies covered.
Alright, let's break down exactly what goes into this masterpiece...
Inside the Ingredient List
The Flavor Foundation
Pumpkin puree forms the soul of these balls, but not all cans are created equal. You want the plain stuff — not the pie filling that's already loaded with sugar and spices. The real beauty of using pure pumpkin is that you control every element of the flavor profile. Look for cans that list "100% pumpkin" and nothing else, because some brands sneak in weird additives that'll throw off your texture. The pumpkin adds this gorgeous orange color and that unmistakable autumn flavor that makes people close their eyes and sigh when they bite into it. If you can't find canned pumpkin (it happens), you can roast and puree your own sugar pumpkin, but honestly, the canned stuff is more consistent and way less messy.
The Texture Crew
Cream cheese is the unsung hero that turns this from a potentially grainy mess into the smoothest filling you've ever tasted. But here's the crucial part — it needs to be at room temperature, not cold from the fridge. Cold cream cheese will fight you every step of the way, creating lumps that no amount of mixing will smooth out. Let it sit on the counter for at least an hour before you start, and you'll be rewarded with a filling that spreads like silk across your tongue. The Double Stuf Oreos aren't just for show — those extra cookies and cream filling add richness and help bind everything together without making the mixture too dry. Regular Oreos work in a pinch, but you'll miss that extra creamy element that makes these balls so addictive.
Powdered sugar does more than just sweeten the deal — it absorbs excess moisture from the pumpkin and creates this perfect, truffle-like consistency. Granulated sugar is your enemy here — it'll stay grainy and create little sugar pockets that'll ruin the smooth texture we're after. The cornstarch in powdered sugar also helps stabilize the filling, so your balls hold their shape even after they've been sitting out at room temperature for a while.
The Unexpected Star
Pumpkin pie spice might seem obvious, but the amount and timing matter more than you'd think. Too much and you'll feel like you're chewing on a spice rack, too little and you lose that warm, cozy flavor that makes these special. I add it in two stages — half goes into the filling where it can bloom and blend, and half gets sprinkled on top for that instant aroma hit when you bite in. If you're making your own blend, go heavy on the cinnamon and light on the cloves — they can overpower everything and make your dessert taste medicinal.
The Final Flourish
The chocolate coating is where most recipes fail spectacularly, but we're going to nail it. You need a chocolate that actually tastes good on its own — if you wouldn't eat it as a candy bar, don't coat your balls with it. I use a combination of real chocolate and a touch of coconut oil, which creates this gorgeous, thin coating that snaps when you bite into it but doesn't overwhelm the delicate pumpkin flavor inside. White chocolate works too, but it needs to be the good stuff — not those waxy chips that taste like sweetened plastic. The coconut oil helps the chocolate set properly and gives it that professional-looking sheen that'll make people think you went to culinary school.
Everything's prepped? Good. Let's get into the real action...
The Method — Step by Step
- Start by pulsing your Oreos in a food processor until they look like fine, dark sand. If you've ever been to the beach at night, that's the texture you're after — no large chunks, no random cookie pieces that'll create lumpy balls. If you don't have a food processor, throw them in a zip-top bag and channel all your frustrations into crushing them with a rolling pin. The sound of those cookies surrendering to your rolling pin is surprisingly therapeutic, and you'll end up with a fine crumb that'll bind perfectly with the other ingredients. Just make sure there are no sneaky large pieces hiding in the corners of the bag.
- Now comes the game-changer moment: whip your room-temperature cream cheese until it looks like soft clouds. This should take about two minutes on medium speed, and it's the difference between dense, heavy balls and ones that feel like pumpkin spice pillows on your tongue. Watch it closely — at first it'll look like it's not doing much, then suddenly it'll transform into this light, fluffy mixture that doubles in volume. If you've ever wondered what autumn clouds would taste like if they had a tangy personality, this is it.
- Time to introduce the pumpkin to the party, but here's where most recipes go wrong — they dump it all in at once and end up with a watery mess. We're going to add it in thirds, folding gently with a spatula after each addition. This keeps the mixture light and prevents the cream cheese from deflating. The mixture should look like a beautiful orange sunset, smooth and creamy without any streaks or lumps. Take your time here; this isn't a race, and your patience will be rewarded with the smoothest filling you've ever tasted.
- Add your powdered sugar and pumpkin pie spice, but don't just throw them in — sift them through a fine-mesh strainer first. This prevents those annoying little clumps that refuse to mix in and create bitter pockets of spice. The mixture will thicken slightly as the sugar absorbs the moisture, and you'll notice it becoming more substantial, like it's ready to hold its shape. Give it a taste — it should taste like pumpkin pie filling had a baby with cookies and cream, and you'll probably want to eat it with a spoon. I won't judge if you do.
- Fold in your Oreo crumbs with the reverence of a sacred ritual. Use a spatula and make figure-eight motions, turning the bowl as you go. The crumbs should disappear into the mixture, creating this gorgeous orange-flecked filling studded with tiny chocolate bits. When it's ready, the mixture should hold its shape when you scoop some up — if it's too soft to form into balls, pop it in the fridge for 15 minutes. If it's too crumbly and won't stick together, add a teaspoon of milk at a time until it comes together.
- Use a small cookie scoop or tablespoon to portion out uniform balls. Roll them between your palms using gentle pressure — you're not trying to make snowballs here, just smooth, round spheres. If the mixture sticks to your hands, dust them lightly with powdered sugar. Place them on a parchment-lined baking sheet and chill for at least an hour. This step is crucial — warm balls will melt your chocolate and create a mess that'll haunt your kitchen for days.
- Now for the chocolate coating magic: chop your chocolate into small, uniform pieces so it melts evenly. Combine it with the coconut oil in a microwave-safe bowl and heat in 30-second bursts, stirring between each one. The chocolate should be smooth and glossy, like liquid velvet. If you've ever struggled with chocolate that seizes up or gets grainy, the coconut oil is your insurance policy — it keeps everything smooth and gives you a longer working window.
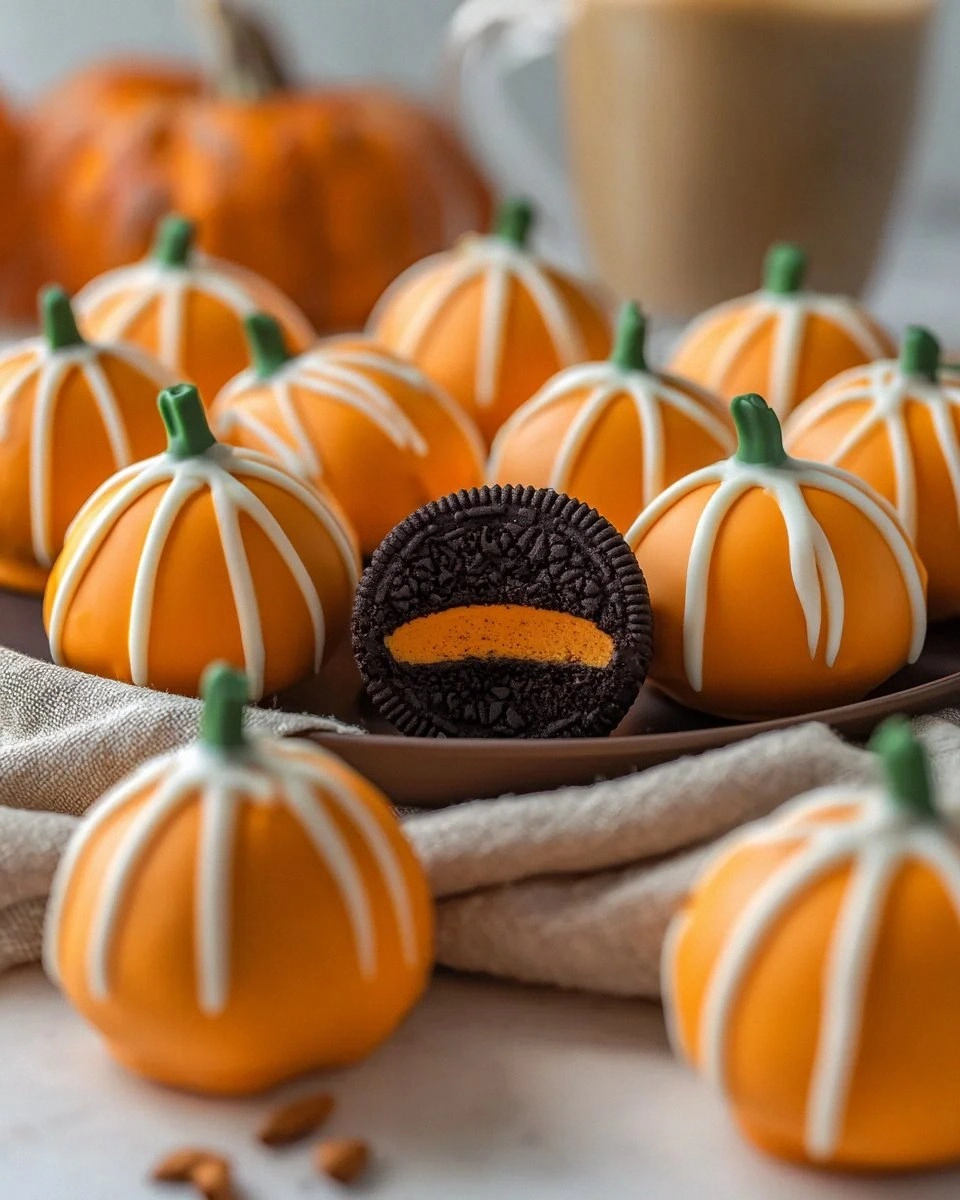
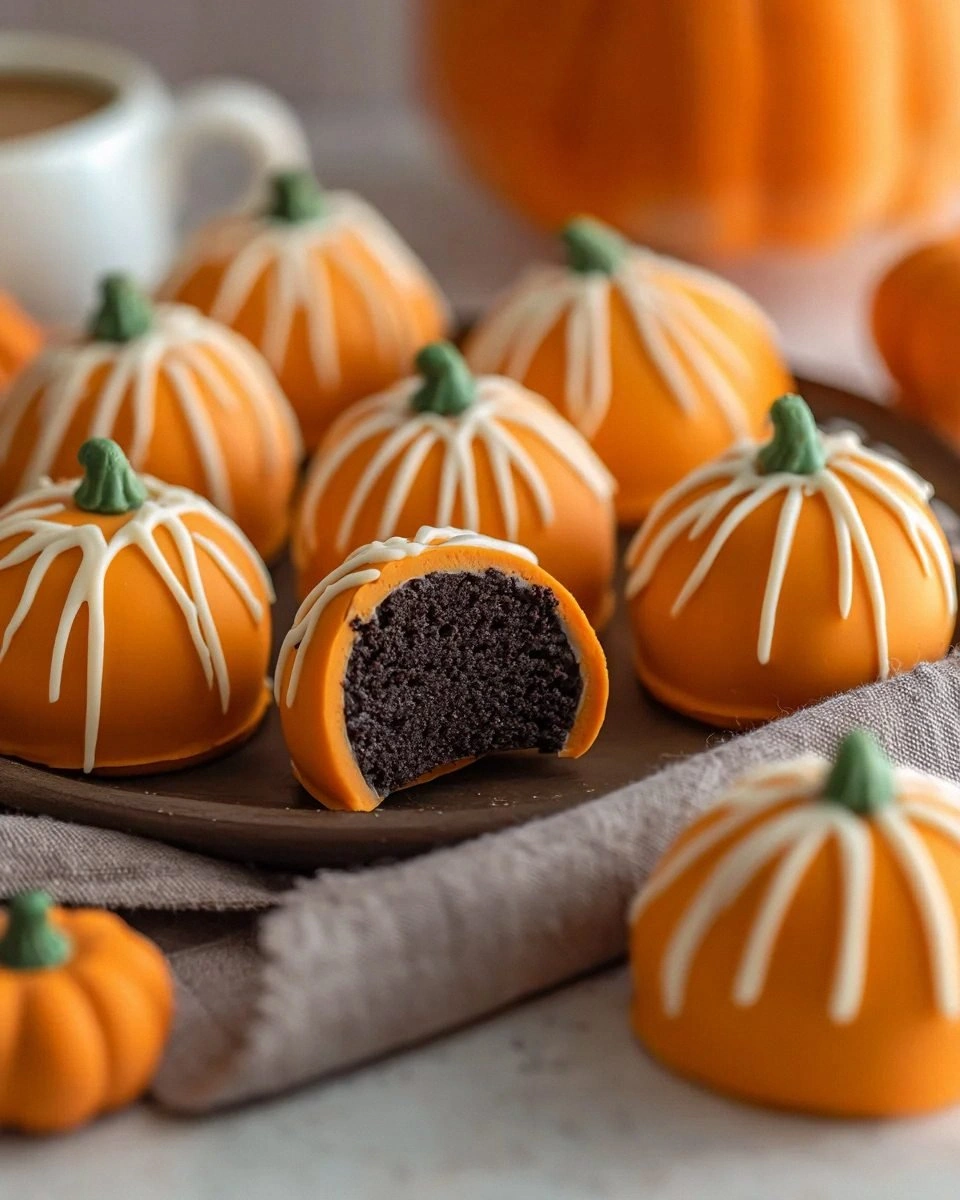
- Dip each ball using a fork, letting the excess chocolate drip off before placing it back on the parchment. The trick is to work quickly and confidently — the chocolate sets fast, and you want a thin, even coating. If you're feeling fancy, drizzle some white chocolate over the top or dust with extra Oreo crumbs while the coating is still wet. The contrast between the dark chocolate and orange filling peeking through creates this gorgeous visual that screams autumn elegance.
- Let them set completely before serving — about 30 minutes at room temperature or 10 minutes in the fridge if you're impatient. The chocolate should snap when you bite into it, revealing that creamy orange center that's been waiting to make your taste buds dance. Store them in an airtight container, but good luck keeping them around long enough to worry about storage. In my experience, they disappear faster than autumn leaves in a windstorm.
That's it — you did it. But hold on, I've got a few more tricks that'll take this to another level...
Insider Tricks for Flawless Results
The Temperature Rule Nobody Follows
Here's the thing about chocolate that nobody tells you — it has a memory like an elephant and a temper like a cat. If you try to dip cold balls into warm chocolate, the temperature shock creates tiny cracks that'll ruin your smooth finish. Let your chilled balls sit at room temperature for 10 minutes before dipping, and your chocolate will coat them like liquid silk. A friend tried skipping this step once — let's just say it didn't end well, and she ended up with balls that looked like they had chocolate acne. The reverse is true too — if your kitchen is warmer than 75°F, your chocolate will set too slowly and develop those dreaded white streaks called bloom.
Why Your Nose Knows Best
Your sense of smell is your secret weapon here, and I'm not just being poetic. When your pumpkin mixture is perfectly balanced, it'll smell like autumn distilled into its purest form — warm spices, sweet pumpkin, and that tangy cream cheese note that makes everything pop. If you can't smell the spices, add a pinch more. If the cream cheese smell overpowers everything, your mixture is too warm and needs a quick chill. Trust your nose — it's been evolving for millions of years to detect exactly these kinds of flavor imbalances. Okay, ready for the game-changer?
The 5-Minute Rest That Changes Everything
After you dip your balls, resist the urge to move them around or check if they're set. Let them sit undisturbed for exactly five minutes — set a timer if you have to. During this time, the chocolate is crystallizing into that perfect snap that makes people think you're a professional. If you move them too soon, you'll get fingerprints or smudges that scream "amateur hour." But here's the magic part: after five minutes, you can gently lift one and check the bottom. If it's set, you're golden. If not, give it another two minutes. This patience pays off in dividends of professional-looking results that'll have people asking if you went to pastry school.
The Storage Secret
Here's where most people go wrong — they think these need to live in the fridge forever, but cold storage actually mutes the flavors and can make the chocolate bloom. Store them in an airtight container at cool room temperature for up to 5 days. The flavors actually develop and meld together, creating this deeper, more complex taste that's impossible to achieve on day one. If your kitchen runs warm, find the coolest spot in your house — maybe a basement or a pantry away from the oven. Just keep them away from direct sunlight, unless you want pumpkin Oreo ball soup.
Creative Twists and Variations
This recipe is a playground. Here are some of my favorite ways to switch things up:
The White Chocolate Dream
Swap the dark chocolate coating for white chocolate mixed with a teaspoon of orange food coloring. The result looks like little pumpkins and tastes like autumn sunshine. Sprinkle the tops with crushed candied ginger for a sophisticated twist that'll make people think you spent hours in the kitchen. The white chocolate brings out the pumpkin flavor in a way that dark chocolate can't quite match — it's like the difference between a sunny day and a cloudy one.
The Bourbon Street Special
Add a tablespoon of good bourbon to the filling and replace half the Oreo crumbs with crushed gingersnaps. The bourbon adds this warm, sophisticated note that makes these perfect for adult gatherings. The gingersnaps bring a spicy snap that plays beautifully with the pumpkin. Just don't serve these to the kids — they'll be bouncing off the walls, and you'll be explaining to other parents why your dessert has a kick.
The Turtle Transformation
Drizzle caramel over your finished balls and sprinkle with toasted pecans. The caramel adds this buttery richness that takes these from "delicious" to "I need to sit down and reevaluate my life choices" territory. The pecans add crunch and this toasty flavor that makes you think of pecan pie meeting pumpkin pie in the best possible way. If you've ever struggled with this combination before, you're not alone — and I've got the fix.
The Mexican Hot Chocolate Version
Add a pinch of cayenne and cinnamon to your chocolate coating. The heat hits you at the end, right after you taste the pumpkin, creating this warm, lingering sensation that's absolutely addictive. Use Mexican chocolate for the coating if you can find it — it has this grainy texture and complex flavor that plays beautifully with the smooth filling. People will taste these and ask "What is that?" in the best possible way.
The Breakfast of Champions
Replace half the cream cheese with maple-flavored cream cheese and add a tablespoon of maple syrup to the filling. Roll them in crushed maple-sugar candy instead of Oreo crumbs. These taste like someone took your favorite autumn breakfast and condensed it into a bite-sized package. Perfect for those mornings when you want dessert but need to pretend you're being responsible.
The Keto Convert
Use crushed almond flour cookies instead of Oreos, replace the powdered sugar with your favorite sugar substitute, and use Lily's sugar-free chocolate for coating. They won't taste exactly the same, but they're close enough that you won't feel deprived. Plus, you can eat twice as many and still stay in ketosis — though I wouldn't recommend testing that theory in one sitting.
Storing and Bringing It Back to Life
Fridge Storage
These beauties will keep in an airtight container in the refrigerator for up to a week, but here's the thing — let them come to room temperature for 15 minutes before serving. Cold kills flavor, and you want all those warm spices to sing. If they've absorbed fridge odors (it happens), place a slice of apple in the container overnight — it'll absorb the weird smells and leave your balls tasting fresh. Just don't store them near anything with strong odors like onions or garlic, unless you want pumpkin-onion Oreo balls, which I don't recommend.
Freezer Friendly
Wrap each ball individually in plastic wrap, then store in a freezer bag for up to three months. Thaw overnight in the fridge, then let them come to room temperature before serving. The chocolate might bloom slightly (get those white streaks), but they'll still taste incredible. If the appearance bothers you, you can redip them in fresh chocolate — it's like giving them a spa day. Pro tip: freeze them on a baking sheet first, then wrap them once they're solid. This prevents them from getting squished in the freezer.
Best Reheating Method
These don't need reheating, but if they've been in a cold car or fridge and you want to serve them immediately, here's the trick: place them in a sealed container with a barely warm cup of water nearby. The gentle humidity brings them back to life without melting the chocolate. Never microwave them — you'll end up with chocolate-covered pumpkin explosions that'll make your microwave look like a crime scene. If they're too soft from being in a warm room, pop them in the fridge for 10 minutes to firm up. They're like Goldilocks — they want everything just right.