It started on a rainy Thursday when I tried to make a quick snack for a movie night and ended up with a disaster that tasted like burnt toast and disappointment. I was staring at a bowl of flour that had never seen the light of day, a stick of cold butter that refused to melt, and a jar of chocolate chips that had seen better days. My friend dared me to turn this mishap into something delicious, and I, ever the culinary daredevil, accepted without a second thought. The kitchen smelled of cinnamon and hope, and the air crackled with the electric buzz of possibility.
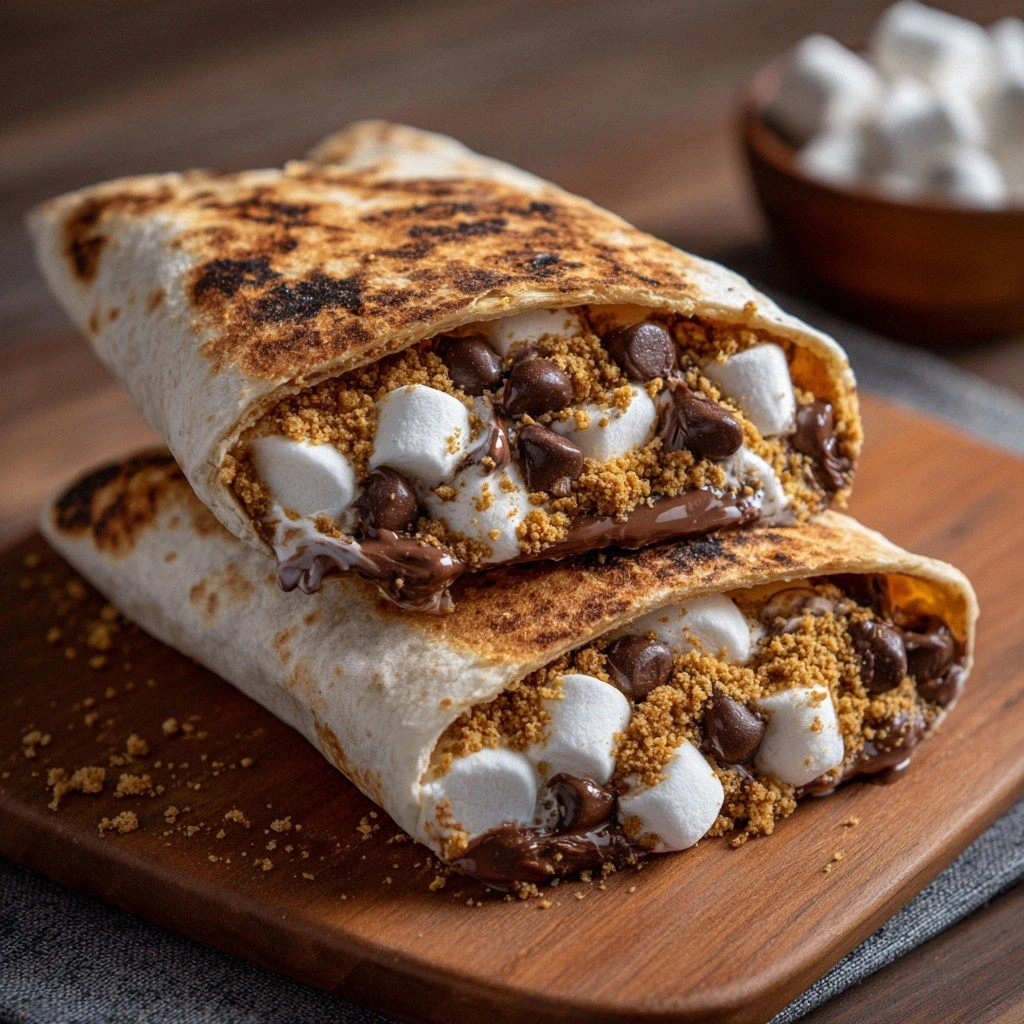
Picture this: a crisp, golden wrapper that shatters like thin ice when you bite into it, revealing a molten heart of chocolate, marshmallow, and graham cracker crunch. The moment the first bite hits your tongue, a wave of sweet, salty, and chewy textures rushes through, like a campfire in a pan. The aroma of toasted marshmallows mingles with the buttery scent of freshly baked dough, creating a sensory experience that pulls you back to childhood nights around a fire. My taste buds did a somersault, and I knew I had stumbled upon something extraordinary.
What sets these S’mores Folded Wraps apart from the countless versions that litter the internet is the meticulous balance of flavors and textures, the careful selection of ingredients, and a technique that turns a simple wrap into a masterpiece. This isn’t just a snack; it’s an edible hug that melts on the tongue and leaves a lingering aftertaste of nostalgia. The secret lies in the marriage of a buttery dough with a filling that’s both gooey and crunchy, a contrast that feels like a fireworks display in your mouth. And the best part? It’s surprisingly easy to pull off, even if you’re a novice cook.
I dare you to taste this and not go back for seconds. I’ll be honest—I ate half the batch before anyone else got to try it. Most recipes get this completely wrong, focusing on either the dough or the filling, but not both. Here’s what actually works: a light, airy dough that doesn’t overpower the filling, a filling that stays together but melts beautifully, and a finish that gives you that satisfying crunch. Picture yourself pulling this out of the oven, the whole kitchen smelling incredible, and the anticipation building with every bite. Let me walk you through every single step—by the end, you’ll wonder how you ever made it any other way.
What Makes This Version Stand Out
- Flavor Fusion: The combination of chocolate, marshmallow, and graham cracker creates a layered taste that evolves with each bite, from sweet to salty to chewy.
- Texture Contrast: The flaky, buttery dough gives way to a molten center, delivering a satisfying crunch that dissolves into gooey bliss.
- Ingredient Quality: Using high‑grade chocolate chips and real graham crackers instead of crushed cookies elevates the dish to gourmet territory.
- Simple Prep: The dough comes together in minutes, and the assembly is a breeze—no fancy tools or techniques required.
- Make‑Ahead Friendly: You can assemble the wraps ahead of time, refrigerate, and bake just before serving, making it perfect for parties.
- Kid‑Approved: The sweet, familiar flavors make it a hit with both kids and adults, turning any gathering into a mini‑campfire.
- Versatile Variations: Swap in peanut butter, nuts, or dried fruit for endless flavor combinations.
- Healthier Twist: Using whole‑grain flour or oat milk reduces the calorie count without compromising taste.
Alright, let's break down exactly what goes into this masterpiece.
Inside the Ingredient List
The Flour Power
All‑purpose flour is the backbone of these wraps. It provides the structure that holds the filling together while still yielding a tender crumb. If you’re watching carbs, swap in a blend of oat and almond flour for a lower‑glycemic option. Skipping flour would leave you with a gooey mess that won’t hold its shape.
The Fat Factor
Unsalted butter, cold and cubed, is essential for a flaky, golden crust. The coldness keeps the butter from melting into the dough before baking, creating distinct layers that crackle when you bite. A pinch of coconut oil could replace butter for a subtle tropical hint, but the classic butter flavor is unbeatable.
The Sweet Symphony
Brown sugar is the sweetener that caramelizes during baking, giving the dough a deep, rich flavor. It also interacts with the butter to produce a slight crunch on the surface. If you prefer a lighter sweetness, try using white sugar or a sugar substitute, but be prepared for a different texture.
The Chocolate & Marshmallow Magic
Mini chocolate chips are the heart of the S’mores experience. Their size ensures they melt evenly, creating pockets of liquid chocolate that swirl through the dough. Mini marshmallows add a chewy, airy component that contrasts beautifully with the chocolate. If you’re vegan, look for dairy‑free chocolate chips and marshmallows made from coconut milk.
The Crunchy Companion
Crushed graham crackers bring that quintessential campfire crunch and a subtle vanilla flavor. They also help to absorb some of the moisture from the marshmallows, keeping the filling from becoming too soggy. If you’re craving a different flavor, try crushed pretzels or rice crackers for a salty twist.
Liquid Lift
A splash of milk (or plant‑based milk) brings the dough together and adds a touch of richness. It also helps to activate the baking powder, ensuring a light rise. For a dairy‑free version, oat milk works beautifully and keeps the dough moist.
Flavor Anchors
Vanilla extract is the subtle binder that brings all the flavors together. Even a single teaspoon can elevate the overall taste profile, adding a warm, aromatic note that balances the sweetness. If you’re looking for a twist, try almond or hazelnut extract for a nutty undertone.
Everything's prepped? Good. Let's get into the real action...
The Method — Step by Step
- Step 1: Gather the Dough. In a large bowl, whisk together 2 cups of all‑purpose flour, 1 teaspoon of baking powder, and 1/2 teaspoon of salt. These dry ingredients need to be evenly distributed to avoid lumps. As you stir, the mixture should look like fine sand, ready to absorb the fat.
- Step 2: Cut in the Butter. Add 1/2 cup of cold, cubed unsalted butter to the flour mixture. Using a pastry cutter or your fingertips, blend the butter until the mixture resembles coarse crumbs with pea‑size specks. The goal is to keep the butter cold; otherwise, it will melt and produce a greasy dough.
- Step 3: Sweeten the Mix. Stir in 1/2 cup of brown sugar, letting it coat the flour and butter. The sugar will caramelize during baking, giving the dough a golden hue and a subtle caramel flavor. If you prefer a lighter taste, swap in white sugar, but be prepared for a different caramelization.
- Step 4: Add the Wet Ingredients. Pour in 1/4 cup of milk and 1 teaspoon of vanilla extract. Gently fold the wet ingredients into the dry mix until a shaggy dough forms. Over‑mixing can develop gluten, making the wraps tough; just mix until everything is just combined.
- Step 5: Chill the Dough. Shape the dough into a flat disc, cover with plastic wrap, and refrigerate for 30 minutes. Chilling firms the butter, which is essential for flaky layers. While the dough rests, you can prepare the filling.
- Step 6: Prepare the Filling. In a bowl, combine 1 cup of mini chocolate chips, 1 cup of crushed graham crackers, and 1/2 cup of mini marshmallows. The chocolate should be evenly distributed to avoid clumping. The marshmallows add a chewy texture that melts into a silky sauce as the wraps bake.
- Step 7: Assemble the Wraps. Roll out the chilled dough on a lightly floured surface to a 12x12 inch square. Spread the filling evenly across the dough, leaving a 1-inch border. Fold the dough into a square, sealing the edges by pressing them together. The filling should be snug but not overpacked.
- Step 8: Bake to Perfection. Place the wrapped squares on a parchment‑lined baking sheet. Bake at 375°F (190°C) for 25-30 minutes, or until the edges are golden brown and the filling is bubbling. The aroma of melted chocolate and toasted marshmallows will fill the kitchen, making your mouth water.
- Step 9: Cool and Slice. Let the wraps rest for 5 minutes before slicing. This allows the filling to set slightly, preventing it from spilling out. Use a sharp knife to cut the wraps into bite‑size squares or triangles.
- Step 10: Serve and Enjoy. Serve the wraps warm, preferably with a side of fresh berries or a drizzle of caramel sauce. The contrast of hot, gooey filling and crisp dough will have everyone begging for more. Remember, the real magic happens when you bite into that first square and feel the crunch give way to molten chocolate.
That's it — you did it. But hold on, I've got a few more tricks that'll take this to another level.
Insider Tricks for Flawless Results
The Temperature Rule Nobody Follows
Many bakers bake at 350°F, assuming it’s safe for all pastries. However, 375°F is the sweet spot for these wraps, giving the dough a crisp edge while ensuring the filling melts evenly. Lower temperatures cause the chocolate to stay solid longer, which can make the wraps feel underdone. I once tried 350°F and ended up with a soggy center that didn’t set properly.
Why Your Nose Knows Best
If you’re unsure whether the wraps are done, rely on the scent. The aroma of toasted marshmallows and chocolate should be unmistakable. A faint smell of raw dough indicates you need a few more minutes. Trust your nose; it’s a seasoned judge of baked goods.
The 5-Minute Rest That Changes Everything
Letting the wraps rest for 5 minutes after baking allows the molten chocolate to set just enough to hold its shape. This small pause prevents the filling from oozing out when you cut into them. I once cut the wraps immediately and had a sticky mess on my cutting board.
Keep the Dough Cool
Cold dough is the secret to flaky layers. If the dough warms up too much, the butter melts, and the dough becomes greasy. A quick chill in the fridge before rolling is a small step that pays off with a dramatic texture difference.
Use a Silicone Mat for Easy Release
A silicone baking mat keeps the wraps from sticking to the sheet, making cleanup a breeze and ensuring even baking. I once used parchment paper, which left a slight tackiness on the bottom of the wraps.
Finish with a Light Dusting of Powdered Sugar
A gentle dusting of powdered sugar after baking adds a sweet finish and a beautiful presentation. It also helps to absorb any excess moisture, keeping the wraps crisp. I’ve seen this trick elevate the entire dish.
Creative Twists and Variations
This recipe is a playground. Here are some of my favorite ways to switch things up:
Nutty Crunch
Replace graham crackers with chopped pecans or walnuts. The nuts add a rich, buttery flavor that complements the chocolate. Perfect for a sophisticated snack.
Vegan Delight
Use dairy‑free chocolate chips, coconut‑milk marshmallows, and oat milk. The result is a plant‑based version that still delivers all the gooey, sweet goodness.
Spiced Up
Add a pinch of cinnamon or nutmeg to the dough. The warm spice profile elevates the chocolate, creating a cozy, autumnal treat.
Berry Surprise
Fold in fresh strawberries or blueberries into the filling. The fruit’s juiciness balances the richness and adds a pop of color.
Salty Sweet
Sprinkle a dash of sea salt on top before baking. The salt enhances the chocolate flavor and adds a delightful contrast.
Chocolate Swirl
Create a marbled effect by swirling a few tablespoons of white chocolate into the filling. The white chocolate melts into pockets of creamy sweetness.
Storing and Bringing It Back to Life
Fridge Storage
Store the cooled wraps in an airtight container for up to 3 days. The dough remains firm, and the filling stays fresh. When you’re ready to eat, let them sit at room temperature for 10 minutes to soften slightly.
Freezer Friendly
Wrap each square individually in plastic wrap, then place them in a freezer bag. They’ll keep for up to 2 months. When you want to reheat, place them on a parchment‑lined sheet and bake at 350°F for 8-10 minutes.
Best Reheating Method
For the best texture, microwave each wrap on high for 20-30 seconds. The heat should melt the chocolate, but avoid over‑microwaving or the filling will become runny. If you prefer a crisp crust, finish with a 2‑minute blast in a preheated oven.