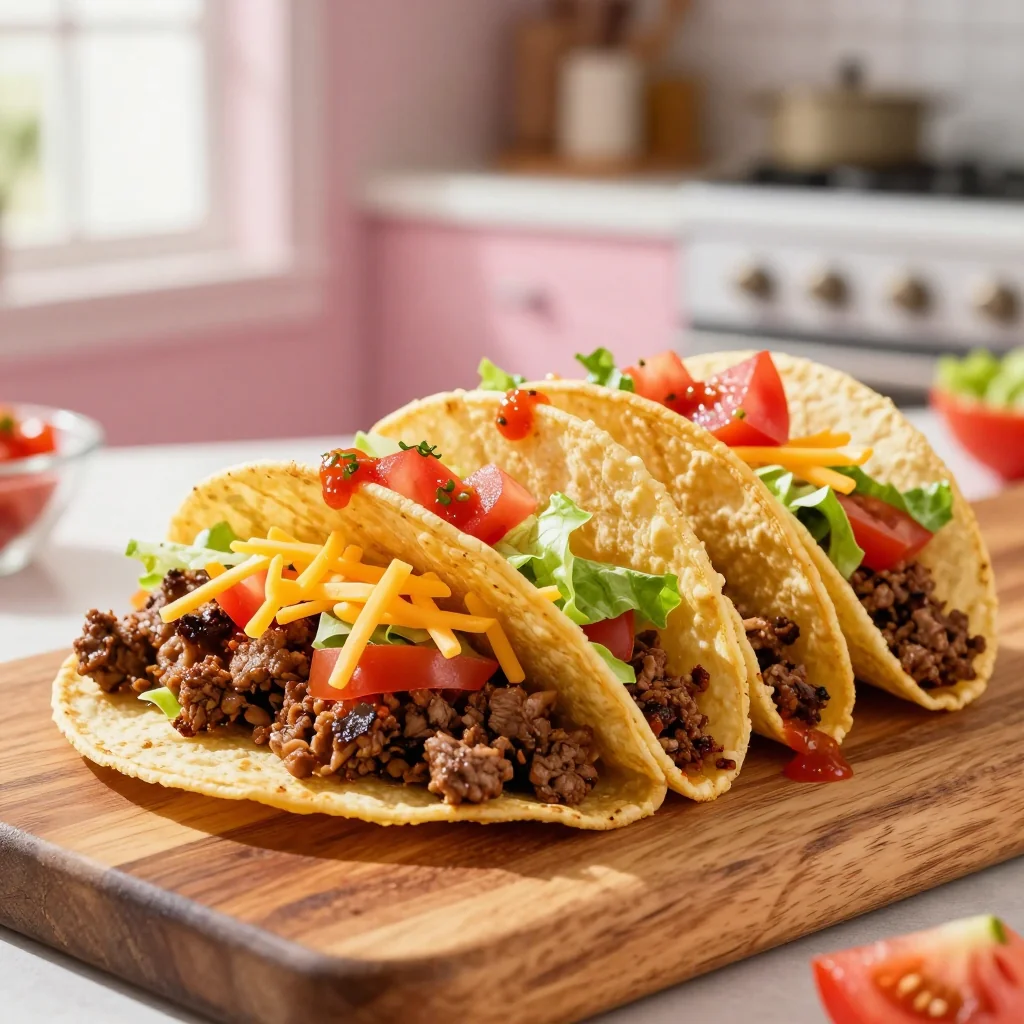
Crispy shells, juicy beef, and fresh toppings combine for a fiesta in every bite.
I still remember the first time I bit into a perfectly crisp taco shell filled with seasoned beef while traveling through a bustling market in Mexico City. The crunch of the shell, the aromatic blend of spices, and the burst of fresh cilantro and lime created a memory that has lingered in my kitchen ever since. That moment sparked my lifelong love affair with tacos, and over the years I’ve refined the classic hard‑shell version to be both quick for weeknight meals and impressive enough for a weekend gathering.
Tacos with hard shell and ground beef are a staple of Tex‑Mex cuisine, bridging the comfort of American home cooking with the vibrant flavors of Mexican street food. The dish is rooted in tradition: the original taco, a humble corn tortilla, evolved when American diners craved a sturdier vessel, leading to the invention of the fried corn shell that could hold generous portions of meat and toppings without falling apart.
In this article you’ll discover a step‑by‑step method that guarantees perfectly seasoned beef, a secret technique for keeping the shells crisp, and a series of topping ideas that add texture and color. By the end, you’ll be able to recreate the authentic crunch and bold flavor profile in your own kitchen, impressing friends and family alike.
So roll up your sleeves, preheat the oil, and let’s embark on a flavorful adventure that brings the spirit of a Mexican market straight to your dinner table.
🌟 Why This Recipe Will Win Your Heart
From the first bite to the last, this taco recipe delivers on taste, texture, and convenience.
- ✨ Foolproof Flavor Balance : The blend of cumin, smoked paprika, and a pinch of cinnamon creates a deep, layered flavor that mimics slow‑cooked beef without the wait.
- ✨ Crunch That Lasts : By frying the shells at the optimal temperature and draining them on paper towels, you get a shell that stays crisp even after loading with moist toppings.
- ✨ Customizable Toppings : Fresh lettuce, ripe tomatoes, creamy avocado, and tangy salsa let you tailor each taco to individual preferences.
- ✨ Speedy Weeknight Solution : The entire dish can be prepared in under 30 minutes, making it ideal for busy families.
- ✨ Budget‑Friendly Ingredients : Ground beef, pantry staples, and a few fresh veggies keep the cost low while delivering high satisfaction.
- ✨ Crowd‑Pleaser : Whether you’re feeding kids, teens, or adults, the combination of textures and flavors appeals to a wide range of palates.
🥗 Ingredients
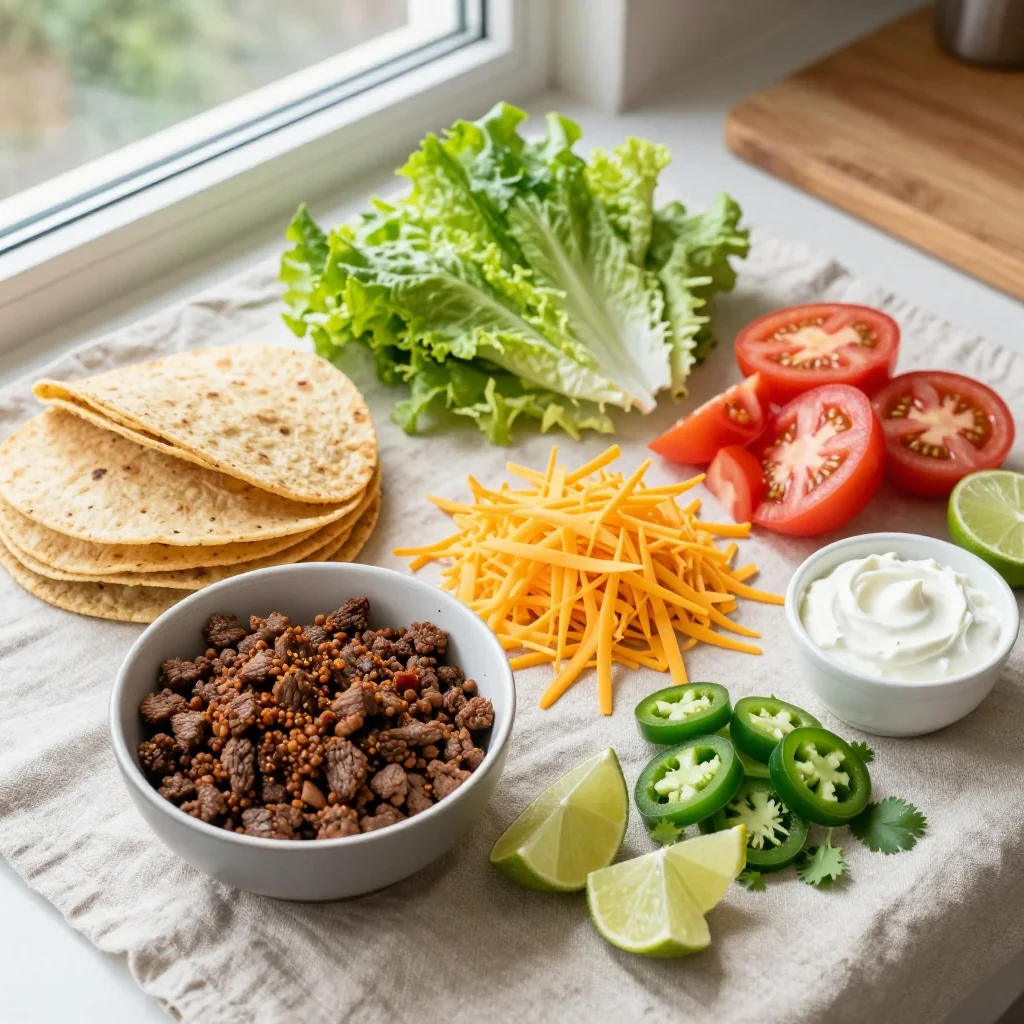
📝 Complete Ingredient List
For the Beef Filling :
- 500 g ground beef
- 1 tbsp taco seasoning
- ½ cup tomato sauce
- 2 cloves garlic, minced
- ¼ cup onion, finely diced
- to taste salt & pepper
For the Toppings :
- 100 g shredded lettuce
- 2 medium tomatoes, diced
- 100 g cheddar cheese, grated
- ½ cup sour cream
- ½ cup salsa
- 1 avocado sliced
For the Shells :
- 12 hard‑shell taco shells
- 2 cups vegetable oil (for frying)
- to taste salt for oil
🔍 Focus on Key Ingredients
Ground Beef
Ground beef provides the hearty backbone of the taco. Opt for an 80/20 lean‑to‑fat ratio; the fat renders during cooking, keeping the meat moist while adding flavor. When browning, avoid overcrowding the pan—this ensures a nice sear and prevents the meat from steaming.
Taco Seasoning
A good taco seasoning balances earthiness (cumin), smoky depth (paprika), and a subtle sweet heat (chili powder). If you prefer less sodium, create your own blend using cumin, coriander, smoked paprika, garlic powder, onion powder, and a pinch of cayenne. This gives you control over the flavor intensity.
Hard‑Shell Taco Shells
The shells are made from corn masa that’s shaped and deep‑fried, resulting in a sturdy yet airy vessel. For the crispiest result, fry them at 180 °C (350 °F) for 30‑45 seconds until golden. Drain immediately on paper towels to remove excess oil and maintain crunch.
🔄 Quick Substitutions
| If you don’t have… | Use instead… |
|---|---|
| Ground beef | Ground turkey or plant‑based mince |
| Taco seasoning | Homemade blend of cumin, paprika, oregano, garlic powder, onion powder, and chili powder |
| Hard‑shell tacos | Soft corn tortillas (toast briefly for a slight crunch) |
👨🍳 Step‑by‑Step Instructions
Follow these detailed phases to achieve perfectly seasoned beef, irresistibly crisp shells, and a vibrant assembly that will have everyone reaching for seconds.
📋 Phase 1: Preparation and Mise en Place
Getting everything organized before you start cooking ensures a smooth workflow.
Prep the Vegetables
Wash the lettuce leaves, pat them dry, and shred them into bite‑size strips. Dice the tomatoes, removing excess seeds to avoid soggy tacos. Slice the avocado in half, remove the pit, and scoop out the flesh, then slice thinly. Mince the garlic cloves and finely dice the onion. Place each prepared component in separate bowls so they stay fresh and crisp while you work on the beef.
Measure and Mix the Seasoning
In a small bowl, combine the taco seasoning (or your homemade blend) with a pinch of salt and pepper. If you like a hint of heat, add a pinch of cayenne. Stir until evenly mixed. This ensures every bite of beef carries the same robust flavor.
🔥 Phase 2: Cooking and Assembly
Now we bring heat to the kitchen and start building the tacos.
Fry the Taco Shells
Heat the vegetable oil in a deep skillet or pot to 180 °C (350 °F). Gently slide each hard‑shell taco into the oil, working in batches to avoid crowding. Fry for 30‑45 seconds, turning once, until the shells puff up and turn a light golden brown. Use tongs to lift them out and place on a paper‑towel‑lined tray. Sprinkle lightly with salt while still hot.
Cook the Ground Beef
In a large skillet over medium‑high heat, add the ground beef. Break it apart with a wooden spoon and let it sizzle. When the meat starts to brown (about 3‑4 minutes), add the minced garlic and diced onion. Continue cooking until the onion becomes translucent and the beef is fully browned, about 5‑6 more minutes. Drain excess fat if necessary.
Season the Beef
Sprinkle the prepared taco seasoning over the browned meat, stirring to coat evenly. Add the tomato sauce and a splash of water (about ¼ cup) to create a moist, saucy consistency. Simmer for 3‑4 minutes, allowing the flavors to meld. Taste and adjust salt or pepper as needed.
✨ Phase 3: Finishing Touches and Plating
The final stage brings everything together for a stunning presentation.
Check the Beef
Ensure the beef is fully cooked (no pink) and the sauce has thickened slightly. The mixture should be flavorful, not watery. If it appears too dry, add a tablespoon of broth; if too wet, let it reduce uncovered for another minute.
Assemble the Tacos
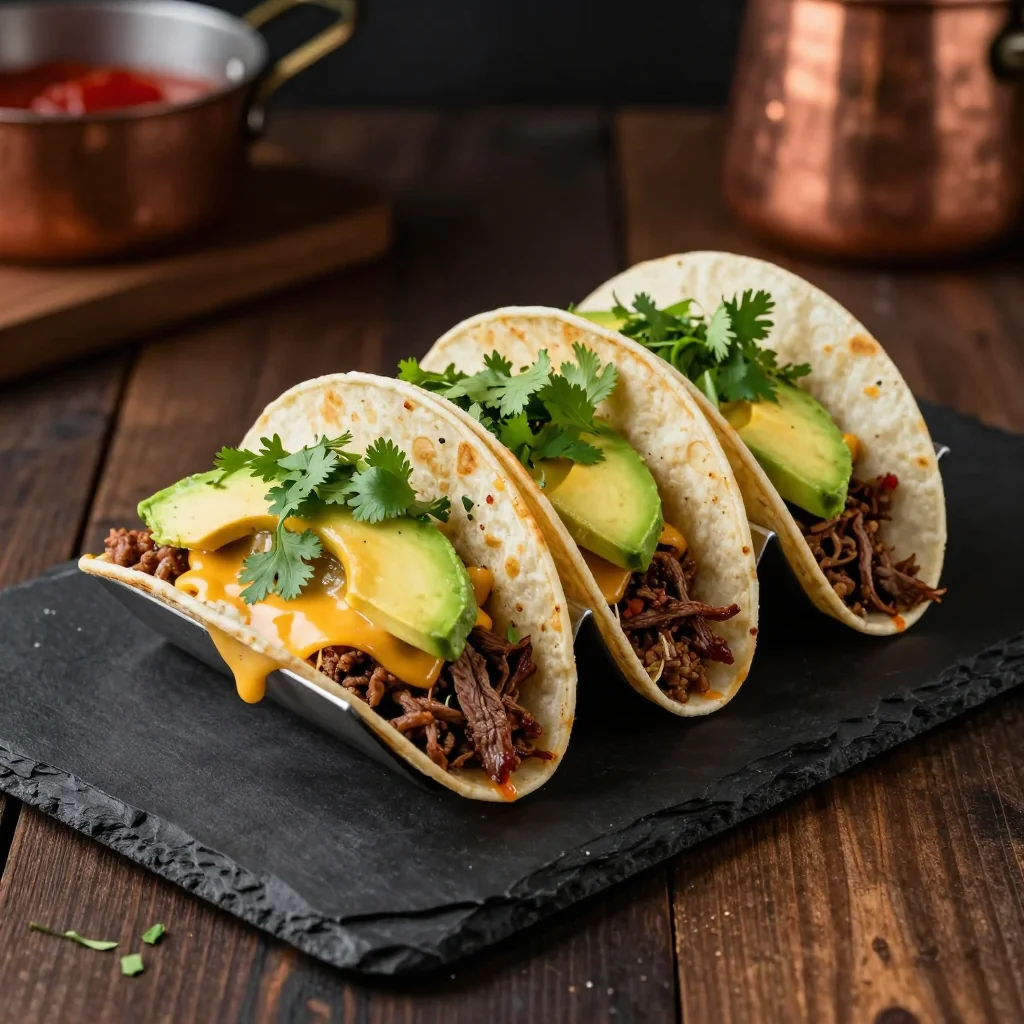
Take a warm, crisp shell, spoon a generous portion of the seasoned beef into the center, then layer with lettuce, diced tomato, grated cheese, a dollop of sour cream, salsa, and avocado slices. Finish with a squeeze of fresh lime juice for brightness.
Serve Immediately
Serve the tacos while the shells are still crisp and the beef is hot. Accompany with extra lime wedges, a side of Mexican rice, or a simple black bean salad for a complete meal.
💡 Expert Tips and Tricks
🛒 Choosing the Right Ingredients
When selecting ground beef, look for a label that reads “80% lean.” This balance provides enough fat for flavor without excessive greasiness. For the shells, choose those made from 100% corn masa—no added wheat or soy—if you’re aiming for an authentic gluten‑free experience. Fresh herbs like cilantro should be bright green and fragrant; wilted leaves indicate age.
🔪 Preparation Techniques
Dice onions uniformly so they cook evenly with the garlic. Use a micro‑plane to grate cheese for a light, fluffy topping that melts quickly. When slicing avocado, keep the knife wet to avoid browning. A quick dip in lemon water after slicing helps preserve the vibrant color.
🌡️ Mastering the Cooking Process
Keep the skillet at medium‑high heat when browning the beef; too low and the meat stews, losing its caramelized flavor. Use a meat thermometer if you’re unsure—ground beef should reach an internal temperature of 71 °C (160 °F). For the shells, a thermometer ensures the oil stays at the right temperature, preventing soggy or burnt shells.
🍽️ Presentation and Service
Arrange the assembled tacos on a large platter, alternating colors for visual appeal. Garnish the platter with lime wedges, extra cilantro leaves, and a small bowl of salsa for dipping. Serving on a wooden board adds rustic charm and keeps the shells from sliding.
🏆 Pro Tips
Professional chefs distinguish their tacos with precision, texture control, and flavor layering.
- 🎯 Pre‑Season the Meat : Sprinkle the ground beef with a pinch of salt 15 minutes before cooking. This draws out moisture, allowing the meat to brown more evenly and develop a richer flavor.
- 🎯 Use a Cast‑Iron Skillet : The even heat distribution of cast iron creates a superior sear on the beef, locking in juices and adding a subtle caramelized note.
- 🎯 Double‑Fry the Shells : For ultra‑crisp shells, fry them briefly at 180 °C, remove, let cool for a minute, then fry again for a second, shorter burst. This technique removes residual moisture and yields a shell that stays crunchy even with wet toppings.
- 🎯 Finish with Fresh Acid : A final drizzle of freshly squeezed lime juice right before serving brightens the dish, balancing the richness of the beef and cheese.
- 🎯 Warm the Shells Before Filling : Place the fried shells in a low oven (120 °C) for 5 minutes before adding fillings. This ensures the shell remains hot and crisp as you assemble.
- 🎯 Layer Textures Thoughtfully : Start with a base of lettuce (crunch), add beef (soft‑savory), then cheese (creamy), followed by avocado (silky) and salsa (juicy). This progression creates a dynamic mouthfeel with each bite.
"A taco is a canvas; the shell is the frame, the filling the masterpiece." — Chef Enrique Olvera
🔄 Variations and Adaptations
The beauty of tacos lies in their adaptability. Below are several ways to transform this classic into something uniquely yours, whether you’re catering to dietary restrictions, seeking bold new flavors, or cooking for little ones.
🥬 Vegetarian / Vegan Version
Replace ground beef with a plant‑based mince made from soy or pea protein. Season it identically, and add a handful of black beans for extra protein. Use vegan cheese and dairy‑free sour cream to keep the dish completely plant‑based.
- Substitution 1: 500 g plant‑based mince – provides similar texture and absorbs seasoning well.
- Substitution 2: ½ cup cooked black beans – adds earthiness and protein.
🌶️ Flavor Variations
Tacos are a perfect platform for experimenting with global spices. Below are three distinct flavor directions you can explore.
Spicy Chipotle Version :
Add 1‑2 teaspoons of chipotle in adobo sauce to the beef mixture for smoky heat. Top with pickled red onions for a tangy contrast.
Mediterranean Twist :
Swap taco seasoning for a blend of oregano, sumac, and a dash of cinnamon. Use feta cheese instead of cheddar and garnish with sliced olives and a drizzle of tzatziki.
Asian Fusion :
Incorporate soy sauce, ginger, and a splash of sesame oil into the meat. Top with shredded cabbage, sliced scallions, and a drizzle of sriracha mayo for a bold, umami‑rich taco.
⚠️ Dietary Adjustments
Gluten‑Free :
Ensure the taco shells are made from 100% corn masa with no added wheat flour. Use gluten‑free soy sauce in Asian variations.
Lactose‑Free :
Substitute cheddar with a lactose‑free cheese alternative or omit cheese entirely. Use coconut‑based sour cream or a plain dairy‑free yogurt.
Low‑Calorie :
Use lean ground turkey or chicken instead of beef, reduce cheese to a sprinkle, and replace sour cream with Greek yogurt (non‑fat). Increase the proportion of lettuce and tomatoes for volume without extra calories.
👶 Kid‑Friendly Version
For younger palates, soften the heat by omitting spicy seasonings. Use mild cheddar and serve the toppings in separate small bowls so kids can build their own tacos. Offer a side of corn kernels or sweet potato fries for added appeal.
📦 Storage and Reheating
🧊 Conservation
Refrigerator :
- Duration: 3 days
- Recommended container: Airtight plastic container
- Tip: Store the beef filling separate from shells to keep them crisp.
Freezer :
- Duration: 2 months
- Method: Portion the cooked beef into freezer‑safe bags, flatten for even freezing.
- Defrost: Thaw overnight in the refrigerator or use the microwave’s defrost setting.
💡 For best texture, reheat the beef in a skillet with a splash of broth to restore moisture.
♨️ Reheating
🔥 Oven (Recommended) :
- Preheat to 180 °C (350 °F).
- Cover shells with foil to prevent drying.
- Reheat for 8‑10 minutes until the beef is hot.
- Remove foil, crisp the shells for an additional 2‑3 minutes.
⚡ Microwave (Quick) :
- Place beef in a microwave‑safe dish, cover with a microwave‑safe lid.
- Heat on medium power for 1‑2 minutes, stir, then continue in 30‑second bursts.
- Re‑heat shells separately for 20‑30 seconds to avoid sogginess.
🍳 Stovetop :
Warm the beef in a skillet over low heat, adding a splash of water if needed. Re‑crisp shells in a dry skillet for 30 seconds per side.
🍷 Perfect Pairings
🥗 Side Dishes
- Mexican Rice : Fluffy rice cooked with tomato, cilantro, and a hint of cumin balances the richness of the beef.
- Black Bean Salad : A cold salad with black beans, corn, red onion, and lime vinaigrette adds protein and freshness.
- Grilled Corn on the Cob : Charred corn brushed with butter and chili powder complements the smoky taco flavor.
🍷 Wine / Beverage
- Rosé (dry) : Its bright acidity cuts through the richness of the beef and cheese.
- Mexican Lager : Light, crisp, and slightly bitter, it refreshes the palate between bites.
- Non‑Alcoholic : Sparkling agua fresca with lime and mint offers a refreshing, sweet‑sour balance.
🍰 To Complete the Meal
Begin with a light citrus soup or a fresh avocado gazpacho. For dessert, serve churros dusted with cinnamon sugar alongside a rich chocolate dipping sauce, or a simple mango sorbet to cleanse the palate.
❓ Frequently Asked Questions
Q: Can I use a different type of meat?
Absolutely. Ground turkey, chicken, or even pork work well. Adjust seasoning slightly—poultry benefits from a pinch of smoked paprika and a dash of soy sauce to deepen flavor.
Q: How do I keep the shells from getting soggy after adding toppings?
Place a paper towel inside each shell before adding wet toppings; it absorbs excess moisture. Alternatively, layer lettuce first as a barrier, then add the beef and sauces.
Q: What’s the best oil for frying the shells?
Use a neutral oil with a high smoke point such as vegetable, canola, or peanut oil. These oils allow you to reach the ideal frying temperature without imparting unwanted flavors.
Q: My beef turned out dry—what went wrong?
Over‑cooking or using very lean meat can cause dryness. Ensure you’re using 80/20 beef, and stop cooking as soon as the meat is no longer pink. Adding a splash of broth or tomato sauce helps retain moisture.
Q: Can I prepare the toppings ahead of time?
Yes. Shred lettuce, dice tomatoes, and slice avocado up to 2 hours in advance. Store avocado slices in a bowl with a little lime juice and cover tightly to prevent browning.
Q: Is it possible to make these tacos gluten‑free?
Absolutely. Choose corn shells that list only corn masa as the ingredient. Verify that any seasoning blends or sauces you use are certified gluten‑free.
🎉 Let’s Get Cooking!
This hard‑shell taco recipe brings together the comforting familiarity of a classic American favorite with the bold, aromatic spices of Mexican street food. By mastering the crisp shell technique, seasoning the beef perfectly, and offering a palette of fresh toppings, you’ll create a meal that satisfies cravings and dazzles guests. Whether you’re feeding a family of four or hosting a taco night for friends, the balance of textures and flavors will keep everyone reaching for more.
I encourage you to experiment—add a splash of your favorite hot sauce, swap the cheese, or try a different protein. Share your variations, ask questions in the comments, and let the community inspire you. Remember, cooking is an adventure, and each taco you build is a step toward culinary confidence.
Have you tried this recipe?
Leave a comment and rating below! Share your photos on Instagram with #TacoFiesta for a chance to be featured.
Tacos with Hard Shell and Ground Beef
Crispy shells, juicy seasoned beef, and fresh toppings create a fiesta in every bite.
📝 Ingredients
Beef Filling
Toppings
Shells
👨🍳 Instructions
- 1
Shred lettuce, dice tomatoes, mince garlic, and slice avocado. Keep each component in its own bowl.
- 2
Mix taco seasoning with a pinch of salt and pepper in a small dish.
- 3
Heat oil to 180 °C and fry taco shells for 30‑45 seconds until golden. Drain on paper towels and sprinkle with salt.
- 4
Cook ground beef in a skillet over medium‑high heat, breaking it up until browned. Add garlic and onion; cook until softened.
- 5
Stir in seasoning blend, tomato sauce, and a splash of water. Simmer 3‑4 minutes; adjust seasoning.
- 6
Check beef for doneness; ensure no pink remains.
- 7
Assemble tacos: shell → beef → lettuce → tomato → cheese → sour cream → salsa → avocado. Finish with lime juice.
- 8
Serve immediately with extra lime wedges and optional sides.
- 9
Store leftovers: keep beef and toppings separate from shells for optimal texture.
- 10
Enjoy your homemade tacos and share your photos using #TacoFiesta!
🥗 Nutritional Information (per serving)
*Nutrition facts are estimates based on standard ingredient brands.
📚 You Might Also Like
Chicken Fajita Tacos
Shrimp Street Tacos
Vegetarian Black Bean Tacos


💬 Comments and Reviews
Leave a Comment
No comments yet. Be the first to share your thoughts!