Picture this: it’s a rainy Saturday afternoon, the kitchen smells like burnt toast, and your friends are staring at your dessert plate with hungry eyes. I had just finished a disastrous chocolate cake that looked more like a sad lump of melted butter than a treat. I was desperate for something sweet, comforting, and quick. That’s when the idea struck me: a no‑bake Banoffee pie that would turn my kitchen catastrophe into a triumphant victory. I grabbed my favorite digestive biscuits, sliced a few ripe bananas, and set out to create a dessert that would make everyone forget the cake debacle.
I could almost taste the caramelized sugar coating the bananas like a buttery blanket, the crunchy biscuit base that whispers with each bite, and the airy whipped cream that floats like clouds. The air was thick with the scent of toasted crumbs, a hint of vanilla, and the faint tang of condensed milk. I could hear the gentle pop of butter melting in the saucepan, the soft hiss of sugar dissolving, and the satisfying clink of a spoon against the glass bowl. My fingers tingled with anticipation as I measured out each ingredient, knowing that a single misstep could ruin the entire composition.
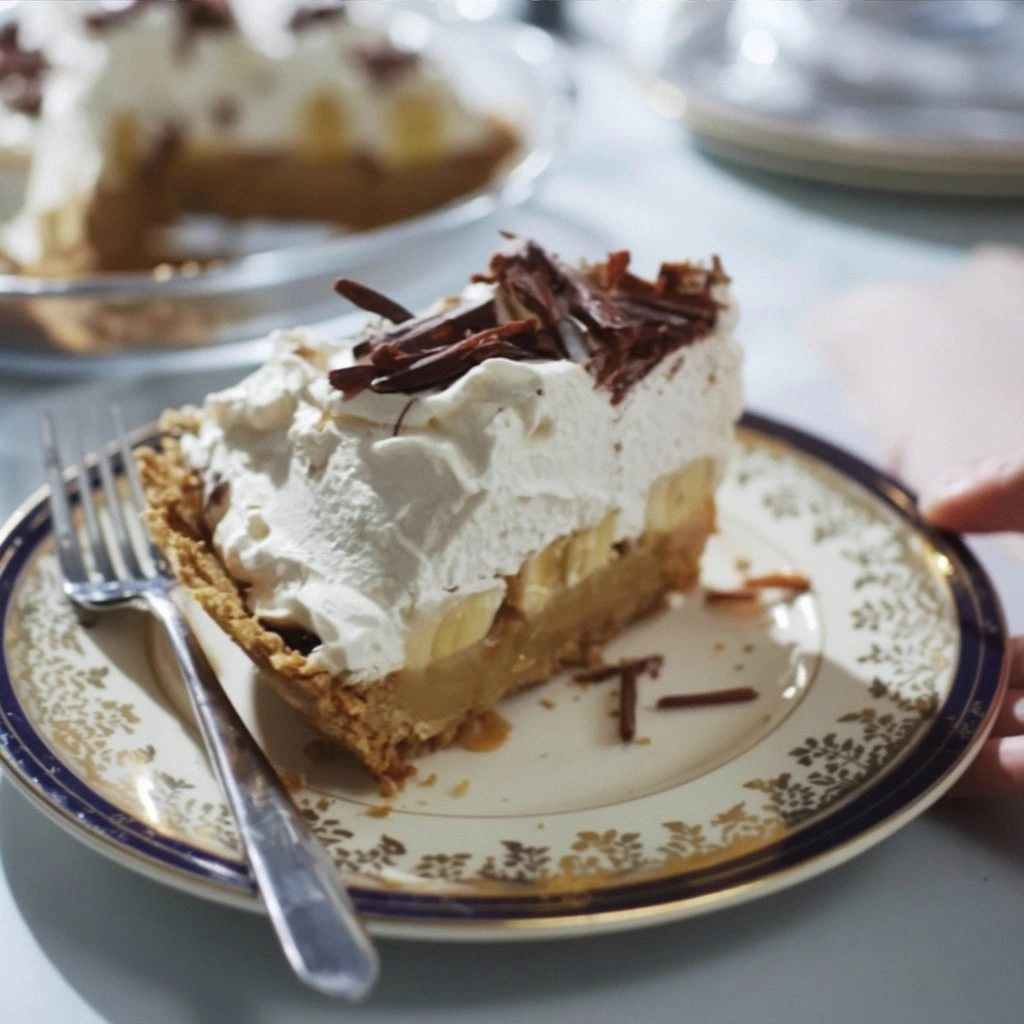
What sets this version apart from every other Banoffee pie you’ve tried is its meticulous layering of flavor and texture. The crust is a buttery, cinnamon‑kissed crumble that holds the pie together with a satisfying crunch. The caramel sauce is silky and rich, yet not cloying, thanks to a precise balance of condensed milk and brown sugar. The bananas are sliced thin to allow the caramel to seep in, creating a harmonious blend that melts in your mouth. The whipped cream is lightly sweetened, giving the pie a light, airy finish that contrasts beautifully with the dense caramel. It’s a dessert that feels indulgent yet refined, a sweet symphony that plays on every taste bud.
I dare you to taste this and not go back for seconds. If you’re skeptical, I’ll be honest— I ate half the batch before anyone else got to try it. Most recipes get this completely wrong, over‑sweetening the caramel or under‑toasting the crust. Here’s what actually works: a short, controlled heat for the caramel, a crunchy but not soggy base, and a light, airy topping that doesn’t drown the flavors. Picture yourself pulling this out of the fridge, the whole kitchen smelling incredible, and watching friends’ faces light up as they take their first bite. Stay with me here— this is worth it.
What Makes This Version Stand Out
- Taste: A perfect balance of sweet, buttery, and caramelized notes that dance across the palate without overwhelming it.
- Texture: A crisp, buttery crust gives way to silky caramel, topped with airy whipped cream for a delightful contrast.
- Simple Method: No oven required, just a few minutes on the stovetop and a quick chill in the fridge.
- Unique Twist: The addition of cinnamon and a pinch of kosher salt elevates the caramel to a gourmet level.
- Crowd‑Pleaser: Its classic flavors are instantly recognizable, yet the execution feels fresh and sophisticated.
- Ingredient Quality: Using high‑quality digestive biscuits and fresh bananas ensures depth of flavor you can’t find in store‑bought versions.
- Make‑Ahead Friendly: The pie can be assembled a day ahead and kept chilled, making it perfect for parties or last‑minute dessert needs.
- Visual Appeal: The glossy caramel and chocolate shavings create an Instagram‑ready finish that looks as good as it tastes.
Alright, let's break down exactly what goes into this masterpiece...
Inside the Ingredient List
The Flavor Base
The 2 cups of digestive biscuit or graham cracker crumbs form the foundation of this pie. They provide a buttery, slightly sweet base that holds the caramel sauce and bananas in place. If you skip the crumbs, you’ll lose that satisfying crunch that contrasts with the silky caramel. For a twist, try using oat crackers or crushed pretzels for a savory edge.
The Texture Crew
The 0.33 cup (about 5 tablespoons) of unsalted butter in the crust is essential for a rich, melt‑in‑your‑mouth crumb. The 5 tablespoons of unsalted butter used for the caramel ensures a silky texture without a greasy bite. The 2 cups of cold whipping cream, lightly sweetened with 0.25 cup confectioners’ sugar, give the pie a light, airy finish that balances the dense caramel. If you’re vegan, substitute coconut cream for the whipping cream—just make sure it’s chilled before whipping.
The Unexpected Star
The 10 oz canned sweetened condensed milk is the secret weapon that turns simple sugar and butter into a luscious caramel sauce. It’s the key to achieving that smooth, glossy finish that looks almost too good to eat. Skipping it would result in a watery sauce that can’t hold the bananas. If you’re looking for a lower‑sugar version, try a half‑and‑half and a splash of maple syrup, but the texture will change.
The Final Flourish
The 3 bananas are sliced thin to allow the caramel to seep into every bite, creating a burst of flavor that melts instantly. The 0.25 cup of toffee bits add a crunchy, buttery bite that contrasts with the smoothness of the caramel and the lightness of the whipped cream. Finally, the 1 garnish of chocolate shavings adds a bittersweet finish that ties all the flavors together. If you’re a chocolate lover, feel free to double the shavings—just remember it will increase the bitterness.
Everything's prepped? Good. Let's get into the real action...
The Method — Step by Step
- Prepare the Crust: In a medium bowl, combine the 2 cups of biscuit crumbs, 2 tbsp granulated sugar, 0.5 tsp kosher salt, and 0.25 tsp ground cinnamon. Toss until the crumbs are evenly coated. This is the moment where the aroma of toasted crumbs starts to dance in the air. Melt the 0.33 cup unsalted butter in a small saucepan over low heat until it’s just liquid, then pour it over the crumb mixture. Stir quickly to coat every crumb, then press the mixture firmly into the bottom of a 9‑inch springform pan. Set aside to chill while you work on the caramel.
- Make the Caramel: In a medium saucepan, combine the 10 oz sweetened condensed milk, 0.5 cup brown sugar, 5 tbsp unsalted butter, 0.25 tsp kosher salt, and 2 tsp vanilla extract. Heat over medium heat, stirring constantly until the butter melts and the mixture starts to bubble. Reduce the heat to low and let it simmer for 5–7 minutes, or until it thickens slightly and turns a deep amber color. The sauce should smell like toasted caramel and the edges should start pulling away from the sides of the pan. This is the step where the pie transforms from simple ingredients into a decadent dessert.
- Cool the Caramel: Remove the saucepan from heat and let the caramel cool for about 10 minutes. It will thicken further as it cools. If you want a smoother texture, whisk in a tablespoon of heavy cream at this point. The caramel should be thick enough to coat the back of a spoon but still pourable.
- Assemble the Bananas: Slice the 3 bananas into thin rounds, about 1/4 inch thick. Lay them in a single layer over the chilled crust. The thin slices allow the caramel to seep in, creating a burst of flavor with every bite.
- Pour the Caramel: Gently pour the warm caramel sauce over the bananas, making sure each slice is fully coated. The caramel should cascade over the bananas, forming a glossy, golden layer that will set as it cools. Let the pie sit at room temperature for 5 minutes to allow the caramel to firm up slightly.
- Chill the Pie: Cover the pie with plastic wrap and place it in the refrigerator for at least 2 hours, or until the caramel sets completely. The chilled pie will have a firm, slice‑ready texture that holds its shape when cut.
- Whip the Cream: In a chilled bowl, whip the 2 cups of cold whipping cream with 0.25 cup confectioners’ sugar until soft peaks form. Fold in the 0.25 cup toffee bits gently. The whipped cream should be light and airy, not heavy or dense.
- Top the Pie: Spread the whipped cream over the caramel layer, smoothing it out with a spatula. Sprinkle the chocolate shavings on top for a final touch of decadence. The shavings add a slight bitterness that balances the sweetness.
- Final Chill: Return the pie to the fridge for another 30 minutes to allow the toppings to set. This final chill ensures the pie stays firm when sliced.
That's it— you did it. But hold on, I've got a few more tricks that'll take this to another level. Keep reading for insider tips that will make your pie even more unforgettable.
Insider Tricks for Flawless Results
The Temperature Rule Nobody Follows
Many bakers think higher heat is always better, but with caramel, it’s a delicate dance. Keep the heat low and let the sugars slowly caramelize. This prevents a burnt, bitter flavor and ensures a silky texture. I once tried a quick high‑heat caramel and ended up with a hard, glassy sauce that didn’t coat the bananas evenly.
Why Your Nose Knows Best
Before you pour the caramel, pause and smell it. A rich, buttery aroma that hints at toasted sugar is a sign of perfection. If it smells faint or overly sweet, let it simmer a bit longer. Your nose is your best judge of flavor intensity.
The 5‑Minute Rest That Changes Everything
After pouring the caramel, let the pie rest for exactly 5 minutes. This short rest allows the caramel to set just enough to hold the bananas without becoming too firm. It also lets the flavors meld, creating a harmonious taste profile.
The Secret to a Crisp Crust
If you want a crunchier crust, press the crumbs into the pan and bake them for 5 minutes at 350°F before adding the caramel. This step is optional but adds an extra layer of texture that many people love.
The Final Touch of Chocolate
For an extra chocolate kick, melt a tablespoon of dark chocolate and drizzle it over the whipped cream before chilling. This creates a glossy finish that looks stunning and tastes heavenly.
Creative Twists and Variations
This recipe is a playground. Here are some of my favorite ways to switch things up:
Caramel‑Apple Banoffee
Swap the bananas for thinly sliced apples and add a pinch of nutmeg to the caramel. The tartness of the apples pairs beautifully with the sweet, buttery sauce.
Nutty Banana Bliss
Add chopped toasted almonds or pecans to the crust and sprinkle them over the whipped cream. The crunch adds a delightful contrast to the silky layers.
Chocolate‑Infused Caramel
Add a tablespoon of cocoa powder to the caramel mixture for a chocolatey depth. This is perfect for chocolate lovers who want a richer flavor profile.
Vegan Banoffee
Use coconut milk instead of whipping cream and a plant‑based condensed milk. The result is a creamy, dairy‑free dessert that still delivers on flavor.
Minty Banana Delight
Stir a teaspoon of fresh mint extract into the whipped cream. The cool mint cuts through the sweetness and adds a refreshing note.
Storing and Bringing It Back to Life
Fridge Storage
Keep the pie in the refrigerator for up to 48 hours. Store it in an airtight container or cover it tightly with plastic wrap to prevent it from absorbing fridge odors. The pie will stay fresh and the layers will maintain their distinct textures.
Freezer Friendly
For longer storage, freeze the pie for up to 3 months. Wrap it tightly in plastic wrap and then in aluminum foil. When ready to serve, thaw overnight in the refrigerator. The texture may soften slightly, but the flavor will still be divine.
Best Reheating Method
If you need to bring the pie back to life, let it sit at room temperature for 30 minutes. Add a splash of water to the caramel layer before serving to re‑hydrate it. The result is a glossy, luscious sauce that feels freshly made.